Winter’s here and we’re ready to transform your fingertips into stunning works of art. Winter ombre nails have become the season’s hottest trend, blending cool-toned hues that capture the magic of snowy landscapes and frosty mornings. From icy blues melting into pristine whites to deep purples fading into silver sparkles, these gradient designs offer endless possibilities for creating your perfect winter look.
We’ve discovered that winter ombre nails aren’t just beautiful – they’re surprisingly versatile. Whether you’re heading to holiday parties or cozy winter gatherings, these sophisticated nail designs complement everything from chunky sweaters to elegant evening wear. The best part? You can achieve these gorgeous looks at home with the right techniques and color combinations.
Ready to master the art of winter ombre nails? We’ll guide you through the most stunning color palettes, essential tools, and step-by-step techniques that’ll have your nails looking professionally done. Let’s jump into creating your perfect winter manicure.
Classic Winter Ombre Nail Designs That Never Go Out of Style
These timeless winter ombre combinations form the foundation of seasonal nail art, offering elegant sophistication that complements any winter wardrobe.
White to Silver Gradient
Creating this ethereal combination starts with a pure white base that transitions seamlessly into shimmering silver tips. We recommend using a makeup sponge to dab silver polish over the white while it’s still slightly tacky for the smoothest blend. Professional nail artists often add silver glitter at the transition point to enhance the metallic effect and create depth.
Application works best when you build the gradient in thin layers, starting with light pressure and gradually increasing opacity toward the tips. We’ve found that metallic silver polishes with fine shimmer particles blend more naturally than chunky glitters. Finishing with a high gloss top coat amplifies the mirror like effect and extends wear time up to two weeks.
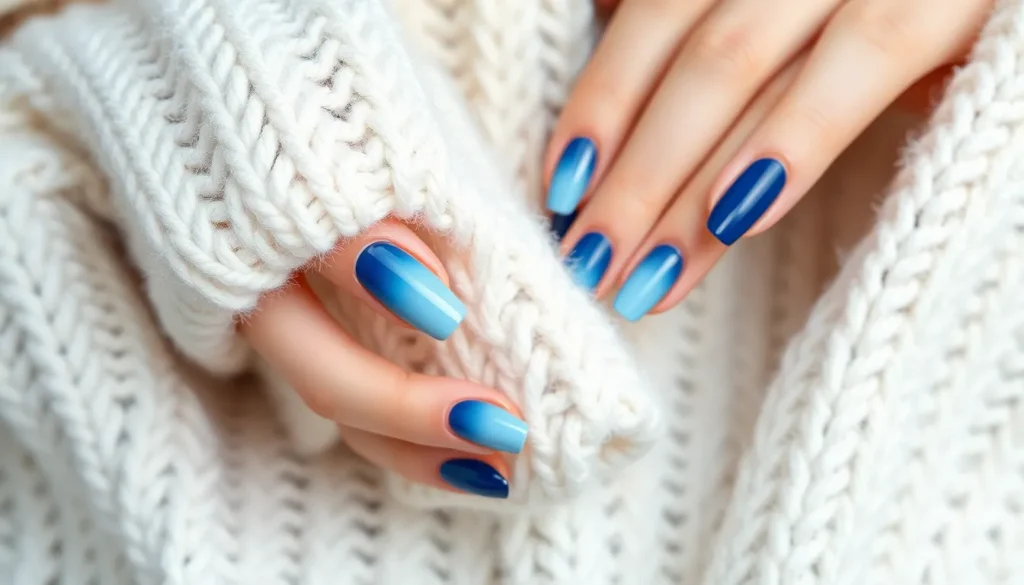
Ice Blue to Navy Transition
Achieving this frosty to deep sea gradient requires patience and the right color selection for a natural winter sky effect. We start with a pale ice blue base coat and gradually introduce navy blue using dabbing motions with a damp beauty sponge. Color mixing happens naturally when you work while both shades remain workable, typically within 30 seconds of application.
Temperature contrast in this design mimics frozen winter mornings transitioning to twilight, making it perfect for holiday events and winter weddings. We suggest adding subtle white shimmer to the ice blue portion to simulate frost crystals. Maintenance becomes easier when you seal each color layer before blending, preventing muddy transitions that can occur with rushed application.
Gray to Black Fade
Sophisticated charcoal tones create the most versatile winter ombre option that pairs effortlessly with both casual and formal winter attire. We begin with a light gray base and gradually deepen to rich black at the tips using circular sponging motions. Contrast develops naturally when you allow each gray shade to dry partially before adding the next darker tone.
Professional results come from using at least three gray shades between the lightest base and black tips for smooth color progression. We recommend matte top coat for a modern finish or glossy for classic elegance. Durability improves significantly when you apply thin base coats and avoid flooding the cuticle area with excess polish during the blending process.
Trendy Color Combinations for Winter Ombre Nails
 1")
We’ve curated the most stunning color combinations that capture winter’s sophisticated elegance. These trending palettes offer versatility for both everyday wear and special winter occasions.
Burgundy to Rose Gold
Burgundy to rose gold creates one of winter’s most luxurious ombre nail combinations. We recommend starting with a deep burgundy base that gradually transitions to a sophisticated rose gold finish at the tips. This rich color pairing delivers an elegant look that complements winter wardrobes perfectly.
Application begins with quality burgundy polish applied to the nail base. We suggest using a makeup sponge to blend the colors seamlessly, creating smooth transitions between the deep wine tones and metallic rose gold. The finished result provides a chic appearance that works beautifully for holiday parties and formal winter events.
Forest Green to Gold
Forest green to gold brings nature inspired glamour to winter nail art. This earthy combination starts with vibrant forest green at the base and transitions smoothly to warm gold at the tips. We love how this palette adds a touch of outdoor elegance to any winter look.
The application process requires careful blending to achieve the perfect gradient effect. We recommend using a small makeup sponge to dab the gold polish over the green base, creating natural looking transitions. This combination works exceptionally well with winter fashion colors like cream, burgundy, and navy.
Purple to Silver Shimmer
Purple to silver shimmer delivers the most dramatic winter ombre effect we’ve seen. Deep purple polish creates a bold base that gradually transforms into shimmering silver tips for an eye catching finish. This combination provides maximum impact for those wanting statement nails during winter months.
We suggest applying the deep purple base coat first, then using a fan brush to blend silver shimmer polish toward the tips. The metallic finish catches winter light beautifully, making this combination perfect for evening events and celebrations. This bold pairing works especially well on longer nail lengths where the gradient effect has more space to develop.
Essential Tools and Products for Creating Winter Ombre Nails
 2")
Now that we’ve explored stunning color combinations, let’s gather the right tools and products to bring these winter masterpieces to life. Having quality supplies makes all the difference in achieving professional-looking results.
Must-Have Nail Polishes
Winter inspired colors form the foundation of our seasonal ombre designs. Frosty blue to white combinations capture the essence of fresh snowfall, while deep purple to lavender gradients mirror twilight skies. Gold to cream transitions add warmth and sophistication to any winter look.
Quality matters when selecting polishes for ombre techniques. We recommend choosing highly pigmented formulas that blend smoothly without streaking. Metallic and shimmer finishes work exceptionally well for winter themes, adding that coveted frosty sparkle.
Color temperature plays a crucial role in winter ombre success. Cool toned blues, silvers, and purples create authentic winter vibes, while warmer golds and creams provide beautiful contrast points.
Sponges and Blending Tools
Makeup sponges serve as our primary blending tool for creating soft, seamless color transitions. These versatile tools allow us to dab and blend colors together naturally, producing that coveted gradient effect without harsh lines.
Dense foam sponges work best for initial color application and blending. We prefer wedge shaped sponges that can be cut into smaller pieces for precise nail work. Fresh sponges ensure clean color transfer without muddying our carefully chosen winter palettes.
Nail brushes offer more precise control when adding finer details or creating sharp gradients. Small detail brushes help us perfect edges and blend stubborn areas that sponges might miss.
Top Coats and Base Coats
Base coat application protects our natural nails and helps polish adhere better for longer lasting results. We always apply a thin, even layer and cure it under UV/LED light when using gel formulas for maximum durability.
Top coat selection determines our final finish and longevity. Glossy top coats add brilliant shine and depth to our winter ombre designs, while matte top coats create a modern, frosted appearance that perfectly captures winter’s essence.
Maintenance products keep our winter ombre nails looking fresh longer. Daily cuticle oil application and wearing gloves protect our manicures from harsh winter conditions. Regular top coat touch ups extend the life of our beautiful ombre creations.
Step-by-Step Tutorial for Perfect Winter Ombre Nails
 3")
Now we’ll walk you through the complete process of creating stunning winter ombre nails at home. This detailed tutorial ensures you’ll achieve professional-looking results with the right technique and patience.
Preparation and Base Application
Clean and shape your nails before starting any color application. Remove old polish completely and push back cuticles for a neat foundation.
File your nails into your preferred shape, whether that’s square, round, or coffin style. We recommend keeping them slightly shorter for easier blending.
Apply a clear base coat to protect your natural nails from staining and create better polish adhesion. Let this dry completely for 2-3 minutes before proceeding.
Paint your nails with the lighter shade of your chosen winter color combination, such as frosty blue or gold. Apply two thin coats rather than one thick coat for even coverage.
Allow each layer to dry thoroughly between applications. Rushing this step can cause smudging and uneven color distribution.
Sponge Technique for Smooth Blending
Prepare a clean makeup sponge by cutting it into a triangular wedge shape for better control and precision.
Apply stripes of both colors directly onto the sponge, placing the lighter shade next to the darker shade. We suggest using cream and deep purple for a cozy winter effect.
Dab the sponge gently onto your nail surface, starting from the cuticle area and moving toward the tip. Press lightly to avoid creating harsh lines.
Repeat the dabbing motion multiple times, slightly overlapping each application to create seamless color blending. This technique requires patience for the best results.
Build up the gradient gradually by adding more color to the sponge as needed. Focus on areas where you want stronger color intensity.
Clean excess polish from your skin using a small brush dipped in nail polish remover or acetone.
Finishing Touches and Sealing
Apply a high-quality top coat immediately after achieving your desired ombre effect. This seals the design and prevents chipping.
Use cuticle oil around the nail bed to moisturize and nourish the skin, especially important during dry winter months.
Allow everything to dry for at least 10-15 minutes before touching anything to ensure your winter ombre design sets properly.
Touch up any imperfections with a small detail brush if necessary, blending carefully to maintain the gradient effect.
Maintain your winter ombre nails by applying a fresh top coat every 3-4 days to extend wear time and keep the shine intact.
Creative Winter Ombre Nail Art Ideas
 4")
We’ve covered the foundational techniques for winter ombre nails, and now it’s time to elevate your designs with artistic embellishments that truly capture winter’s magic.
Snowflake Accents on Ombre Base
Snowflake designs transform our basic ombre into a winter wonderland masterpiece. We recommend using a nail stamp or small brush to create delicate snowflakes on top of your completed ombre base. This technique adds a whimsical and wintry feel that perfectly complements the gradient effect.
Apply the snowflakes while your ombre base is completely dry to prevent smudging. We suggest placing 2-3 snowflakes per nail for optimal visual impact without overwhelming the gradient. White or silver polish works beautifully for snowflake details, especially on darker ombre bases like deep purple to lavender transitions.
Glitter Gradient Effects
Glitter gradients create stunning sparkly accents that enhance our winter ombre designs. We apply glitter polish in a gradient pattern, starting with dense coverage at the nail tip and gradually decreasing toward the cuticle. This method creates depth while maintaining the ombre’s seamless flow.
Layer the glitter while your base ombre is slightly tacky for better adhesion. We’ve found that using a makeup sponge to dab glitter creates more natural distribution than brush application. Silver and gold glitters work exceptionally well with frosty blue to white and burgundy to rose gold combinations respectively.
Matte Finish Variations
Matte top coats transform our glossy winter ombre into sophisticated frosted designs. We seal completed ombre nails with matte finish products to achieve a modern, velvety appearance that mimics winter frost. This technique works particularly well with deeper color combinations like gray to black fades.
Apply matte top coat in thin, even layers to prevent streaking or bubbling. We recommend waiting 2-3 minutes between your final color application and the matte topcoat to ensure proper adhesion. Matte finishes also help camouflage minor imperfections in the gradient blending process.
Winter Ombre Nails for Different Nail Lengths and Shapes
 5")
We’ll show you how to adapt winter ombre techniques for your exact nail length and shape. Different approaches work better for various nail dimensions and forms.
Short Nails Ombre Techniques
Short nails require subtle ombre effects to avoid overwhelming the limited space. We recommend starting with a thin base coat and curing it under UV/LED light for the best foundation. Color application works best when you use a lighter shade as the base and apply a darker shade towards the tip for a natural gradient.
Sponge technique creates the smoothest blend on short nails. Apply your lighter and darker shades side by side on a makeup sponge and dab gently onto the nail, starting from the cuticle and moving towards the tip. This method prevents harsh lines that can make short nails appear even smaller.
Winter color combinations like frosty blue to white work perfectly for creating that snowy effect on compact nail surfaces. Deep purple to lavender transitions give short nails a cozy evening vibe without overpowering the overall look.
Long Nails Dramatic Gradients
Long nails provide the perfect canvas for more dramatic ombre effects that really make a statement. We can use multiple shades to create deep, gradual transitions from light to dark that showcase the full spectrum of winter colors. These extended nail surfaces allow for complex color stories that wouldn’t work on shorter lengths.
Brush technique gives you precise control over dramatic gradients on long nails. This method allows for sharp transitions between colors if you want more defined sections rather than seamless blends. Gold to cream combinations create festive holiday looks that really pop on longer nail lengths.
Multiple color zones work beautifully on extended nails, letting you incorporate three or four shades in a single gradient. This creates depth and visual interest that captures winter’s complexity.
Almond and Coffin Shape Considerations
Almond shaped nails enhance ombre effects through their naturally curved tips that highlight the gradient transition. The pointed end draws the eye upward, making the color progression more noticeable and elegant. We find that winter ombre looks particularly stunning on almond shapes because the curve mimics natural color flows.
Coffin shaped nails provide a clean, square canvas for sharp color transitions that create bold statements. The flat tip area gives you more space to showcase the darkest shade in your gradient, making dramatic winter combinations really stand out. Sharp transitions work especially well with this shape since the geometric form complements defined color changes.
Both shapes work beautifully with winter ombre techniques, but almond shapes suit softer gradients while coffin shapes excel with more dramatic color contrasts.
Professional vs. DIY Winter Ombre Nails
 6")
We often face the choice between professional salon services and creating beautiful winter ombre nails at home. Both approaches offer unique advantages depending on our skills, budget, and time constraints.
Salon Treatment Benefits
Professional nail technicians deliver expertise and quality that’s difficult to replicate at home. They use high-quality products and specialized equipment like airbrush machines to achieve flawless ombre effects that showcase winter’s beauty perfectly.
Salon treatments provide longer lasting results compared to DIY applications. Professional gel polish applications create more durable and polished finishes that maintain their winter ombre magic for weeks.
Convenience becomes a major advantage for busy schedules or those who prefer hassle-free experiences. We can relax while experts handle the intricate blending techniques required for stunning winter gradients.
At-Home Application Tips
Sponge technique mastery requires proper moisture control to achieve smooth winter ombre transitions. We should use sponges that aren’t too dry or too wet to avoid lifting the base coat or causing colors to run uncontrollably.
Color selection strategy focuses on adjacent spectrum shades for the most natural winter gradients. Choosing colors next to each other on the color wheel creates subtle, sophisticated ombre effects that capture winter’s gentle beauty.
Nail preparation maximizes visual impact by growing nails out slightly before application. Longer nail beds provide more surface area to showcase the full winter ombre gradient effect we’re trying to achieve.
Cost Comparison and Time Investment
| Factor | DIY Approach | Professional Salon |
|---|---|---|
| Cost | More cost-effective | Higher expense |
| Time Investment | Requires patience and practice | Quick, convenient service |
| Learning Curve | Steep initial learning period | No learning required |
| Quality Consistency | Variable results | Consistent professional finish |
DIY winter ombre nails offer important cost savings compared to salon treatments over multiple applications. We invest in tools and polish once, then create countless winter designs throughout the season.
Time investment varies dramatically between approaches based on our skill level and expectations. DIY requires more patience and practice to achieve salon-quality finishes, while professional services deliver immediate results for our winter nail goals.
Maintenance Tips for Long-Lasting Winter Ombre Nails
 7")
Maintaining your winter ombre nails requires consistent care and attention to keep them looking fresh throughout the season. We’ll share essential techniques to extend the life of your beautiful gradient designs.
Proper Cuticle Care
Softening your cuticles with a moisturizer before gently pushing them back with a cuticle pusher ensures healthy nail growth. We recommend this gentle approach to prevent damage and maintain the clean lines of your ombre design.
Applying nourishing oils to your cuticles maintains their health and prevents the dry, ragged appearance that can detract from your manicure. Cuticle oils containing jojoba, vitamin E, or argan oil work best for winter conditions.
Regular cuticle maintenance every 3-4 days keeps your winter ombre nails looking professionally done. We suggest incorporating this into your evening routine for consistent results.
Touch-Up Techniques
Regularly touching up your polish prevents chips and fading that can ruin the seamless gradient effect. We recommend checking your nails every 2-3 days for any signs of wear.
Using a makeup sponge to blend colors creates a seamless ombre effect when doing touch ups. This technique allows you to recreate the original gradient pattern without starting over completely.
Keeping a small bottle of each color in your ombre palette makes quick repairs possible. We suggest storing these in a cool, dry place to maintain their consistency.
Applying thin layers during touch ups prevents buildup that can make your nails look thick and uneven. Multiple light coats always produce better results than one heavy application.
Protection from Winter Weather
Wearing gloves protects your hands from cold and dry air that can cause polish to crack and chip. We recommend keeping a pair in your car, purse, and by your front door for easy access.
Avoiding harsh products helps prevent the drying that can weaken both your nails and polish. Heavily scented soaps, cleaning products, and sanitizers can strip away the protective oils from your nails.
Limiting exposure to water when washing dishes or cleaning prevents the weakening of your nails that leads to chips and breaks. We suggest wearing rubber gloves during household chores to maintain your manicure.
Using oil based lotions keeps your hands and nails hydrated throughout winter’s harsh conditions. This prevents the dryness and breakage that can compromise your ombre design’s integrity.
Winter Ombre Nail Inspiration from Celebrities and Influencers
 8")
We’ve seen celebrities and influencers embrace winter ombre nails with sophisticated takes that incorporate season-exact colors like deep burgundy, frosty blues, and metallic accents. These stunning nail designs often feature gradients from darker to lighter hues, sometimes enhanced with glitter or chrome effects for added glamour.
Red Carpet Looks
Elegant winter ombre nails dominate red carpet appearances, showcasing rich, moody tones that exude luxury and sophistication. Burgundy fading into soft nude creates a timeless combination that complements formal attire beautifully. We’ve noticed these looks frequently feature gold or silver accents that enhance the gradient effect while maintaining minimalist elegance.
Celebrities often choose metallic shades that catch the light perfectly under camera flashes. Deep wine tones transitioning to rose gold offer a particularly striking combination for evening events. These red carpet designs demonstrate how winter ombre nails can serve as both statement pieces and refined accessories.
Social Media Trending Designs
Social media platforms showcase an incredible variety of winter ombre nail designs that are trending in 2025. Soft pastel gradients bring a romantic, feminine vibe that’s perfect for everyday wear. Moody dark ombre shades blending from black or deep blue to lighter hues create dramatic effects that photograph beautifully.
Metallic and chrome ombre designs offer a futuristic, shiny look that’s particularly popular among younger influencers. Gold glitter overlays add festive sparkle that’s perfect for holiday celebrations. Frosty winter blues paired with silver or pearl accents create that coveted icy effect that captures winter’s essence.
We’ve observed that these trending designs emphasize personalization, with creators combining color fades with unique textures like glitter or chrome to make each manicure distinctive and fashionable.
Seasonal Fashion Pairings
Winter ombre nails pair exceptionally well with seasonal clothing trends, creating cohesive looks that reflect the season’s aesthetic. Burgundy ombre nails complement warm, cozy fabrics and gold jewelry perfectly, echoing the richness of autumn and winter palettes. These deeper tones work beautifully with cashmere sweaters, wool coats, and leather accessories.
Frosty blues align seamlessly with cool-toned winter outfits, improving looks that feature silver accessories, pearl jewelry, or icy knits. Chrome or metallic ombre designs bring a modern edge that suits festive party wear or elegant evening gowns. We’ve found that these nail designs can elevate winter wardrobes by serving as the perfect finishing touch that ties an entire look together.
Common Mistakes to Avoid When Creating Winter Ombre Nails
 9")
Even experienced nail enthusiasts can stumble when creating winter ombre designs. We’ve identified the most frequent errors that can transform your stunning gradient into a disappointing result.
Blending Errors
Inadequate blending creates harsh transition lines that completely ruin the ombre effect. We recommend using gentle, repetitive motions with a makeup sponge to achieve seamless color transitions. The key lies in building the gradient gradually rather than rushing through the blending process.
Overblending produces muddy, uneven color distribution that lacks the crisp definition winter ombre nails require. We suggest stopping once you achieve a smooth gradient, as excessive blending can cause colors to merge into an unappealing mess. Finding the perfect balance between under and overblending takes practice, but the results are worth the effort.
Color Selection Issues
Incompatible color combinations can destroy even the most skillful application technique. We always choose winter appropriate shades like frosty blues, deep purples, or festive golds that naturally complement each other. Colors that clash or compete for attention will never create the elegant winter ombre effect you’re seeking.
Insufficient contrast between your lightest and darkest shades makes the gradient barely visible. We ensure there’s a clear distinction between our chosen colors while maintaining harmony within the winter palette. The gradient should be noticeable from a distance, not something that requires close inspection to appreciate.
Application Problems
Incorrect tool usage leads to uneven, patchy results that look amateurish. We prefer makeup sponges for softer blends and precision brushes for more controlled application. Each tool serves a exact purpose in creating professional looking winter ombre nails.
Insufficient drying time between coats causes smudging and uneven color distribution. We always allow each layer to dry completely before applying the next, preventing the colors from bleeding together uncontrollably. Patience during the drying process ensures your winter ombre design maintains its intended appearance throughout the entire manicure.
Conclusion
Winter ombre nails offer endless possibilities for expressing your creativity while staying on-trend throughout the season. We’ve shown you how to master these stunning gradient designs whether you’re working with short or long nails and regardless of your skill level.
The key to success lies in choosing the right color combinations understanding proper blending techniques and investing in quality tools. With practice you’ll develop the confidence to experiment with different shades and artistic embellishments that make your nails truly unique.
Remember that maintenance is crucial for keeping your winter ombre nails looking fresh and vibrant. By following our care tips and avoiding common mistakes you’ll enjoy beautiful gradient nails that complement your winter wardrobe perfectly.
We encourage you to start with simpler designs and gradually work your way up to more complex patterns. Your winter nail game will never be the same once you’ve mastered these gorgeous ombre techniques.
Frequently Asked Questions
What are winter ombre nails?
Winter ombre nails feature a gradual color transition that blends cool-toned shades like blues, grays, silvers, and whites to reflect the beauty of winter landscapes. This nail art technique creates a seamless gradient effect that’s perfect for the winter season and suitable for both casual and formal occasions.
What colors work best for winter ombre nail designs?
The best winter ombre colors include classic combinations like white to silver, ice blue to navy, and gray to black. Trendy options feature burgundy to rose gold, forest green to gold, and purple to silver shimmer. These cool-toned palettes capture winter’s sophisticated elegance beautifully.
What tools do I need to create winter ombre nails at home?
Essential tools include highly pigmented nail polishes in your chosen colors, makeup sponges for blending, a quality base coat, and a durable top coat. You’ll also need nail files, cuticle pushers, and nail dehydrator for proper preparation. Quality supplies ensure professional-looking results.
How do I create a smooth ombre gradient effect?
Apply your lighter shade as the base coat first. Then, paint both colors onto a makeup sponge and gently dab it onto your nail, blending from light to dark. Work quickly while the polish is wet, and repeat the process until you achieve your desired gradient intensity.
Can winter ombre nails work on short nails?
Yes, winter ombre nails work beautifully on short nails. Use subtle gradients with lighter bases and darker tips, employing the sponge technique for smooth blending. Color combinations like frosty blue to white create an elegant snowy effect that’s perfect for shorter nail lengths.
How long do winter ombre nails typically last?
With proper application and maintenance, winter ombre nails can last 1-2 weeks. Professional salon applications may last longer due to expert techniques and high-quality products. Regular touch-ups, cuticle care, and protection from harsh winter weather help extend their lifespan significantly.
What’s the difference between DIY and salon winter ombre nails?
Salon applications offer expert technique, longer-lasting results, and convenience, typically costing $30-60. DIY approaches save money long-term and allow creative freedom but require practice and time investment. The choice depends on your budget, skill level, and desired durability.
How can I add creative elements to my winter ombre nails?
Enhance your winter ombre nails with snowflake accents using nail stamps or brushes, glitter gradients for added sparkle, or matte top coats for sophistication. These artistic embellishments transform basic ombre designs into unique, magical winter nail art that stands out beautifully.
What are common mistakes to avoid with winter ombre nails?
Avoid rushing the blending process, choosing incompatible colors, and applying thick coats. Don’t skip the base coat or apply top coat before colors are completely dry. Take time between steps, use adjacent color shades for natural gradients, and practice the sponge technique for best results.
How do I maintain my winter ombre nails?
Maintain your winter ombre nails by moisturizing cuticles regularly, doing touch-ups with a makeup sponge, and protecting hands with gloves in harsh weather. Apply cuticle oil daily, avoid drying products, and use thin layers during touch-ups to prevent buildup and maintain the design’s integrity.


