Red and black nail combinations never go out of style – they’re the ultimate power duo that screams confidence and sophistication. Whether you’re channeling gothic elegance or modern chic vibes, these two colors create stunning contrasts that work for every occasion and season.
We’ve all been there – staring at our nail polish collection wondering how to create something bold yet wearable. That’s where red and black designs come in clutch. From classic French tips with a twist to intricate geometric patterns, these versatile shades offer endless possibilities for nail art enthusiasts at every skill level.
The beauty of red and black manicures lies in their adaptability. You can go subtle with accent nails or make a statement with full-on dramatic designs. We’re here to show you exactly how to master this timeless color combination and turn your nails into the perfect accessory for any look.
Classic Red and Black Combinations for Timeless Elegance
These foundational designs showcase the sophisticated power of red and black nail combinations. We’ll explore three cornerstone techniques that never go out of style.
Traditional French Tips with a Twist
Transform the classic French manicure by replacing white tips with deep black polish for an edgy sophistication. We recommend using a rich burgundy or cherry red as your base color to create striking contrast against the black tips. This technique works beautifully on both short and long nails, making it perfect for professional settings or evening events.
Apply thin black lines just above traditional tip placement to create a modern double tip effect. We’ve found that using a steady hand or nail tape ensures clean, precise lines that elevate the overall look. Professional nail artists often suggest this variation for clients wanting subtle drama without overwhelming bold patterns.
Experiment with reverse French tips by painting black crescents at the nail base instead of traditional tips. We love how this creates an unexpected focal point while maintaining the elegant French manicure structure. This approach particularly flatters shorter nail lengths and adds visual interest to everyday manicures.
Solid Color Alternating Nails
Alternate between glossy red and matte black polish on each finger to create a striking checkerboard effect across your hands. We suggest using deep crimson or classic fire engine red to ensure maximum impact against the black contrast. This technique requires no special tools or artistic skills, making it accessible for beginners.
Coordinate your thumb and ring finger in matching red while painting your index, middle, and pinky fingers in black for balanced asymmetry. We’ve noticed this pattern creates natural focal points that draw attention to hand gestures and jewelry. Many clients prefer this approach because it feels more wearable than full alternating patterns.
Switch between metallic red and matte black finishes to add textural depth to your alternating nail design. We recommend chrome or foil red polishes paired with flat black for maximum visual contrast. This combination catches light beautifully and adds dimension that photographs exceptionally well.
Half-Moon Designs
Create crescent shapes at your nail base using black polish over a red foundation for classic half-moon elegance. We use reinforcement stickers or nail tape to achieve perfectly curved lines that mirror your natural cuticle shape. This vintage inspired technique originated in the 1920s and remains timelessly chic today.
Reverse traditional half-moons by painting red crescents over black base coats for a modern interpretation of this classic style. We find this variation particularly striking because it creates the illusion of longer nail beds while maintaining sophisticated appeal. Professional manicurists often recommend this technique for clients with shorter nails.
Layer thin gold or silver accent lines between red and black half-moon sections to add luxury detail to your design. We suggest using striping tape or a fine brush to create clean metallic borders that enhance the overall elegance. This embellishment transforms simple half-moons into statement nails perfect for special occasions.
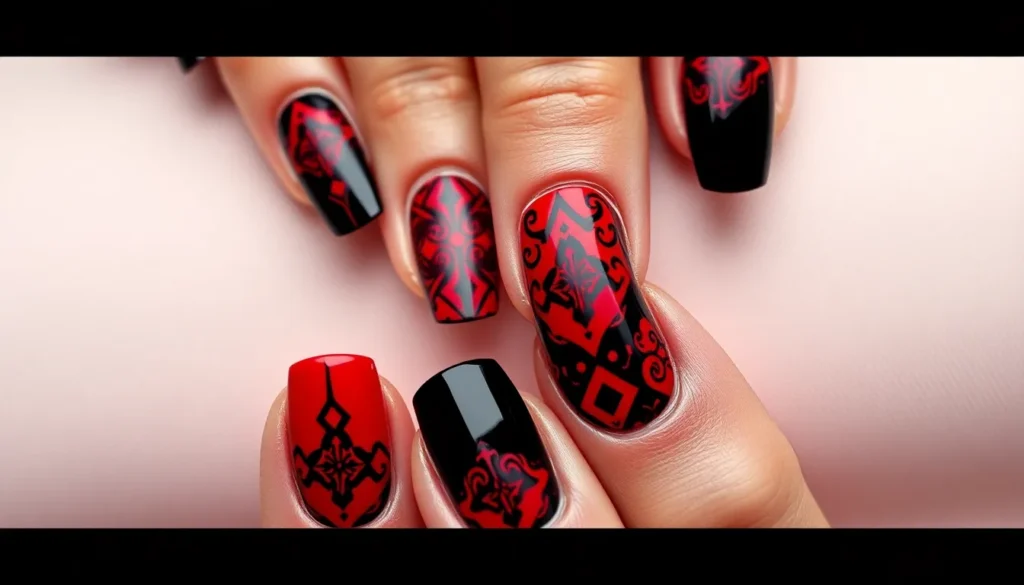
Bold Geometric Patterns Using Red and Black

Geometric nail art transforms simple red and black polish into striking visual statements that command attention. We’ll explore three fundamental geometric techniques that create bold contrasts and clean lines.
Striped Nail Art Designs
Horizontal stripes offer the most classic approach to geometric red and black nails. We alternate between red and black horizontal bands across each nail, creating a timeless pattern that works for any occasion. Striping tape helps achieve perfectly clean lines between colors, ensuring professional looking results even at home.
Vertical stripes deliver a more modern and elongating effect on your nails. We paint vertical bands that run from cuticle to tip, making fingers appear longer and more slender. This technique works exceptionally well on longer nail shapes like almond or coffin styles, where the vertical lines can fully showcase their dramatic impact.
Checkerboard Pattern Nails
Checkerboard nails create a playful yet sophisticated design using alternating red and black squares. We start by mapping out a grid pattern on each nail, then carefully fill in alternating squares with our chosen colors. This technique requires patience and steady hands, but the results deliver maximum visual impact with geometric precision.
Small squares work best on shorter nails, while larger squares suit longer nail beds perfectly. We recommend using a thin brush or nail art pen to outline the grid first, ensuring each square maintains consistent proportions throughout the design.
Angular Color Blocking
Angular Color Blocking divides each nail into sharp, geometric sections using diagonal or zigzag lines. We create dramatic contrasts by painting one section red and the adjacent section black, forming bold angular shapes that catch light beautifully. This technique allows for endless creativity in how we position and angle each division.
Asymmetrical designs take color blocking further by creating intentionally unbalanced patterns across the nail set. We might paint the left half of each nail red and the right half black, or create triangular sections that point in different directions. These designs work particularly well when we want each nail to complement the others while maintaining individual character.
Gradient and Ombre Red and Black Nail Ideas

We can elevate red and black combinations through sophisticated blending techniques that create seamless color transitions. These gradient and ombre methods transform sharp contrasts into flowing masterpieces that captivate attention.
Subtle Fade Techniques
Subtle fade techniques involve selecting closely related shades to create gentle transitions between red and black. We recommend using burgundy as a mid-tone color to soften the gradient and achieve a more refined look. Makeup sponges become essential tools for blending three shades smoothly: bright red, transition burgundy, and deep black.
The process requires patience as we build layers gradually to avoid harsh color breaks. Nail protectors help maintain clean cuticle lines while we dab the sponge repeatedly for seamless blending. This understated approach suits professional environments where bold contrasts might feel overwhelming.
Dramatic Color Transitions
Dramatic color transitions maximize the contrast between bright red and solid black for striking visual impact. We achieve this by positioning vivid crimson at the nail base and transitioning sharply to midnight black at the tips. High gloss finishes enhance the vibrancy and depth of both colors, creating an eye-catching effect that demands attention.
The key lies in controlling the blend zone where colors meet, keeping it narrow for maximum drama. We apply the lightest pressure with makeup sponges to maintain color intensity while creating smooth transitions. This technique works exceptionally well for evening events and special occasions where bold statements are welcome.
Reverse Ombre Effects
Reverse ombre effects flip traditional gradient expectations by placing dark red at the tips and transitioning to black at the base. This unexpected approach adds sophistication and uniqueness to standard ombre techniques. We can enhance the look further with glitter accents or matte topcoats for additional dimension.
The reverse method creates an elegant upward flow that elongates nail appearance while maintaining visual interest. Glittered finishes catch light beautifully against the dark base, while matte topcoats provide modern sophistication. This technique pairs perfectly with statement jewelry and formal attire where refined details matter most.
Floral and Nature-Inspired Red and Black Designs

Nature’s beauty transforms red and black nail combinations into artistic masterpieces that capture organic elegance. We’ll explore three stunning floral approaches that bring sophisticated botanical elements to your fingertips.
Rose Motifs on Black Base
Elegant rose patterns on glossy black backgrounds create timeless sophistication that works for any occasion. We recommend starting with a high quality black base coat to achieve the perfect canvas for your rose artwork. Delicate rose details can range from minimalist single blooms to intricate garden scenes depending on your skill level and preference.
Thin brushes become essential tools for creating precise petal shapes and realistic rose textures. We suggest practicing basic rose techniques on practice wheels before applying them to your nails. Subtle shading techniques using darker red tones add dimensional depth that makes your roses appear to pop off the black surface.
Various rose styles offer different aesthetic appeals for diverse occasions. We’ve found that simple line art roses work beautifully for everyday wear while detailed painted roses suit special events perfectly. Adding tiny white highlights to rose centers creates authentic botanical realism that elevates the entire design.
Abstract Leaf Patterns
Stylized leaf shapes in vibrant red against black backdrops deliver modern artistic flair with natural inspiration. We create these patterns by varying leaf sizes and orientations to establish visual rhythm across all ten nails. Abstract interpretations allow for creative freedom while maintaining the organic essence that makes these designs appealing.
Different leaf shapes provide endless creative possibilities for unique pattern development. We recommend experimenting with maple leaves, fern fronds, and simple oval shapes to discover your preferred aesthetic. Modern stylized approaches work exceptionally well for contemporary fashion while realistic leaf details suit those who prefer natural authenticity.
Visual interest increases when we incorporate varied leaf positioning and scaling throughout the design. We often alternate large statement leaves with smaller accent foliage to create balanced compositions. Strategic placement of red leaves at different angles prevents monotonous patterns while maintaining cohesive design flow.
Cherry Blossom Themes
Delicate cherry blossoms in red and pink tones against dark backgrounds evoke springtime romance and timeless beauty. We typically use gradient backgrounds that transition from deep black to subtle gray for authentic cherry blossom ambiance. This classic design choice remains popular across seasons and works especially well for spring celebrations.
Soft romantic aesthetics emerge when we combine red and pink shades for dimensional blossom effects. We apply subtle shading techniques to individual petals that create realistic depth and movement. Multiple pink tones ranging from pale blush to deeper rose create natural variation that mimics actual cherry blossoms.
Gradient backgrounds enhance the overall cherry blossom theme by providing atmospheric depth and visual interest. We often incorporate gentle color transitions that suggest dawn or dusk lighting conditions. Adding delicate branch elements in thin black lines connects individual blossoms and creates cohesive botanical storytelling across your nail design.
Edgy Gothic Red and Black Nail Art

Gothic nail art transforms the classic red and black combination into something darkly beautiful and dramatically striking. We’ll explore three sophisticated approaches that capture the mysterious allure of gothic aesthetics.
Matte Finish Combinations
Matte black with red accents creates the perfect foundation for gothic nail art that’s both dramatic and wearable. We start with a full matte black base, then add geometric red patterns using striping tape for precise lines and sharp angles. Dots, triangles, and abstract shapes in glossy red create stunning contrast against the velvety black finish.
Dark red matte polish paired with black accents offers a subtler yet equally striking effect for those who prefer understated drama. We recommend applying the dark red matte base first, then adding thin black lines or small geometric elements for visual interest. This combination works particularly well for professional settings where you want gothic flair without overwhelming boldness.
Dark Romance Designs
Classic ombre effects gradually blend red into black for a romantic yet mysterious look that captures gothic elegance perfectly. We create this seamless transition by starting with bright red at the cuticle area, then using a makeup sponge to blend progressively darker shades until reaching solid black at the tips. Multiple thin layers ensure smooth color transitions without streaking or harsh lines.
Dalmatian print brings playful drama to gothic nail art through bold red and black spotted patterns. We begin with either a red or black base, then use a dotting tool to create irregular spots in the contrasting color across each nail. This technique works best when we vary the spot sizes and placement randomly, mimicking the natural pattern found in dalmatian fur.
Victorian-Inspired Details
Ribbon accents painted in intricate red designs on black backgrounds add Victorian elegance to gothic nail art. We use fine detail brushes to create delicate bow shapes, ribbon swirls, and lace patterns that evoke vintage sophistication. These designs require steady hands but create stunning results when enhanced with tiny rhinestones or pearl accents.
Floral motifs featuring red flowers on matte black bases bring vintage inspired beauty to gothic aesthetics. We paint roses, peonies, or abstract blooms using various red shades from crimson to burgundy, adding depth through layered petals and subtle shading. Small black accents within the flowers create definition while maintaining the gothic color scheme throughout the design.
Seasonal Red and Black Nail Ideas

Seasonal celebrations provide perfect opportunities to showcase red and black nail combinations in festive ways. Each holiday offers unique design possibilities that capture the spirit of the occasion while maintaining the sophisticated appeal of this classic color duo.
Valentine’s Day Heart Designs
Heart shaped accents transform ordinary manicures into romantic masterpieces by featuring red hearts on glossy black backgrounds. We recommend using nail art brushes or heart shaped stencils to create precise romantic motifs that celebrate love.
Red and black stripes offer a playful Valentine’s approach through alternating color bands with dedicated heart accent nails. Creating this design involves applying base colors in stripes then adding a single heart motif on the ring finger for romantic emphasis.
Gradient heart effects blend red seamlessly into black backgrounds while featuring contrasting heart shapes at the nail tips. This technique requires makeup sponges for smooth color transitions and steady hands for precise heart placement.
Halloween-Themed Nails
Spider web designs create spooky elegance by painting intricate black web patterns over vibrant red base coats. We suggest using thin nail art brushes or dotting tools to create realistic web structures that capture Halloween’s mysterious atmosphere.
Candy corn inspired patterns use red and black segments with white accents to mimic the iconic Halloween treat. This design requires careful sectioning of each nail into three equal parts then filling with appropriate colors for authentic candy appearance.
Gothic Halloween motifs combine matte black bases with glossy red accent details like bats, crosses, or abstract spooky shapes. These designs work particularly well when incorporating small rhinestones or metallic details for added drama.
Holiday Party Looks
Glamorous rhinestone accents elevate simple black bases through strategically placed red rhinestones that catch party lights beautifully. We recommend applying rhinestones while the base coat remains slightly tacky for better adhesion and longer wear.
Geometric party patterns showcase modern sophistication through sharp red and black angular designs that complement formal attire. Creating these patterns involves using striping tape to achieve clean lines and professional looking geometric sections.
Festive glitter gradients blend fine red glitter into black bases creating sparkling effects perfect for holiday celebrations. This technique requires building glitter density gradually from cuticle to tip for smooth professional results.
Textured Red and Black Nail Techniques

Adding texture transforms ordinary red and black nail designs into dimensional masterpieces that demand attention. These techniques create tactile elements that enhance the visual impact of your manicure.
Velvet Powder Applications
Velvet powder creates a luxurious plush finish that instantly elevates any red and black design. Apply a base coat in your chosen color and while the polish remains tacky, gently dust velvet powder over exact areas using a soft brush. This technique works beautifully when you contrast textured sections with smooth glossy areas on the same nail.
Red velvet powder over black base coats produces a rich burgundy effect that’s perfect for evening events. Black velvet powder applied over red creates dramatic depth and sophistication. We recommend using this technique on accent nails to prevent overwhelming the overall look while maintaining visual interest.
Glossy and Matte Contrasts
Glossy red accents paired with matte black bases create one of the most striking visual effects in nail art. This contrast technique highlights the different textures while making each color appear more vibrant. Apply your base color first and allow it to dry completely before adding the contrasting finish.
Matte top coats transform glossy sections into velvety surfaces that create dramatic juxtaposition against shiny areas. Use this technique to create geometric patterns where matte black triangles meet glossy red sections. The textural difference adds depth without requiring additional colors or complex designs.
3D Embellishments
3D nail art elements like beads, rhinestones, and sculpted designs add dimensional interest to red and black combinations. Position these embellishments strategically to create focal points that draw the eye while maintaining balance across all nails. Small black beads clustered on red backgrounds create sophisticated texture variations.
Red or black gel allows you to sculpt raised patterns directly onto the nail surface. Create geometric shapes, floral motifs, or abstract designs that cast subtle shadows and catch light differently than flat surfaces. These sculpted elements work particularly well when combined with matte finishes that provide contrast to the dimensional aspects of your design.
Professional Red and Black Manicure Ideas

Professional environments require refined nail designs that maintain sophistication while expressing personal style. We’ll explore workplace-appropriate red and black combinations that command respect and elevate your professional image.
Subtle Office-Appropriate Designs
Red accents on a black base create the perfect balance between professional polish and personal expression. We recommend applying matte black polish to all nails except the ring finger, which gets a deep burgundy or wine red shade for subtle contrast. This approach maintains professionalism while adding visual interest that won’t distract in boardroom meetings.
Minimalist ombre designs offer another office-friendly option that transitions from deep red at the cuticle to black at the tips. We suggest using closely related shades like burgundy and charcoal to achieve a seamless gradient that appears sophisticated under office lighting. The key lies in keeping the transition subtle enough to pass dress code requirements while still showcasing your attention to detail.
Thin red accent lines against black backgrounds provide elegance without overwhelming your professional appearance. We position single horizontal stripes near the base of each nail or create delicate geometric shapes using striping tape for clean, precise lines that complement business attire perfectly.
Sophisticated Color Placement
Strategic color placement transforms basic red and black combinations into polished professional statements. We place red polish on alternating nails in a pattern that creates visual rhythm, such as applying black to the thumb, middle finger, and pinky while keeping the index and ring fingers in deep red. This alternating pattern maintains sophistication while preventing the design from appearing too bold for conservative workplace environments.
Negative space techniques elevate professional manicures by incorporating the natural nail color into the design. We create thin red lines or small geometric shapes on a clear base, then add black accents strategically placed to frame the design without overwhelming the overall look. This approach works particularly well for offices with strict dress codes since the majority of the nail remains natural.
Half moon designs positioned at the cuticle area offer vintage inspired elegance suitable for professional settings. We apply black polish to cover three quarters of the nail, leaving a red half moon shape at the base that creates sophisticated contrast while maintaining a classic, timeless appearance appropriate for any business environment.
Minimalist Accent Nails
Single accent nails provide the perfect introduction to red and black combinations for conservative workplace environments. We recommend painting one nail per hand in deep red while keeping the remaining eight nails in glossy black, creating focal points that draw attention without appearing unprofessional. The ring fingers typically work best as accent nails since they’re visible during handshakes and presentations.
Two accent nail approaches double the visual impact while maintaining professional appropriateness. We suggest painting both ring fingers in red while keeping all other nails black, or alternating the accent placement between hands by choosing the ring finger on one hand and the middle finger on the other. This asymmetrical approach adds modern sophistication to traditional professional manicures.
Thin red French tips over black bases create minimalist elegance perfect for professional environments. We apply the red color sparingly along the nail edge, keeping the lines clean and precise to maintain a polished appearance that complements business attire while adding subtle personality to your professional image.
DIY Tips for Creating Red and Black Nail Designs

Creating stunning red and black nail art requires the right approach and attention to detail. Let’s explore the fundamental techniques that’ll help you achieve professional-looking results at home.
Essential Tools and Products
High-quality nail polishes form the foundation of any successful red and black design. We recommend selecting bright red and deep black polishes with excellent pigmentation for maximum impact. Darker red shades like burgundy or wine provide versatility when creating subtle gradient transitions.
Precision tools ensure clean lines and professional finishes in your designs. Striping tape helps create geometric patterns and sharp divisions between colors. Nail guides or stencils allow you to achieve consistent shapes and patterns across all nails.
Application accessories make complex techniques more manageable for beginners. Makeup sponges are essential for creating smooth gradient effects and ombre transitions. Dotting tools enable precise placement of accents and small details. Thin brushes give you control when painting intricate patterns or touch-ups.
Protective products preserve both your nails and your finished design. Base coats prevent staining from dark pigments and create a smooth application surface. Top coats seal your artwork and provide lasting shine or matte finishes depending on your desired look.
Step-by-Step Application Techniques
Preparation sets the stage for flawless results every time. We start by cleaning nails thoroughly to remove oils and old polish residue. Shape your nails to your preferred length and gently push back cuticles for a neat appearance.
Base application creates the perfect canvas for your red and black design. Apply a thin layer of base coat to protect your natural nails from staining. Allow this to dry completely before proceeding with your chosen color scheme.
Color layering requires patience for the best outcome. Paint your base color in thin, even coats rather than attempting full coverage in one stroke. Wait for each layer to dry completely before adding the next coat or beginning pattern work.
Design execution varies depending on your chosen technique. For gradient effects, apply colors to a damp makeup sponge and dab gently onto the nail surface. When creating geometric patterns, use striping tape as guides and remove while the polish is still slightly wet for clean edges.
Finishing touches complete your professional-looking manicure. Apply a quality top coat to seal your design and enhance durability. Clean up any mistakes around the cuticle area with a small brush dipped in nail polish remover.
Common Mistakes to Avoid
Rushing between coats leads to smudged designs and uneven coverage. We always wait for each layer to dry completely before proceeding to the next step. This prevents colors from bleeding together and maintains crisp pattern lines.
Over-application creates thick, uneven layers that take forever to dry. Apply multiple thin coats instead of trying to achieve full opacity in one stroke. This technique provides better coverage and a smoother finish.
Neglecting cuticle protection results in stained skin that detracts from your finished look. Apply cuticle oil or use liquid latex around the nail area before painting. This creates a barrier that makes cleanup much easier.
Skipping base and top coats compromises both the appearance and longevity of your design. Base coats prevent staining and improve polish adhesion, while top coats protect your artwork from chips and extend wear time.
Working with dull tools makes precise application nearly impossible. Keep your brushes clean and replace them when they become frayed or lose their shape. Sharp, clean tools are essential for achieving professional-quality results at home.
Celebrity-Inspired Red and Black Nail Looks

Celebrity nail trends continue to drive our fascination with red and black combinations. Stars like Zendaya, Kylie Jenner, and Sabrina Carpenter regularly showcase these dramatic color pairings, inspiring countless recreations across social platforms.
Red Carpet Recreations
Celestial nail designs dominate red carpet appearances with their sophisticated mystery. Black French tips serve as the foundation while gold and red star accents create an elite astronomical theme that photographs beautifully under camera flashes.
Aura effect manicures transform traditional gradients into show stopping statements. Deep red polish glows intensely at the nail bed before fading seamlessly into rich black tips, creating that coveted red carpet drama we’ve seen celebrities embrace.
Reverse ombre techniques flip conventional color placement for maximum impact. Starting with solid black at the cuticle area, the design transitions through deep burgundy into vibrant red at the tips, offering a fresh take on classic gradient methods.
Social Media Trending Styles
Chrome finish applications deliver the fiery boldness that’s currently dominating Pinterest feeds. Neon red chrome polish paired with strategic black accent placements creates that mirror like shine social media users can’t resist sharing.
Ombre acrylic combinations blend red and black seamlessly across various nail shapes. These designs work particularly well on coffin and almond shapes, where the extended length showcases the gradient transition more dramatically.
Matte and glossy contrasts create striking visual tension that performs exceptionally well in social media photography. Alternating between glossy red and matte black finishes on different nails produces that eye catching checkerboard effect we’re seeing across Instagram and TikTok.
Iconic Fashion Moments
Runway presentations from Valentino have elevated red and black nail combinations to high fashion status. These designs blend classic elegance with contemporary drama, proving their versatility beyond everyday wear.
Simone Rocha collections showcase how red and black nails complement avant garde fashion statements. The designer’s emphasis on romantic gothic elements translates perfectly to nail art that balances darkness with passionate red undertones.
Fashion week backstage moments reveal how professional nail artists achieve these celebrity looks using precise application techniques. Strategic color placement and expert blending create the sophisticated edge that makes these combinations a fashion staple.
Conclusion
Red and black nail designs offer endless possibilities for expressing your unique style while maintaining timeless elegance. Whether you’re drawn to classic French tips or bold geometric patterns these versatile colors adapt to any occasion or personal preference.
We’ve explored techniques ranging from beginner-friendly alternating colors to advanced gradient effects and textured finishes. The beauty of this color combination lies in its ability to work equally well in professional settings and dramatic evening looks.
From celebrity-inspired designs to DIY-friendly options you now have the tools and inspiration to create stunning red and black manicures at home. Remember that practice makes perfect and even simple designs can make a powerful statement when executed with confidence.
Frequently Asked Questions
What makes red and black nail combinations so popular?
Red and black nail combinations are timeless because they convey confidence and sophistication while remaining incredibly versatile. These colors work for various styles, from gothic elegance to modern chic, making them suitable for any occasion. The striking contrast creates bold yet wearable designs that complement different skin tones and personal aesthetics.
Are red and black nail designs suitable for beginners?
Absolutely! Many red and black designs are beginner-friendly, including classic French tips with black polish, simple alternating colors, and basic geometric patterns. Start with easier techniques like half-moon designs or color blocking before progressing to more complex patterns like gradients or intricate floral motifs.
What tools do I need for DIY red and black nail art?
Essential tools include high-quality red and black polishes, base and top coats, striping tape for clean lines, makeup sponges for blending, and precision brushes for details. Additional items like rhinestones, velvet powder, or 3D embellishments can enhance your designs but aren’t necessary for basic patterns.
Can I wear red and black nails to work?
Yes! Professional red and black designs include subtle accent nails, thin red French tips over black bases, minimalist ombre transitions, and strategic color placement. Focus on clean lines, negative space techniques, and understated patterns that maintain sophistication while expressing your personal style within workplace guidelines.
How do I create smooth gradients with red and black polish?
Use makeup sponges to blend colors while wet, starting with lighter shades and gradually building intensity. Work quickly before polish dries, and use closely related shades like burgundy for subtle transitions. Apply a high-gloss top coat to enhance the gradient effect and ensure smooth color transitions.
What are the most popular red and black nail trends right now?
Current trends include chrome finishes, aura effect manicures with dramatic gradients, celestial designs with gold accents, and ombre acrylic combinations. Social media platforms showcase textured techniques using velvet powder, 3D embellishments, and celebrity-inspired looks featuring geometric patterns and sophisticated color blocking.
How can I adapt red and black nails for different seasons?
For Valentine’s Day, try heart-shaped accents and gradient effects. Halloween calls for spider web designs and gothic motifs with matte finishes. Holiday parties work well with rhinestone accents and glitter gradients. Adapt textures and patterns while maintaining the classic red and black color scheme.
What’s the difference between matte and glossy red and black combinations?
Matte finishes create dramatic, sophisticated looks perfect for gothic aesthetics and professional settings. Glossy finishes offer classic elegance and enhance color vibrancy. Combining both textures in one design creates striking contrast and visual interest, making your nail art more dimensional and eye-catching.


