We’ve all been there – staring at our nails wondering how to create that perfect gradient effect that looks effortlessly chic. Ombre nails have taken the beauty industry by storm and it’s easy to see why. This stunning technique transforms ordinary manicures into eye-catching works of art that blend colors seamlessly from light to dark or vice versa.
Whether you’re preparing for a special occasion or simply want to elevate your everyday look ombre nails offer endless possibilities. From subtle nude transitions to bold rainbow gradients we’re about to explore the most captivating ombre nail ideas that’ll have everyone asking where you got your manicure done.
The best part? You don’t need to be a professional nail artist to achieve these gorgeous results. With the right techniques and a little practice you’ll master the art of ombre nails and discover why this trend continues to dominate social media feeds and red carpets alike.
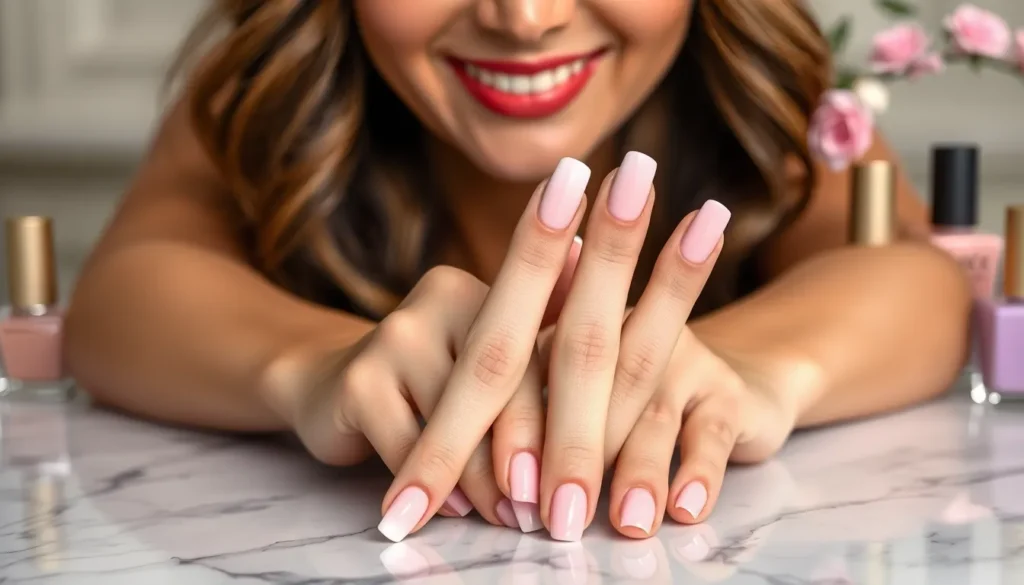
Classic Pink to White Ombre Nail Ideas
Pink to white ombre nails offer the perfect introduction to gradient nail art with their subtle elegance and timeless appeal. These feminine combinations create a sophisticated look that complements every skin tone while maintaining versatility for any occasion.
Soft Gradient Techniques
Sponge blending creates the smoothest pink to white transitions we’ve seen in professional nail art. Apply your base pink color across the entire nail, then dab white polish onto a makeup sponge and gently press it from the tip toward the middle of each nail. Work in thin layers to build up the gradient gradually rather than attempting to achieve full opacity in one application.
Brush stippling offers precise control over your ombre placement and intensity. Load a flat brush with white polish and lightly stipple it over the pink base in overlapping motions. Start with minimal pressure at the cuticle area and increase intensity toward the nail tips. This technique works particularly well for creating defined gradient lines.
Powder dipping produces ultra smooth gradients without visible brush strokes or sponge texture. While your pink base coat remains tacky, dip each nail at an angle into white acrylic powder or eyeshadow. The powder adheres to the sticky surface and creates a seamless blend that rivals salon quality results.
Glitter Accent Variations
Micro glitter overlays add subtle sparkle without overwhelming the pink to white gradient beneath. Apply fine holographic or iridescent glitter over the entire nail using a fan brush for even distribution. Focus slightly more glitter toward the white tips to enhance the ombre effect while maintaining the base gradient visibility.
Chunky glitter placement creates dramatic focal points within your pink to white design. Position larger glitter pieces strategically along the gradient line where pink meets white, or concentrate them at the tips for maximum impact. Use tweezers for precise placement and seal with a thick top coat to prevent snagging.
Gradient glitter application mirrors your color ombre with a complementary sparkle pattern. Start with dense glitter application at the white tips and gradually decrease the concentration toward the cuticle area. This double gradient effect adds dimension while maintaining the classic pink to white color story.
Bold Blue Ombre Nail Ideas

Blue ombre nails offer dramatic flair that commands attention while maintaining sophisticated elegance. We’ve curated striking blue gradient combinations that’ll transform your manicure into a captivating statement piece.
Navy to Sky Blue Transitions
Navy to sky blue ombre creates one of the most sophisticated color transitions we’ve seen in nail art. Starting with deep navy at the base, this gradient flows seamlessly upward to light sky blue at the tips, delivering both drama and elegance in a single design.
This particular combination works exceptionally well for professional settings where you want to make a statement without being overly flashy. We recommend using a makeup sponge to blend the colors, starting with navy polish at the cuticle area and gradually building up the sky blue toward the nail tips.
The contrast between these two blue shades creates visual depth that makes your nails appear longer and more slender. Professional nail artists often suggest applying a base coat first, then using thin layers of each color to achieve the smoothest transition possible.
Turquoise to Teal Combinations
Turquoise to teal ombre delivers vibrant energy that’s perfect for summer occasions and beach themed events. This combination blends the bright, cheerful nature of turquoise with the rich sophistication of teal, creating an eye catching gradient that works beautifully on both short and long nails.
We’ve found this color pairing particularly stunning when enhanced with subtle glitter accents or metallic topcoats. The transition from vibrant turquoise at the base to deep teal at the tips creates a mesmerizing effect that catches light beautifully throughout the day.
This combination pairs exceptionally well with gold jewelry and warm toned accessories, making it an ideal choice for tropical vacations or summer events. Professional manicurists often recommend using a fan brush technique for this particular gradient to achieve the smoothest color blend between these two distinct blue green shades.
Sunset Ombre Nail Ideas

Sunset ombre nails capture the breathtaking beauty of golden hour in your manicure. These warm toned designs blend seamlessly from deep oranges to soft yellows and pinks, creating stunning gradient effects that mirror nature’s most spectacular moments.
Orange to Yellow Blends
Orange to yellow ombre nails create vibrant summer looks that radiate warmth and energy. Start with a rich tangerine orange at the base of each nail, then gradually transition to a bright lemon yellow at the tips using a damp makeup sponge. Dab the sponge gently in overlapping motions to achieve smooth color blending without harsh lines.
Apply a base coat first to protect your natural nails and ensure better color adhesion. Layer the orange polish thickly at your cuticle area, then add the yellow polish to the opposite end of your sponge. Pat the sponge onto your nail in a rolling motion, working from the base toward the tip to create that perfect gradient transition.
Seal your orange to yellow blend with a glossy top coat for maximum shine and longevity. This technique works especially well on longer nail shapes like almond or coffin, where you have more surface area to showcase the beautiful color transition.
Pink to Orange Fades
Pink to orange fades offer a softer, more romantic approach to sunset inspired ombre nails. Begin with a delicate blush pink at your nail base, then blend into a warm coral orange toward the tips for an elegant gradient effect. This combination works beautifully for both casual and formal occasions.
Choose a light peachy pink as your starting color, applying it generously near the cuticle area. Select a vibrant coral orange for the tips, ensuring the two shades complement each other harmoniously. Use a clean makeup sponge to blend the colors together, dabbing gently to avoid streaking.
Apply thin layers rather than thick ones for better color control and smoother transitions. Allow each layer to dry completely before adding the next to prevent smudging or uneven application. Finish with a quality top coat to enhance the gradient effect and protect your beautiful sunset fade from chipping.
Neutral Ombre Nail Ideas

We’ll explore sophisticated neutral ombre designs that offer timeless elegance perfect for any occasion. These understated color combinations create seamless transitions while maintaining professional appeal.
Nude to Beige Gradients
Nude to Beige Gradients create the most versatile ombre effect for everyday wear and professional settings. We recommend starting with a light beige base and gradually blending into a soft nude tone toward the cuticle area. This subtle transition works beautifully with both gel polish and regular nail polish applications.
Makeup sponge technique delivers the smoothest results for this delicate color combination. We apply both shades to a damp cosmetic sponge and gently dab it across each nail surface. The key lies in building thin layers gradually rather than attempting bold coverage in one application.
Finish options include matte or glossy top coats depending on your desired aesthetic. We find that glossy finishes enhance the gradient effect while matte coats create a more modern, sophisticated appearance. Both options complement the natural tones beautifully.
Brown to Cream Transitions
Brown to Cream Transitions add warmth and depth while maintaining neutral sophistication. We start with a rich chocolate or espresso brown at the nail base and blend upward into a creamy vanilla or off white tone. This combination works particularly well during fall and winter seasons.
Blending technique requires careful attention to prevent muddy color mixing. We recommend using a clean, damp sponge for each nail and working quickly before the polish begins to set. The acrylic paint method offers better control for this exact color pairing since it allows more blending time.
Enhancement tips include adding subtle shimmer to the cream portion for extra dimension. We suggest applying a pearl or champagne shimmer over the lighter section once the base gradient has dried completely. This creates visual interest without overwhelming the elegant neutral palette.
Glitter Ombre Nail Ideas

Sparkling ombre designs add glamour to traditional gradient manicures through strategic glitter placement. These techniques create stunning effects that catch light beautifully while maintaining the smooth transitions ombre nails are known for.
Sparkle Fade Techniques
Creating the perfect glitter gradient requires careful application starting from the nail tip. We recommend applying reflective glitter gel polish heavily at the tip and gradually reducing the density as you move toward the cuticle using an ombre brush for smooth blending. This technique creates a mesmerizing effect where sparkle naturally fades from intense to subtle.
Precision placement gives you complete control over your glitter distribution. Using a toothpick, we can individually place glitters on the nail for a more deliberate scattered effect that looks professionally crafted. This method works exceptionally well when creating accent nails or when you want exact glitter patterns within your ombre design.
Sealing your sparkle fade ensures longevity and enhances the overall effect. We always apply a thin layer of clear polish over the glitters to secure them in place and boost their reflective properties. For dramatic results, chunky glitters applied more densely at the tip create bold statements perfect for special occasions.
Holographic Ombre Effects
Building holographic gradients requires layering different colored holographic polishes strategically. We start by applying darker holographic shades at the nail tip and gradually transition to lighter holographic tones toward the cuticle area. This creates depth while maintaining the prismatic effect that makes holographic polishes so captivating.
Blending holographic colors demands patience for the best rainbow reflection results. We apply each color in thin layers, allowing proper drying time between applications to prevent the holographic particles from becoming muddy or losing their distinctive shine. The key lies in maintaining the integrity of each holographic shade while creating seamless transitions.
Finishing touches amplify the holographic ombre’s full potential through proper sealing. We complete every holographic ombre design with a high quality top coat that enhances the prismatic effect while providing protection. This final step transforms the manicure from pretty to absolutely stunning under various lighting conditions.
Dark Gothic Ombre Nail Ideas

Dark gothic ombre designs offer a perfect way to embrace dramatic elegance while maintaining the sophisticated gradient techniques we’ve explored. These mysterious color combinations create striking contrasts that capture attention and make bold fashion statements.
Black to Gray Gradients
Black to Gray Gradients create the ultimate dramatic effect by transitioning from deep obsidian at the base to soft charcoal toward the tips. We achieve this mysterious look by starting with a black base coat and gradually blending lighter gray shades using a damp makeup sponge. The technique involves dabbing the sponge with both colors and gently pressing it onto the nail while the polish remains slightly wet.
Building this gradient requires patience since we need to work with thin layers to prevent streaking. Start with your darkest black polish at the cuticle area and blend upward toward the nail tips using gentle bouncing motions. Add progressively lighter gray tones as you move toward the free edge of the nail. The key lies in overlapping colors while they’re still tacky to create seamless transitions.
Finishing touches include applying a high quality matte top coat to enhance the gothic aesthetic or choosing a glossy finish for added depth. We recommend using a small brush to clean up any excess polish around the cuticles before the final coat application.
Purple to Black Fades
Purple to Black Fades combine elegance with gothic drama by transitioning from rich purple hues at the base into mysterious black tips. We create this sophisticated look by selecting deep purple shades like eggplant or burgundy and gradually blending them into jet black. The color combination offers versatility since purple adds a touch of luxury while black maintains the gothic edge.
Technique execution begins with applying your chosen purple shade as the base color, focusing on the cuticle area and lower half of the nail. While the polish remains workable, we blend black polish starting from the tip and working downward toward the center. Using a makeup sponge allows for better control over the gradient transition compared to brush techniques.
Layering becomes crucial for achieving smooth color transitions without muddy results. We apply multiple thin coats rather than attempting to create the entire gradient in one application. Each layer should be allowed to partially dry before adding the next, preventing the colors from mixing too heavily and losing their distinct characteristics.
Enhancement options include adding subtle shimmer to the purple base or incorporating metallic accents along the gradient line for extra visual interest.
Rainbow Ombre Nail Ideas

Rainbow ombre nails bring together vibrant color combinations that create stunning visual transitions across your manicure. We’ll explore how to achieve these eye-catching designs using various techniques that blend multiple colors seamlessly.
Multi-Color Transitions
Gradual color shifts make rainbow ombre designs truly spectacular when you transition through the entire color spectrum. We recommend starting with red at the cuticle and progressing through orange, yellow, green, blue, and purple toward the nail tip for a classic rainbow effect. Layered hues work best when you apply multiple thin coats of each color, allowing each layer to dry completely before adding the next.
Blending becomes easier when you use a damp makeup sponge to merge adjacent colors at their meeting points. We suggest working with two or three colors at a time rather than attempting all six simultaneously. Smooth transitions develop when you dab the sponge gently along the color boundaries, creating natural gradients between each hue.
Reverse rainbow techniques offer a unique twist by starting with purple at the cuticle and ending with red at the tips. We find this approach creates a more dramatic effect that draws attention to the nail tips. Professional results come from patience and practice, as rushing the blending process often leads to muddy color combinations.
Pastel Rainbow Effects
Soft color palettes create elegant rainbow ombre designs that work beautifully for everyday wear or special occasions. We love using pastel versions of traditional rainbow colors like baby pink, peach, butter yellow, mint green, powder blue, and lavender for a gentler appearance. These subtle shades blend more easily than their vibrant counterparts, making them perfect for beginners.
Delicate gradients emerge when you apply pastel polishes in thin layers, building up the color intensity gradually. We recommend using white polish as a base coat to enhance the pastel colors and create better opacity. Blending pastels requires a lighter touch since these colors are naturally more forgiving than bold shades.
Sophisticated finishes develop when you seal pastel rainbow ombre with a high quality top coat that enhances the soft color transitions. We suggest adding a subtle shimmer overlay to catch light and create depth without overwhelming the delicate color palette. These pastel rainbow designs complement any outfit while still showcasing your creative nail art skills.
French Ombre Nail Ideas

French ombre nails combine the timeless elegance of classic French manicures with modern gradient techniques. This sophisticated approach transforms traditional white tips into stunning color transitions that elevate any look.
Modern French Tip Variations
Vertical ombre effects create striking optical illusions that break away from horizontal gradient patterns. We recommend using bold color combinations like red and black for dramatic impact, applying the darker shade at one side and blending toward the lighter tone using a makeup sponge.
Pigment powder techniques offer professional level results when paired with specialized tools like a BrenDek brush. These methods allow for precise control over color placement and create seamless blends that appear naturally airbrushed.
Gel polish layering provides longer lasting wear and enhanced color vibrancy compared to traditional polish methods. We suggest building thin layers gradually, allowing each coat to cure properly under LED or UV light for optimal results.
Sponge application methods remain the most accessible technique for achieving smooth gradient transitions. This approach works effectively for beginners and professionals alike, creating natural looking ombre effects with minimal equipment.
Colored French Ombre Styles
Multi colored gradients transform classic French tips into vibrant masterpieces using sunset inspired hues or soft pastel combinations. We recommend starting with complementary colors on the color wheel and blending them using a damp makeup sponge for seamless transitions.
Green themed designs work beautifully for seasonal celebrations, particularly using gel polishes like ‘Out Late’ and ‘Ivy’ for Christmas inspired manicures. These deeper tones create sophisticated gradients that complement winter wardrobes perfectly.
Matte finish applications add contemporary sophistication to any ombre French design by eliminating shine and creating texture contrast. We suggest applying matte top coat after the gradient is complete and fully dry to prevent smudging or color bleeding.
Sparkle integration enhances colored ombre effects without overwhelming the base gradient, using micro glitter or shimmer particles concentrated at the tips. This technique adds glamour while maintaining the elegant foundation of French ombre styling.
Seasonal Ombre Nail Ideas

We can perfectly capture the essence of changing seasons through carefully curated ombre nail designs that reflect nature’s own color transitions. These seasonal variations allow us to express our style while staying in harmony with the time of year.
Fall Color Combinations
Copper ombre designs showcase warm, subtle tones that perfectly complement the autumn season’s golden atmosphere. We recommend blending rich copper shades from deep bronze at the cuticle to bright penny copper at the tips for maximum impact.
Brown ombre incorporates earthy shades that mirror falling leaves and can be elevated with metallic accents. Adding gold, silver, or rose gold sparkle creates depth while maintaining the natural autumn aesthetic we love.
Red and orange ombre combinations capture the vibrant essence of fall foliage and seasonal pumpkins. Blending deep crimson into bright tangerine creates a striking gradient that celebrates autumn’s most iconic colors.
Pumpkin spiced ombre draws inspiration from everyone’s favorite fall treat by combining warm orange and sunny yellow shades. This cozy color combination evokes memories of pumpkin pie and crisp autumn days, making it perfect for seasonal celebrations.
Winter Holiday Themes
Chrome ombre delivers a glittery, festive appearance that’s ideal for holiday parties and special winter events. We achieve this look by layering chrome powder over gradient base colors for maximum reflective impact.
Silver ombre remains a classic choice that adds sophisticated elegance with its subtle glitter finish. This timeless combination works beautifully with both formal winter wear and casual holiday gatherings.
Halloween moon phases black ombre features dramatic dark oranges transitioning into deep black, accented with rich browns and burgundy tones. We often pair this mysterious gradient with spooky nail art elements like crescent moons and tiny bats for the ultimate Halloween aesthetic.
Professional Ombre Nail Ideas

We’ve curated sophisticated ombre designs that maintain workplace professionalism while showcasing your personal style through elegant gradient techniques.
Office-Appropriate Gradients
Nude to lavender transitions create the perfect balance between subtlety and sophistication for corporate environments. We recommend starting with a nude base coat and gradually blending into soft lavender tips using a damp makeup sponge. This classic gradient offers a nearly invisible grow-out phase, extending the life of your manicure between salon visits.
French ombre manicures elevate traditional French tips through seamless color transitions from neutral bases to slightly darker tips. We suggest using beige or pale pink shades for this timeless look that complements any professional attire. Apply the darker shade sparingly at the tips and blend downward for a natural gradient effect.
Soft pastel gradients in pale pink, baby blue, or mint green deliver sophisticated elegance without overwhelming your professional appearance. We find these gentle colors work exceptionally well when applied in thin layers, allowing each shade to blend seamlessly into the next. Finish with a glossy top coat to enhance the gradient’s smooth appearance and professional polish.
Subtle Work-Friendly Options
Monochromatic gradients using different shades of the same color family create understated elegance perfect for conservative work environments. We recommend working with neutral tones like beige, gray, or taupe to achieve this refined look. Start with the lightest shade at the cuticle and gradually deepen the color toward the tip for a sophisticated ombre effect.
Minimalist gradient placement focuses the ombre effect on exact nail areas rather than covering the entire surface. We suggest concentrating the gradient at just the tips or cuticle areas to create subtle visual interest without bold statements. This technique works particularly well when you want to add dimension while maintaining a professional appearance that meets strict workplace dress codes.
Conclusion
We’ve explored an incredible spectrum of ombre nail designs that prove this trend’s enduring appeal and versatility. From subtle professional gradients to bold rainbow statements each style offers unique ways to express your personality while maintaining polished sophistication.
The beauty of ombre nails lies in their adaptability – whether you’re preparing for a corporate meeting or a weekend celebration there’s a gradient combination that perfectly matches your mood and occasion. The techniques we’ve shared make these stunning looks achievable at home with practice and patience.
Remember that mastering ombre nails is about experimenting with colors textures and application methods until you find what works best for you. Start with simpler gradients and gradually work toward more complex designs as your confidence grows.
Your nails are a canvas for creativity and ombre techniques offer endless possibilities to showcase your personal style while staying on-trend.
Frequently Asked Questions
What are ombre nails and why are they popular?
Ombre nails feature a seamless color gradient that blends one shade into another, creating a stunning visual transition. They’re popular because they transform ordinary manicures into artistic masterpieces while being versatile enough for both everyday wear and special occasions. With the right techniques, anyone can achieve beautiful ombre effects at home.
What are the best techniques for creating ombre nails?
The most effective techniques include sponge blending (using a damp makeup sponge), brush stippling for texture, and powder dipping for smooth gradients. Each method offers unique advantages – sponges create seamless transitions, brushes add texture, and powders provide professional-looking results. Practice and patience are key to mastering these techniques.
Which ombre nail colors work best for beginners?
Classic pink to white gradients are perfect for beginners due to their forgiving nature and timeless appeal. Neutral combinations like nude to beige or brown to cream are also excellent starting points. These color pairs blend easily and complement most skin tones while being appropriate for any occasion.
How do I achieve smooth color transitions in ombre nails?
Apply thin layers using a damp makeup sponge, working quickly before the polish dries. Start with lighter colors as your base, then gradually blend darker shades. Use gentle dabbing motions rather than wiping, and seal with a high-quality top coat for a professional finish and enhanced durability.
Can ombre nails be professional workplace-appropriate?
Yes, professional ombre designs include nude to lavender transitions, soft pastel gradients, and monochromatic color families. French ombre manicures and minimalist gradient placements offer subtle elegance perfect for office settings. Choose muted tones and avoid overly dramatic color contrasts for workplace appropriateness.
How can I make my ombre nails last longer?
Use a quality base coat before application and seal with a high-grade top coat for protection. Apply thin layers to prevent chipping, and allow each coat to dry completely. For gel polish versions, proper curing under UV/LED lights extends wear time significantly compared to regular polish.
What’s the difference between glitter ombre and regular ombre nails?
Glitter ombre incorporates sparkles through fade techniques – heavy application at tips gradually reducing toward cuticles. Holographic effects use layered colored holographic polishes for prismatic depth. Regular ombre focuses purely on color gradients without sparkle elements, offering a more understated elegant look.
Are seasonal ombre designs worth trying?
Seasonal ombre designs let you express personal style while harmonizing with the time of year. Fall features warm copper and pumpkin spice tones, winter showcases chrome and silver effects, while spring and summer embrace bright, vibrant color combinations. They’re perfect for matching your mood and wardrobe.


