We’ve all felt that magnetic pull toward the ocean’s endless beauty – and now you can carry that mesmerizing charm right on your fingertips. Ocean nail ideas have become one of the hottest trends in nail art, transforming ordinary manicures into stunning aquatic masterpieces that capture the sea’s most captivating elements.
From shimmering mermaid scales to dramatic wave patterns, ocean-inspired nails offer endless possibilities for expressing your love of coastal vibes. Whether you’re dreaming of tropical beaches or deep-sea adventures, these designs bring the water’s tranquil essence to your everyday style.
We’ll jump into the most gorgeous ocean nail ideas that’ll make waves wherever you go. Get ready to discover techniques, color combinations, and creative designs that’ll transform your nails into tiny canvases celebrating the sea’s natural artistry.
Classic Ocean Blue Gradient Nails
Ocean blue gradient nails capture the serene beauty of deep waters transitioning to shallow coastal areas. We’ll show you how to create this timeless oceanic look that’s perfect for any season.
Light to Dark Blue Ombre Technique
Starting with a light sky blue at the cuticle creates the perfect foundation for your gradient design. We recommend using a makeup sponge to blend three different blue shades seamlessly from light to dark. Apply the lightest blue polish as your base coat and let it dry completely.
Dabbing the middle tone onto a damp makeup sponge helps create smooth color transitions. We place this medium blue shade about halfway down the nail and gently press the sponge in a rolling motion. The key is working quickly while the polish remains wet for optimal blending.
Building up the darkest navy blue at the nail tips requires patience and multiple thin layers. We suggest using a deep ocean blue or midnight navy for maximum impact. Apply this darkest shade with the sponge technique, focusing on the tips and gradually fading upward.
Sealing your gradient with a high quality top coat prevents chipping and enhances the color depth. We always apply two thin coats of clear polish to lock in the ombre effect and create a glossy finish.
Glitter Accent for Sparkle Effect
Adding fine silver glitter over your blue gradient mimics sunlight dancing on ocean waves. We prefer using a glitter polish with varied particle sizes to create realistic water sparkle. Apply the glitter concentrate more heavily at the nail tips where the darkest blue creates contrast.
Layering holographic glitter creates dimensional sparkle that shifts with light movement. We recommend applying glitter to every other nail for a balanced look that isn’t overwhelming. The holographic particles catch light beautifully against the deep blue background.
Focusing glitter application along the nail edges enhances the wave like appearance of your gradient. We use a small detail brush to place concentrated glitter particles strategically. This technique creates the illusion of foam and bubbles found in ocean waters.
Buffing the glitter smooth before your final top coat ensures a professional salon finish. We gently file any raised glitter pieces to create an even surface. The final clear coat locks everything in place while maintaining the ocean inspired sparkle effect.
Seashell and Starfish Nail Art Designs

These coastal motifs bring the ocean’s treasures directly to your fingertips through detailed artwork and dimensional elements. Seashells and starfish create playful, beachy touches that capture the essence of seaside adventures.
3D Seashell Embellishments
Adding texture transforms flat ocean designs into tactile masterpieces that demand attention. Small seashell shaped beads, rhinestones, and molded acrylic pieces create realistic dimension when affixed to accent nails. We recommend limiting these embellishments to one or two nails to maintain balance and visual impact.
Placement strategy works best when 3D elements sit atop ombre or foam sponged backgrounds that mimic ocean waves. The contrast between smooth gradient bases and textured seashells creates depth that makes your manicure stand out. These dimensional pieces pair beautifully with soft blues and whites that simulate ocean and sand environments.
Application technique requires careful positioning of each embellishment while the base coat remains slightly tacky. Press each seashell piece gently into place, then seal everything with a quality top coat. The result delivers a realistic ocean scene that captures light and creates movement with every hand gesture.
Hand-Painted Starfish Motifs
Freehand artistry allows unlimited creativity when painting starfish designs using fine brushes and dotting tools. Artists typically create these motifs atop sandy beige or gradient backgrounds that represent ocean floors. We’ve found that varying starfish sizes across different nails creates visual interest and prevents repetitive patterns.
Color combinations work best when using darker blues, teals, or iridescent glitters to simulate water and light effects. The starfish themselves can range from realistic coral tones to stylized bright colors that pop against oceanic backgrounds. Accent details like tiny pearls or microbeads mimic sand particles or water droplets for added realism.
Customization options make hand painted starfish suitable for various skill levels from beginners to advanced nail artists. Simple five pointed shapes work perfectly for newcomers, while experienced artists can add shading, texture lines, and dimensional details. This technique results in unique, eye catching manicures that showcase personal artistic expression.
Coral Reef Inspired Nail Colors

Coral reef nail designs capture the vibrant energy of underwater ecosystems through bold, saturated colors that mirror nature’s most spectacular marine displays. These designs transform your nails into miniature works of art celebrating the ocean’s living treasures.
Vibrant Coral and Pink Combinations
Bold coral paired with pink creates stunning nail art that instantly transports you to tropical paradise. We recommend combining peachy corals with fuchsia pinks for maximum visual impact, while soft rose tones offer a more subtle approach to this vibrant color story.
Gradient techniques work beautifully with these coral and pink combinations, allowing colors to flow seamlessly from one shade to another. Creating accent nails with these hues adds dimension without overwhelming the overall design aesthetic.
Metallic gold embellishments elevate coral and pink combinations to luxury status. Pearl accents provide sophisticated shine that mimics the natural luster found in ocean treasures, while these metallic elements catch light beautifully throughout the day.
| Color Combination | Enhancement Options | Design Style |
|---|---|---|
| Peachy coral + Fuchsia pink | Gold metallics | Gradient accent |
| Soft coral + Rose pink | Pearl embellishments | Subtle blend |
| Bright coral + Hot pink | Chrome powder | Bold statement |
Textured Coral Effect Techniques
Sponge dabbing creates the most authentic coral texture by layering multiple colors with a makeup sponge. This technique produces soft, organic patterns that closely resemble natural coral formations found in reef environments.
Acrylic and gel applications using dotting tools allow for raised, dimensional textures that bring coral designs to life. We suggest using cuticle sticks to create detailed branch-like patterns that mimic actual coral structures with impressive three-dimensional effects.
Clear gel droplets applied strategically across the nail surface create wet, glossy effects that enhance the oceanic appearance. Chrome powders and tiny bead embellishments add natural sheen that reflects light just like real coral underwater.
Appliqués and decals offer quick answers for achieving mother-of-pearl or shell-like finishes without advanced artistic skills. These pre-made elements provide professional results while saving time during your coral reef manicure process.
Wave Pattern Nail Art Styles

Wave patterns bring the rhythmic beauty of ocean swells directly to your nails. These designs offer the perfect balance between minimalist elegance and bold, playful expression.
Freehand Wave Painting Methods
Freehand wave painting gives us complete creative control over our ocean-inspired designs. This technique requires a fine nail art brush and steady hand to achieve flowing, natural-looking waves. We start by applying a light blue or white base color and allowing it to dry completely before beginning our wave work.
Creating layered wave effects adds depth and dimension to our designs. Using a small nail art brush, we paint wavy lines in contrasting colors like teal, mint, or deeper blues. The key lies in building up multiple layers to achieve that coveted 3D or ombré effect that mimics real ocean movement.
Beginners can achieve professional results using simple guiding tools. Stencils or strips of masking tape help ensure clean, crisp edges while we’re still developing our freehand skills. This approach lets us create stunning wave patterns without years of practice, making ocean nail art accessible to everyone.
Stamping Wave Designs
Stamping delivers fast, precise wave patterns with professional consistency. This technique uses specially engraved stamping plates featuring intricate wave designs. We coat the plate with polish, scrape away excess product, then transfer the complete design onto our nail using a stamper tool.
Complex wave patterns become achievable through stamping technology. Pinterest showcases many stamped wave designs that would take hours to paint freehand. The speed and accuracy of stamping make it particularly popular for intricate or repetitive patterns that demand perfect symmetry.
Minimalist stamping creates clean, modern ocean aesthetics. White or pastel wave stamps against nude or light blue backgrounds offer sophisticated elegance. These subtle designs work perfectly for professional settings while still celebrating our love for ocean-inspired beauty.
| Technique | Tools Needed | Best For |
|---|---|---|
| Freehand Painting | Brush, polish, tape | Custom, creative designs |
| Stamping | Stamping plate, stamper | Fast, consistent patterns |
| Stenciling (Washi) | Washi tape, scissors | Minimalist, clean lines |
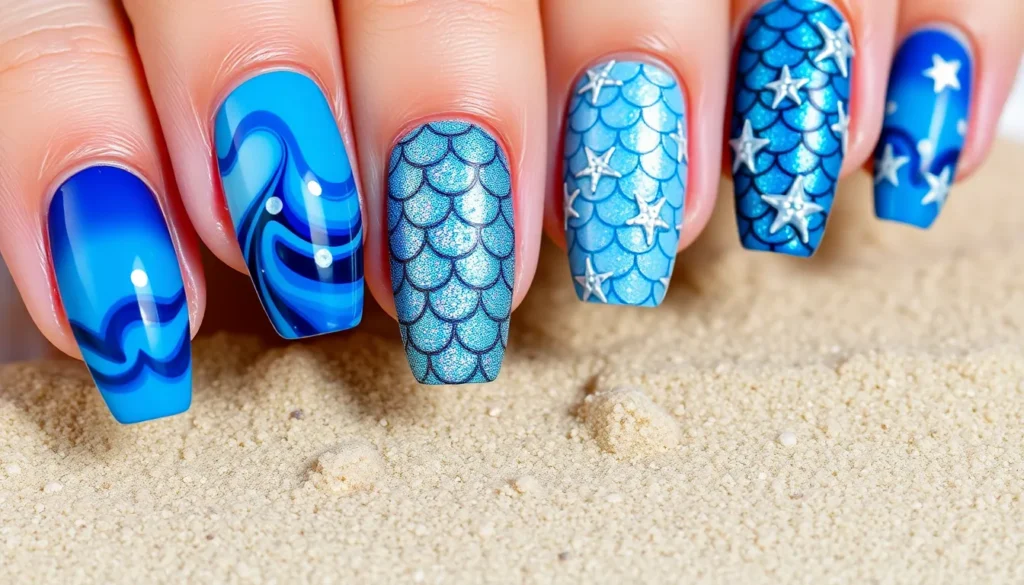
Mermaid Scale Nail Designs

Transform your nails into enchanting underwater masterpieces with designs that capture the mystical allure of mermaid tails. These captivating patterns recreate the overlapping scale textures found on ocean creatures through layered polishes and specialized techniques.
Iridescent Scale Patterns
Create stunning rainbow shimmer effects that mirror the natural beauty of seashells and fish scales with iridescent polishes. Glass flake nail polishes reflect and refract light to produce mesmerizing multicolor displays that shift and change as you move your hands. Apply these effects using gradient blending techniques, starting with a base color and layering iridescent particles on top for maximum impact.
Ombre blending works exceptionally well for scale patterns, allowing colors to flow seamlessly from one shade to another like real underwater scales. We recommend using translucent polishes with metallic flakes to build depth and dimension in your design. Glitter additions enhance the sparkle factor, creating an even more dramatic transformation that catches light from every angle.
Professional techniques involve buffing gel polish applications for glossy finishes that amplify the iridescent properties. Stamping plates offer precise scale shapes for those who prefer structured patterns over freehand artistry. Advanced nail artists use 3D acrylic applications to build raised scale structures, adding physical texture that makes the design truly three dimensional.
Holographic Scale Effects
Generate prismatic rainbow effects that closely resemble luminous ocean surfaces with holographic nail polishes and powders. These products create full spectrum displays that change dramatically depending on viewing angle and lighting conditions. Holographic topcoats work beautifully over existing scale patterns or gradient backgrounds, instantly transforming ordinary designs into extraordinary underwater fantasies.
Application methods focus on layering holographic pigments over prepared base colors for maximum visual impact. Ever-changing reflective properties make these effects highly versatile, working equally well for subtle shimmer or bold statement looks. We suggest creating gradient backgrounds first, then applying holographic elements to enhance the scale pattern structure.
Professional results come from understanding how holographic materials interact with different base colors and lighting environments. Darker bases create more dramatic contrast, while lighter shades allow the holographic properties to shine through more subtly. Combining holographic powders with iridescent particles creates complex layered effects that truly capture the magical essence of mermaid scales swimming through ocean depths.
Tropical Fish Nail Art Inspirations

Tropical fish motifs bring vibrant, playful energy to your manicure with their lively colors and underwater patterns. These designs capture the essence of marine life through bold stripes and delicate watercolor effects.
Clownfish Orange and White Stripes
Clownfish nail art recreates the iconic alternating stripes that make these fish instantly recognizable. We recommend using bright orange and crisp white polish to achieve the bold contrast that defines this aquatic look.
Hand painting creates a more organic, handmade effect that adds character to each stripe. Artists typically start with an orange base coat, then use a thin brush to add white stripes in varying widths. This technique allows for subtle imperfections that mirror natural fish patterns.
Nail art tape delivers sharp, clean lines for those seeking precision. We suggest applying tape in straight lines across the nail, painting over it with contrasting polish, then removing the tape while the polish is still slightly wet. This method ensures professional looking results.
Glossy top coat application enhances the design’s shine and mimics the appearance of water reflecting light. The high gloss finish creates depth and makes the colors appear more vibrant, capturing that underwater luminescence effect.
Angelfish Watercolor Techniques
Angelfish inspired designs favor soft, flowing watercolor effects that blend silver, blue, and white tones. These techniques evoke the fish’s iridescent scales through translucent layering and artistic blending.
Sponge application creates the signature watercolor effect by dabbing polish in overlapping layers. We recommend using a makeup sponge to blend colors while they’re still wet, building up translucent layers that mimic the flowing movement of angelfish fins.
Brush layering allows for more controlled color placement and detailed work. Artists use flat brushes to apply thin, translucent strokes that flow across the nail surface. This technique works particularly well for creating the gradient effects seen in angelfish coloring.
Fine detail work adds finishing touches like fins and eyes using nail art pens or thin brushes. These elements transform the abstract watercolor base into recognizable fish motifs. Each nail becomes a miniature underwater scene with these carefully placed details.
Complementary design elements like coral, bubbles, or mermaid scales enhance the overall aquatic theme. Pinterest and YouTube tutorials frequently showcase these combinations, demonstrating how tropical fish designs integrate with broader ocean inspired nail art collections.
Pearl and Bubble Accent Nails

We can elevate any ocean nail design by incorporating dimensional pearl and bubble elements that capture the tactile beauty of underwater treasures. These accent techniques add luxurious texture while maintaining the whimsical charm of sea-inspired nail art.
Pearl Stud Placement Ideas
Pearl studs create elegant focal points when strategically placed to mimic natural ocean elements. We recommend clustering these small pearl beads near the cuticle area for a subtle yet striking accent that draws the eye upward along the nail.
Edge placement works beautifully when we line pearls along the nail’s sides to replicate wave patterns or sea foam movement. This technique creates visual flow while maintaining balance across the manicure.
Scattered arrangements give us the most natural underwater effect by randomly placing pearls across accent nails. The irregular spacing mimics floating bubbles or treasure scattered along the ocean floor.
Combined motifs allow us to pair pearl studs with tiny seashell or starfish decals for complete coastal storytelling. We can anchor these combinations with gradient backgrounds that transition from deep ocean blues to shallow turquoise.
Bubble Dot Patterns
Bubble dot patterns simulate rising underwater bubbles through carefully positioned circular accents using gel or polish. We achieve the most realistic effect by creating gradient sizing that starts with tiny dots near the base and progressively increases toward the nail tip.
Layered bubble effects develop depth when we apply dots in multiple sizes and opacity levels. Clear or translucent white dots work best over blue or teal base colors to capture light refraction through water.
Clustered patterns combine beautifully with wave backgrounds or sea creature silhouettes for comprehensive ocean scenes. We can create movement by spacing bubble clusters asymmetrically across the nail surface.
Gradient applications use dot sizing to guide the eye from small bubbles at the cuticle to larger ones at the tip. This technique mimics how bubbles naturally grow as they rise toward the surface.
Shimmer integration enhances bubble dots when we add fine glitter or holographic elements within each circle. The reflective properties create authentic underwater light play that changes with hand movement.
Nautical Anchor and Rope Designs

Building on these oceanic inspirations, we’ll explore timeless nautical motifs that bring maritime elegance to your manicure. These classic designs offer sophisticated alternatives to vibrant tropical themes while maintaining that beloved ocean connection.
Classic Navy and White Anchors
Navy blue anchors against crisp white backgrounds create the perfect foundation for sophisticated nautical nail art. We recommend applying this design to accent nails while keeping other fingers in complementary solid colors like soft blue or neutral beige. Bold anchor silhouettes work best when painted with steady strokes using a fine detail brush or nail art pen.
Metallic accents transform basic anchor designs into luxurious statements that catch light beautifully. Gold foil details along anchor edges add warmth and elegance, while silver accents create a cooler, more modern aesthetic. Consider adding tiny rope details around the anchor base using thin striping brushes for authentic maritime appeal.
Professional techniques involve using stencils or vinyl decals for perfectly symmetrical anchor shapes. Place these templates carefully on dried white base coats, then fill with navy polish using gentle dabbing motions to prevent bleeding. Remove stencils while polish remains slightly wet for clean, sharp edges that define each anchor perfectly.
Rope Braiding Nail Art
Intricate rope patterns bring dimensional texture to ocean themed manicures through carefully crafted braiding effects. We achieve these looks by layering thin lines in alternating directions, creating the twisted appearance of actual nautical rope. Start with a neutral base like sandy beige or soft gray to make rope details stand out prominently.
Textured applications using thick gel polish create raised rope effects that feel authentic under fingertips. Apply gel in thin rope shaped lines, then use a dotting tool to create indent patterns that mimic actual rope fibers. Cure each layer properly to build substantial dimension while maintaining durability throughout daily wear.
Intertwining rope designs with anchor motifs creates comprehensive nautical themes that tell complete maritime stories. Position rope elements to appear as if they’re securing anchors or creating decorative knots around nail edges. Vary rope thickness across different nails to add visual interest while maintaining cohesive nautical aesthetics that celebrate classic seafaring traditions.
Sea Glass Color Combinations

Sea glass nails capture the ethereal beauty of ocean treasures washed smooth by waves and time. These translucent, weathered hues bring a sophisticated coastal elegance to your fingertips.
Frosted Glass Finish Techniques
Matte top coat application transforms any shiny base color into an authentic sea glass appearance. Apply your chosen ocean hue first, then seal with a quality matte topcoat for that signature frosted finish we love in genuine sea glass pieces.
Textured glass effects elevate the realism of your sea glass nails through strategic layering. Incorporate fine glitter or tiny glass beads into wet polish to create subtle texture that mimics real weathered glass. These dimensional elements catch light beautifully while maintaining the soft, frosted aesthetic.
Sponge blending techniques create authentic opacity variations found in natural sea glass. Dab a makeup sponge lightly over semi dry polish to achieve those characteristic cloudy patches and transparency shifts that make each piece unique.
Pastel Ocean Hues
Soft blues and greens form the foundation of our sea glass color palette, evoking calm coastal waters. Combine aqua with deeper turquoise shades for classic depth, or blend buildable green and blue hues for natural sea glass effects that change subtly in different lighting.
Jade and mint combinations offer refreshing alternatives to traditional blue tones. Pair rich jade green with delicate pastel mint for an oceanic vibe that feels both sophisticated and playful. These complementary shades work beautifully together in gradient techniques or as alternating accent nails.
Seafoam green applications capture the essence of ocean foam in a single, versatile shade. This popular pastel hue works stunning as a standalone color or blended with pale pinks and purples for whimsical touches that still maintain coastal authenticity.
Rose and lavender accents add unexpected warmth to sea glass designs without losing their oceanic connection. These pale pink and purple shades mirror the subtle color variations found in rare sea glass pieces, creating unique manicures that stand out from typical beach inspired looks.
Deep Sea Dark Blue Nail Ideas

Deep sea dark blue nail ideas capture the mysterious depths of ocean waters through rich, saturated colors that evoke the profound beauty of underwater realms.
Midnight Ocean Gradient
Midnight ocean gradients blend dark navy blues with shimmering aquatic tones to create sophisticated depth effects. We recommend combining shimmery blue and green shades for a soft gradient that mimics the ocean’s mysterious depths. Chrome and aura manicure techniques capture the natural beauty of light and dark water patches while adding extra shine to your design.
Application techniques for midnight gradients include:
- Sponge blending from deep navy at the cuticle to lighter blue at the tips
- Layering translucent shimmer over solid dark bases for dimensional effects
- Adding metallic silver highlights to simulate moonlight on water
- Creating asymmetrical gradient patterns that follow natural water movement
Professional finish techniques involve sealing your gradient with glossy top coat to enhance the depth perception. Consider incorporating fine holographic particles that catch light differently at various angles. This creates an authentic underwater lighting effect that changes as you move your hands.
Bioluminescent Glow Effects
Bioluminescent glow effects transform ordinary dark blue nails into mesmerizing displays of underwater magic. We achieve these effects using glow in the dark nail polish or specialized LED embedded clear gel applications for futuristic looks. Glowing waves create captivating patterns when applied over dark blue backgrounds using wave shaped stencils.
Essential techniques for bioluminescent effects:
- Charging glow polish under UV light before application for maximum brightness
- Creating gradient glow patterns from intense at the tips to subtle near cuticles
- Layering clear gel with embedded micro LED lights for advanced dimensional effects
- Applying glow accents in organic bubble or plankton inspired patterns
Advanced applications include mixing phosphorescent powder with clear polish for custom glow intensities. Position these accents strategically along nail edges or in flowing patterns that mimic natural bioluminescent phenomena. The result creates an otherworldly effect that appears to pulse with life under low lighting conditions.
Conclusion
Ocean nail art offers endless possibilities to express your love for the sea through stunning manicure designs. From shimmering mermaid scales to mysterious deep-sea gradients we’ve explored techniques that’ll transform your nails into captivating works of art.
Whether you’re drawn to vibrant coral reefs minimalist wave patterns or elegant nautical themes there’s an ocean-inspired design that matches your style and skill level. These aquatic nail ideas let you carry a piece of the ocean’s beauty with you wherever you go.
We encourage you to experiment with different techniques and color combinations to create your own unique oceanic masterpiece. Jump into these creative possibilities and let your nails reflect the endless wonder of the sea.
Frequently Asked Questions
What are ocean-inspired nail art designs?
Ocean-inspired nail art designs are manicures that capture the beauty of the sea through various techniques and patterns. These include mermaid scales, wave patterns, seashell motifs, coral reef colors, and nautical themes. They transform ordinary nails into stunning representations of coastal aesthetics using specialized techniques, color combinations, and dimensional elements.
How do you create ocean blue gradient nails?
To create ocean blue gradient nails, use multiple shades of blue polish and a makeup sponge for blending. Start with the lightest blue at the tips and gradually blend to darker blues toward the cuticle. Apply each color to the sponge and dab onto the nail for seamless transitions. Seal with a top coat and add silver glitter for sparkle.
What techniques work best for seashell nail art?
For seashell nail art, use 3D embellishments applied to one or two accent nails for balance. Position them on ombre or sponged backgrounds for depth. Alternatively, hand-paint seashell motifs on sandy beige backgrounds. Vary sizes for visual interest and use fine brushes for detailed artwork. Both methods work well for different skill levels.
How can you achieve coral reef-inspired nail colors?
Achieve coral reef colors by combining peachy corals with fuchsia pinks for tropical vibes, or use soft rose tones for subtlety. Apply gradient techniques for smooth color transitions. Enhance with metallic gold embellishments and pearl accents. Use sponge dabbing for textured coral effects or clear gel droplets for a wet, dimensional look.
What are the best methods for creating wave pattern nails?
Create wave patterns through freehand painting for creative control, allowing color layering for depth. Beginners can use stencils or masking tape for clean edges. Stamping techniques offer fast, precise patterns with consistent results. For professional settings, try minimalist wave designs that provide sophisticated aesthetics while maintaining the ocean theme.
How do you create mermaid scale nail designs?
Create mermaid scales using layered polishes and specialized techniques. Apply iridescent polishes with gradient blending for rainbow shimmer effects. Add glitter for extra sparkle. For holographic effects, use polishes that create prismatic displays changing with light. Focus on achieving glossy finishes through proper layering and professional application techniques.
What are some tropical fish nail art ideas?
Tropical fish designs include clownfish motifs with bold orange and white stripes using hand-painting or nail art tape for precision. Try angelfish-inspired watercolor techniques for soft, flowing effects that mimic iridescent scales. Enhance with complementary elements like coral patterns and bubble dots to complete the aquatic theme.
How can you incorporate pearls and bubbles into ocean nails?
Add dimensional pearls in clusters near the cuticle or along nail edges to mimic wave patterns. Create bubble dot patterns using carefully positioned circular accents in gradient sizes. Use shimmer integration for realistic effects. These elements add luxurious texture while maintaining the whimsical charm of sea-inspired nail art.
What are nautical anchor and rope nail designs?
Nautical designs feature classic navy and white anchor motifs with metallic accents for elegance. Use professional techniques for clean, sharp edges. Incorporate intricate rope braiding patterns for dimensional texture. These sophisticated alternatives to tropical themes maintain ocean connections while offering more subtle, professional-appropriate designs.
How do you achieve sea glass nail effects?
Create sea glass effects using matte top coats for frosted finishes and fine glitter or glass beads for texture. Use sponge blending for authentic opacity variations. Choose soft blues, greens, and pastels that evoke coastal waters. Combine jade and mint shades for freshness, or add rose and lavender accents for warmth.
What are deep sea dark blue nail ideas?
Deep sea designs use rich, saturated dark blues to capture ocean depths. Create midnight ocean gradients blending dark navy with shimmering aquatic tones. Add bioluminescent glow effects using glow-in-the-dark polish and LED gel applications. These sophisticated designs offer mysterious, captivating patterns that celebrate the ocean’s deeper mysteries.


