We’ve all dreamed of stepping into a nail studio that feels more like a luxurious retreat than a typical salon. The perfect nail studio combines stunning aesthetics with functional design to create an unforgettable experience for every client who walks through the door.
Whether you’re planning to open your first nail salon or looking to refresh your existing space, the right design elements can transform your business from ordinary to extraordinary. From Instagram-worthy accent walls to ergonomic furniture that keeps clients comfortable during lengthy sessions, every detail matters in creating a space that clients will rave about.
Today’s most successful nail studios understand that ambiance drives customer loyalty just as much as exceptional service does. We’ll explore creative design concepts that’ll help you create a memorable environment while maximizing both comfort and profitability. Get ready to discover inspiring ideas that’ll set your nail studio apart from the competition.
Create a Welcoming Reception Area That Sets the Tone
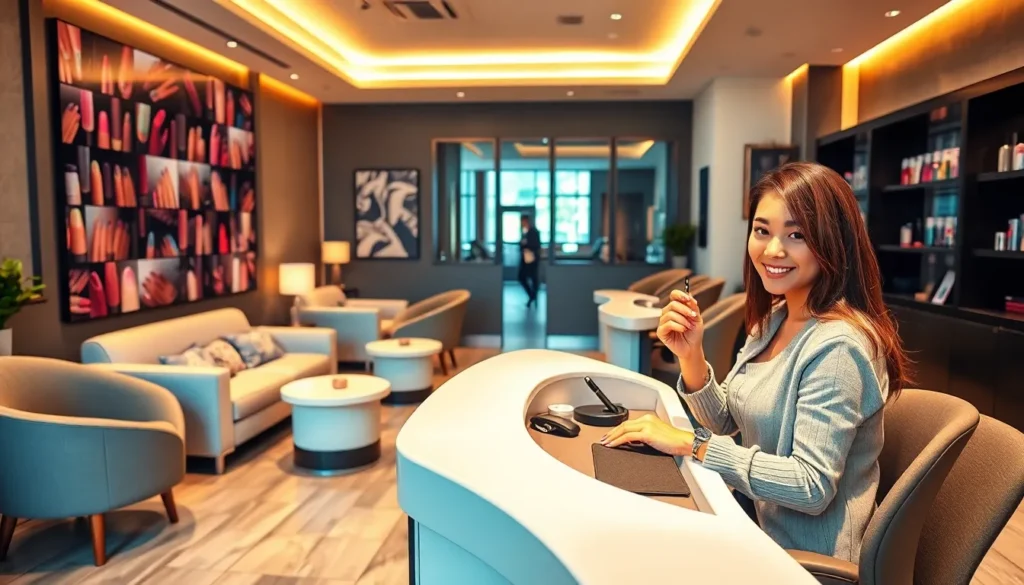
Your reception area creates the first impression that influences how clients perceive your entire nail studio experience. We’ll show you how to transform this crucial space into an inviting gateway that immediately communicates your brand’s luxury and professionalism.
Design a Comfortable Waiting Space
Seating arrangements should prioritize both comfort and visual appeal to keep clients relaxed during their wait. Plush armchairs, velvet benches, or modern sectional sofas create an upscale atmosphere while providing adequate space for multiple clients. We recommend choosing furniture in neutral tones like cream, soft gray, or blush pink that complement your overall color scheme.
Lighting design plays a crucial role in creating ambiance that feels warm and welcoming rather than harsh or clinical. Soft pendant lights, elegant table lamps, or decorative chandeliers provide the perfect illumination for your waiting area. Natural light from windows should be filtered through sheer curtains or blinds to maintain privacy while brightening the space.
Entertainment options keep clients engaged and comfortable while they wait for their appointments. Install a wall mounted TV displaying fashion shows, lifestyle content, or your studio’s promotional videos. We suggest providing current magazines focusing on beauty, fashion, and lifestyle topics that align with your target clientele’s interests.
Display Your Portfolio and Services
Service menus should be prominently displayed using elegant stands, wall mounted frames, or digital displays that showcase your pricing and offerings. Create beautifully designed boards featuring high quality photos of your nail art, gel manicures, and specialty treatments. We recommend updating these displays seasonally to highlight new services or trending designs.
Before and after galleries demonstrate your expertise and inspire clients to try new looks during their visit. Install floating shelves or picture ledges to display framed photos of your best work, rotating them regularly to keep the display fresh. Digital photo frames offer another modern option for showcasing your portfolio with automatically changing images.
Product showcases allow clients to see and touch the premium products you use in your treatments. Display bottles of your preferred nail polish brands, hand creams, and cuticle oils on attractive shelving or in glass cases. We suggest including small informational cards explaining the benefits of each product line you offer.
Add Personal Touches That Reflect Your Brand
Brand elements should be woven throughout your reception area to create a cohesive visual identity that clients remember. Incorporate your logo, signature colors, and design motifs through wall decals, custom artwork, or decorative accessories. We recommend choosing 2-3 key brand colors and repeating them consistently in your furniture, artwork, and accent pieces.
Personal collections add character and conversation starters that help clients connect with your space on a deeper level. Display fresh flowers, interesting books about beauty and fashion, or unique decorative objects that reflect your personality and style. Seasonal decorations like holiday themed accents or summer inspired elements keep your space feeling current and captivating.
Scent and sound create an immersive sensory experience that enhances your reception area’s welcoming atmosphere. Use subtle reed diffusers or essential oil diffusers with calming scents like lavender, vanilla, or eucalyptus that won’t overpower your space. Soft background music or nature sounds played at low volume help clients relax and set the mood for their pampering session.
Choose the Perfect Color Scheme for Your Nail Studio

Creating the right color palette sets the foundation for your studio’s atmosphere and directly impacts how clients perceive your brand. The colors you select will influence everything from client comfort to your studio’s professional image.
Select Calming and Professional Colors
Neutrals form the backbone of successful nail studio design because they create a serene environment that promotes relaxation. White, grey, and beige establish a clean foundation that allows your nail art to take center stage without visual competition. Soft pastels like blush pink, lavender, and sage green add gentle warmth while maintaining the professional aesthetic clients expect.
These calming tones help reduce client anxiety and create a space where they can truly unwind during their service. Research shows that neutral color schemes contribute to a sense of cleanliness and organization that clients associate with quality service. Professional colors also provide versatility when you want to update your decor seasonally without completely redesigning your space.
Incorporate Your Brand Colors Throughout
Strategic placement of your brand colors reinforces your identity and creates memorable experiences for clients. Accent walls, furniture pieces, and decorative accessories offer perfect opportunities to weave your signature colors into the overall design scheme. Your brand colors should appear in approximately 20-30% of your color palette to maintain balance without overwhelming the space.
Consider incorporating your brand hues through nail polish displays, artwork, or even statement lighting fixtures that become conversation pieces. Small touches like colored towels, branded signage, or custom storage answers create cohesive branding that clients will associate with your quality service. This approach ensures your studio remains recognizable while maintaining the calming base that neutral colors provide.
Consider Lighting Effects on Color Perception
Testing your chosen colors under various lighting conditions prevents costly mistakes and ensures your studio looks stunning throughout the day. Natural light, LED fixtures, and accent lighting each cast different tones that can dramatically alter how colors appear to clients and staff. Warm lighting enhances reds and oranges while cool lighting brings out blues and greens more prominently.
Install different types of lighting during your design phase to see how your color scheme performs under each condition. Track lighting, pendant fixtures, and table lamps all contribute to the overall color perception in your space. Your nail technicians need accurate color representation to perform detailed work, so proper lighting coordination with your color scheme becomes essential for both aesthetics and functionality.
Design Functional Workstations for Maximum Efficiency

Building on our color scheme and ambiance foundation, we’ll now focus on creating workstations that blend ergonomic design with operational excellence. Smart workstation planning transforms nail services from routine appointments into comfortable, professional experiences.
Optimize Table Height and Client Comfort
Adjustable tables serve as the cornerstone of ergonomic workstation design, accommodating clients of varying heights and physical needs. We recommend investing in tables that offer height adjustment ranges of 28 to 34 inches, ensuring both technician and client maintain proper posture throughout services.
Comfortable seating arrangements directly impact client satisfaction and service quality. Position adjustable chairs with lumbar support for clients, allowing them to relax while maintaining optimal arm positioning for nail work. This setup reduces strain on both parties and enhances precision during detailed nail art applications.
Ergonomic furniture selection should prioritize adjustability and support features. Choose chairs for nail technicians that offer height adjustment, back support, and swivel capabilities to prevent repetitive strain injuries common in the beauty industry.
Organize Storage Answers for Easy Access
Strategic placement of storage units maximizes workflow while maintaining the studio’s aesthetic appeal. Install storage cabinets within arm’s reach of workstations without creating visual clutter or obstructing client movement through the space.
Built-in storage drawers integrated into workstation tables keep essential tools organized and instantly accessible. These compartments should accommodate nail files, buffers, polish bottles, and sanitization supplies while maintaining a clean work surface appearance.
Multi-functional furniture pieces combine seating with storage capabilities, optimizing space efficiency in smaller studios. Rolling carts with multiple tiers provide mobile storage answers that can be repositioned based on service requirements while keeping supplies organized.
Install Proper Ventilation Systems
Adequate ventilation systems protect both technicians and clients from potentially harmful chemical fumes released during nail services. Install ventilation units that provide at least 6 air changes per hour to maintain healthy indoor air quality standards.
Air purification technology enhances the workspace environment beyond basic ventilation requirements. Position HEPA filter systems near workstations to capture airborne particles and chemical vapors, creating a cleaner breathing environment during extended service sessions.
Natural airflow integration complements mechanical ventilation systems when workstations are positioned near windows. This combination reduces energy costs while providing fresh air circulation that clients often find more comfortable than purely mechanical systems.
Invest in Quality Lighting for Precision Work

After designing efficient workstations with proper ventilation, we need to address one of the most critical elements for professional nail services: lighting. Quality lighting ensures our technicians can perform precise work while creating an inviting atmosphere that enhances the overall client experience.
Install Task Lighting at Each Station
Task lighting forms the backbone of any professional nail studio because it provides the focused illumination needed for detailed work. We recommend installing adjustable desk lamps at each workstation to give technicians control over light direction and intensity during treatments.
Recessed can lights offer an elegant solution for concentrated lighting at manicure stations. These smaller decorative fixtures deliver powerful illumination without cluttering the workspace or creating visual distractions for clients.
LED lighting systems should be our top priority when selecting task lighting options. LEDs with high Color Rendering Index (CRI) ratings accurately represent nail polish colors and skin tones, which is essential for achieving professional results and client satisfaction.
Add Ambient Lighting for Atmosphere
Ambient lighting creates the welcoming environment that transforms our nail studio from a clinical workspace into a relaxing retreat. This softer illumination sets the mood and helps clients feel comfortable throughout their service.
LED strip lighting can be strategically placed under shelves, around mirrors, or along architectural features to provide gentle background illumination. These versatile fixtures offer dimming capabilities that allow us to adjust the atmosphere throughout the day.
Pendant lights serve dual purposes by providing ambient lighting while acting as decorative focal points. We can choose fixtures that complement our color scheme and overall design aesthetic to reinforce our brand identity.
Neon signs add personality to our space while contributing to the lighting scheme. These eye catching elements can display our logo, inspirational quotes, or decorative patterns that enhance the studio’s unique character.
Consider Natural Light Sources
Natural light brings many benefits to our nail studio, including energy savings and a connection to the outdoors that many clients find appealing. But, we shouldn’t rely on natural light as our primary illumination source due to its inconsistent nature.
Window placement requires careful consideration to avoid glare issues that can interfere with precision work. We can install window tinting to control harsh sunlight while still allowing beneficial natural light to filter through the space.
Seasonal variations in natural light intensity mean we need robust artificial lighting systems to maintain consistent working conditions year round. Natural light should complement rather than replace our carefully planned LED and task lighting setup.
Strategic positioning of workstations near windows can take advantage of natural light during peak daylight hours while ensuring we have adequate artificial lighting for evening appointments and overcast days.
Create Instagram-Worthy Photo Opportunities

Transforming your nail studio into a social media hotspot requires strategic design elements that encourage clients to share their experiences online. We’ll explore how to create picture-perfect moments that showcase your work and attract new clients through organic social media exposure.
Design a Dedicated Photo Backdrop
Colorful backdrops add visual interest and depth to your nail photography setup. We recommend installing a modular backdrop system that allows you to switch between different textures, patterns, and colors based on current trends or seasonal themes. Vibrant options like coral pink, sage green, or navy blue create striking contrasts against nail art designs.
Textured surfaces elevate the professional quality of your photos. Consider materials like marble contact paper, wood grain panels, or fabric backdrops that add dimension without overwhelming the nail art itself. These surfaces photograph beautifully and give your images a polished, editorial quality that stands out on social media feeds.
Seasonal updates keep your content fresh and captivating throughout the year. We suggest creating backdrop collections for each season: spring florals, summer brights, autumn metallics, and winter neutrals. This approach ensures your Instagram feed stays current with trending aesthetics and gives clients new photo opportunities during repeat visits.
Set Up Ring Lights for Perfect Shots
Professional lighting eliminates shadows and creates even illumination across nail surfaces. Ring lights are ideal for nail photography because they provide 360-degree lighting that minimizes harsh shadows and highlights the true colors of nail polish and art designs. We recommend LED ring lights with adjustable brightness settings to accommodate different nail art styles.
Natural light enhances the appearance of nail colors and textures when properly utilized. Position your photo station near a north-facing window to capture consistent, soft natural light throughout the day. But, we always supplement natural light with artificial lighting to maintain consistency regardless of weather conditions or time of day.
Multiple lighting angles create depth and dimension in nail photography. We suggest combining ring lights with side lighting or overhead fixtures to add visual interest and properly illuminate intricate nail art details. This multi-light setup ensures every design element is clearly visible and Instagram-ready.
Create Seasonal Display Areas
Seasonal decor transforms your studio into a festive backdrop that clients love to photograph. We recommend updating display areas quarterly with themed decorations like fresh flowers for spring, beach elements for summer, autumn leaves for fall, and holiday ornaments for winter. These touches create natural photo opportunities that clients eagerly share on their social media accounts.
Product displays showcase your nail care offerings while adding visual appeal to photos. Arrange nail polish collections, seasonal nail care kits, and nail art supplies in attractive, organized displays that double as photo props. We suggest using tiered shelving, glass cases, or floating shelves to create depth and visual interest in background shots.
Strategic placement of display areas maximizes their impact on social media visibility. Position seasonal displays near your photo backdrop or workstations where they’ll naturally appear in client photos. This approach ensures your products and seasonal themes are consistently featured in social media posts, creating additional marketing exposure for your studio.
Incorporate Smart Storage Solutions Throughout

Smart storage transforms your nail studio from cluttered chaos into an organized oasis that impresses clients while boosting efficiency. We’ll explore three key approaches that maximize space while maintaining the luxurious atmosphere you’ve carefully crafted.
Maximize Vertical Wall Space
Wall-mounted shelves serve as the backbone of vertical storage, displaying nail polish collections and frequently used supplies within arm’s reach. Install floating shelves at varying heights to create visual interest while storing different categories of products, from base coats to nail art supplies.
Spice racks repurposed for nail polish storage create stunning wall displays that double as decorative elements. Mount multiple racks in a grid pattern to showcase your complete color collection, making it easy for clients to browse options during their service.
Pegboards with hooks maximize vertical real estate by holding tools, towels, and equipment off countertops. Configure the hooks to accommodate different tool sizes, from nail files to UV lamps, keeping everything visible and accessible.
Organize Supplies by Category and Frequency
Categorized storage systems streamline your workflow by grouping similar items together with clear labels. Designate exact areas for nail polish, nail art tools, sanitation supplies, and client amenities, making it simple for technicians to locate exactly what they need.
Frequency-based placement positions daily essentials in prime locations while storing occasional items in secondary spots. Place base coats, top coats, and popular polish colors at eye level, while specialty items like seasonal collections can occupy higher or lower shelves.
Designated drawers with custom dividers keep small items organized and prevent the dreaded “junk drawer” syndrome. Allocate separate compartments for cuticle tools, nail art brushes, and acetone-soaked cotton pads, using adjustable dividers to customize each space.
Design Mobile Storage for Flexibility
Mobile carts provide portable organization that adapts to different service needs throughout the day. Roll these versatile units between workstations to transport polish collections, nail art supplies, or sanitization equipment exactly where you need them.
Adjustable shelving units on wheels offer maximum flexibility for changing inventory or rearranging your space layout. Configure the shelves to accommodate everything from tall bottles to flat storage containers, adjusting heights as your supply needs evolve.
Hanging organizers designed for jewelry or accessories work perfectly for storing nail polish, removers, and oils while freeing up valuable drawer space. Hang these transparent organizers inside cabinets or on walls to keep supplies visible and easily accessible.
Add Comfort Features That Enhance Client Experience

Physical comfort directly impacts client satisfaction and determines whether customers return for future appointments. Creating a luxurious environment through thoughtful comfort features transforms routine nail appointments into memorable experiences that clients eagerly anticipate.
Install Massage Chairs or Comfortable Seating
Massage chairs create the ultimate relaxation experience that keeps clients coming back for more appointments. We recommend investing in high-quality massage chairs that offer multiple settings like heat therapy, vibration, and targeted pressure points to enhance the pedicure experience. Ergonomic salon seating contributes significantly to client satisfaction and repeat visits by providing proper support during longer services.
Select chairs that align with your studio’s aesthetic while prioritizing physical comfort and functionality. The best massage chairs feature adjustable settings that accommodate clients of different sizes and comfort preferences. Position seating strategically to help natural conversation between clients and technicians, creating a social atmosphere that enhances the overall experience.
Consider upgrading to chairs with additional features like USB charging ports, cup holders, and adjustable armrests for maximum convenience. Regular maintenance of massage chairs ensures consistent performance and extends their lifespan while maintaining client safety standards.
Provide Entertainment Systems
Entertainment systems keep clients engaged and relaxed throughout their visit, making time pass quickly during longer services. Mount flat-screen TVs at optimal viewing angles from each workstation to ensure every client has clear sight lines. We suggest offering diverse content options including streaming services, local television channels, and relaxing nature documentaries.
Individual tablets at each station provide personalized entertainment choices that cater to different client preferences. Wireless headphones eliminate noise conflicts and create private entertainment zones for each customer. Digital magazine subscriptions offer beauty inspiration and lifestyle content that appeals to your target demographic.
Interactive entertainment options like gentle music playlists or meditation apps enhance the relaxation benefits of nail care services. Consider installing sound systems with individual volume controls to accommodate varying noise preferences among clients.
Offer Refreshment Stations
Refreshment stations demonstrate exceptional hospitality and ensure clients feel pampered throughout their visit. Stock your station with premium bottled water, gourmet coffee, herbal teas, and fresh fruit juices to cater to different taste preferences. We recommend using attractive dispensers and elegant glassware that match your studio’s upscale aesthetic.
Seasonal beverage offerings like iced teas in summer or hot chocolate in winter create memorable experiences that clients associate with your brand. Healthy snack options such as granola bars, fresh fruit, or artisanal crackers complement the self-care atmosphere you’re creating.
Position refreshment stations in easily accessible locations that don’t disrupt workflow or create congestion near workstations. Maintain strict hygiene standards with regular cleaning schedules and proper food storage practices to ensure client safety and regulatory compliance.
Plan Your Equipment Layout for Smooth Workflow

Arranging your nail studio equipment strategically transforms daily operations and elevates client satisfaction. We’ll show you how smart equipment placement creates seamless workflow while maintaining the luxurious atmosphere we’ve established.
Position Nail Stations for Privacy
Nail stations need privacy dividers to create intimate spaces where clients feel comfortable and relaxed. We recommend installing booth-style layouts or decorative screens between workstations to give each client their own personal sanctuary. This setup allows technicians to work efficiently while clients enjoy private conversations without feeling exposed.
Spacing between stations should provide enough room for both comfort and functionality. Position chairs with adequate distance so clients don’t feel cramped while ensuring technicians can access all necessary tools without obstruction. Arrange essential items like nail files, buffers, and polish within arm’s reach of each station for maximum efficiency.
Consider the sight lines when positioning your stations throughout the space. Place workstations so clients can’t directly see into adjacent service areas, creating a sense of exclusivity that enhances the premium experience. This thoughtful positioning also helps maintain confidentiality during consultations about nail health or service preferences.
Create Clear Pathways Between Areas
Pathways throughout your studio must remain uncluttered and logically designed for smooth traffic flow. We suggest maintaining wide walkways between service areas, reception, and restrooms so both clients and staff can move freely without congestion. These unobstructed routes prevent accidents and create a more comfortable environment for everyone.
Direct routes between frequently used areas streamline daily operations and reduce wait times. Connect your manicure stations to drying areas with clear, straight pathways that don’t require clients to navigate around obstacles. Position UV lamps and other commonly used equipment along these routes for quick access during services.
Emergency exit pathways require special attention to ensure safety compliance while maintaining aesthetic appeal. Mark these routes subtly using floor patterns or lighting elements that blend with your studio’s design. Keep these pathways completely clear of furniture, supplies, or decorative elements that could impede movement during busy periods.
Designate Exact Areas for Different Services
Service zones help organize your studio operations while creating distinct experiences for different nail treatments. We recommend clearly marking areas for manicures, pedicures, gel applications, and polish drying to help both clients and technicians navigate effortlessly. This organization prevents confusion and ensures each service receives appropriate attention and resources.
Manicure stations should feature multi-functional furniture with built-in storage to keep tools organized and within reach. Position these stations near windows when possible to take advantage of natural light for detailed work. Install wall-mounted shelving above each station to display polish collections and frequently used supplies.
Pedicure areas require different considerations including proper ventilation and water access. Place these stations away from high-traffic areas to maintain tranquility during longer treatments. Consider installing under-counter drawers specifically designed for pedicure tools and supplies to maintain organization without cluttering the visual space.
Drying stations need strategic placement to complete the service flow smoothly. Position these areas between active service stations and the reception area so clients can relax while their nails cure. Include comfortable seating, entertainment options, and refreshment access to enhance the waiting experience we’ve carefully crafted throughout your studio.
Design a Professional Sanitation Station

Creating a professional sanitation station builds client trust while ensuring our nail studio meets health regulations. We’ll transform this essential area into a visible demonstration of our commitment to safety and cleanliness.
Install Proper Sterilization Equipment
Autoclaves serve as the gold standard for sterilizing metal implements through high-pressure steam sterilization. We recommend investing in medical-grade autoclaves that reach temperatures of 250°F to eliminate all bacteria, viruses, and spores from our tools.
UV sanitizers provide effective disinfection for non-metallic items like plastic implements, nail files, and buffer blocks. These units offer continuous sterilization cycles and work perfectly for items that can’t withstand autoclave temperatures.
Ultrasonic cleaners handle the crucial pre-cleaning step before sterilization begins. We use these devices to remove debris and buildup from tools, ensuring the sterilization process reaches every surface effectively.
Position all sterilization equipment in a well-lit, easily accessible area where clients can observe our sanitization procedures. Install proper ventilation around these units to manage heat and humidity levels throughout the workday.
Create Dedicated Cleaning Areas
Organized storage transforms our cleaning efficiency through strategic placement of supplies and tools. We use mobile carts with multiple compartments to keep disinfectants, cleaning cloths, and sterilization pouches within arm’s reach of our sanitization station.
Cleaning stations require separate designated areas for different sanitization tasks to prevent cross-contamination. We establish distinct zones for disposing of contaminated materials, washing reusable items, and storing clean implements.
Wall-mounted shelves maximize vertical space while keeping cleaning supplies organized and visible. We label each storage area clearly to help staff maintain consistent cleaning protocols throughout their shifts.
Install hand washing stations with foot-operated controls to eliminate the need for hand contact with faucets. We stock these areas with antibacterial soap dispensers and single-use paper towels to maintain sterile conditions.
Display Hygiene Certifications Prominently
Certification displays reassure clients about our professional standards and regulatory compliance. We mount certifications from state health departments and professional organizations in clear acrylic frames where clients can easily view them from seating areas.
Cleaning schedules become powerful marketing tools when we post them prominently throughout our studio. We create laminated charts that detail our sanitization procedures and timing, allowing clients to see exactly when and how we clean our equipment.
Digital displays offer ever-changing ways to showcase our hygiene practices through rotating images of our sanitization processes. We include timestamps and procedure descriptions to demonstrate our thorough approach to cleanliness.
Staff badges with current health certifications provide additional credibility during client interactions. We ensure each team member displays their individual sanitization training certificates alongside our studio’s primary health permits.
Consider Budget-Friendly DIY Nail Studio Ideas

We understand that creating a stunning nail studio doesn’t have to drain your savings account. Smart planning and creative answers can help you build a professional space that rivals expensive commercial designs while staying within budget constraints.
Repurpose Furniture for Unique Touches
Vintage furniture transforms your nail studio into a space with distinctive character and charm. We’ve found that old dressers work exceptionally well as storage units for nail supplies, offering both functionality and aesthetic appeal. Second-hand pieces often cost a fraction of new furniture while providing unique design elements that mass-produced items simply can’t match.
Upcycling existing tables or desks creates custom nail stations at minimal cost. Adding a glass top to an old wooden table instantly elevates its appearance and makes it suitable for professional nail services. We recommend applying decorative finishes or paint treatments to match your studio’s color scheme, ensuring these repurposed pieces integrate seamlessly with your overall design.
Shopping at thrift stores and estate sales reveals hidden gems for your studio transformation. Look for sturdy pieces with good bones that can be refinished or modified to suit your exact needs. These vintage finds often feature superior craftsmanship compared to modern alternatives and add authentic character that clients notice and appreciate.
Create Custom Wall Art and Decorations
Hand-painted signs and murals provide personal touches without the hefty price tag of professional artwork. We suggest creating nail-themed artwork that showcases your brand personality while keeping costs low. Simple designs using acrylic paints can produce impressive results that rival expensive commissioned pieces.
Reclaimed materials like wood and fabric offer endless possibilities for unique decorative elements. Weathered barn wood can be transformed into rustic wall hangings or accent pieces that add texture and warmth to your space. Fabric scraps can be stretched over canvases to create colorful abstract art that complements your color scheme.
DIY photo displays showcase your best nail art work while serving as inspiration for clients. Create gallery walls using inexpensive frames from discount stores, arranging them to highlight your artistic skills and completed projects. These displays function as both decoration and marketing tools, encouraging clients to try new designs.
Build Your Own Storage Answers
Custom storage units using reclaimed wood or repurposed crates keep your studio organized and clutter-free. We’ve discovered that wooden crates can be stacked and secured to create modular storage systems that adapt to your changing needs. These answers cost significantly less than manufactured storage furniture while offering superior customization options.
Multi-functional furniture pieces maximize space efficiency while reducing overall costs. Reception desks with built-in storage compartments serve dual purposes, eliminating the need for separate storage units. Ottoman seats with hidden compartments provide comfortable seating for clients while storing supplies out of sight.
Wall-mounted organizers use vertical space effectively without consuming valuable floor area. Pegboard systems accommodate various tools and supplies while allowing easy reconfiguration as your needs change. These flexible storage answers adapt to your workflow better than fixed cabinetry and cost considerably less to install.
Conclusion
Transforming your nail studio into a luxurious haven doesn’t have to expensive when you combine smart design choices with creative DIY answers. We’ve shown you how the right color schemes and functional workstations create the perfect foundation while Instagram-worthy photo spots help attract new clients through social media buzz.
Remember that every element—from ergonomic furniture to strategic lighting—works together to enhance both client satisfaction and your team’s productivity. The key lies in balancing stunning aesthetics with practical functionality while maintaining that spa-like atmosphere your clients crave.
Whether you’re refreshing an existing space or starting from scratch these design strategies will help you create a nail studio that stands out from the competition and keeps clients coming back for more.
Frequently Asked Questions
What makes a nail studio feel like a luxurious retreat?
A luxurious nail studio combines stunning aesthetics with functional design elements. Key features include Instagram-worthy accent walls, ergonomic furniture, comfortable seating with plush materials, warm lighting, and personal touches that reflect your brand. Incorporating sensory elements like pleasant scents and relaxing sounds creates a cohesive, memorable experience that sets your studio apart from typical salons.
How important is the reception area in a nail studio?
The reception area is crucial as it sets the first impression and tone for the entire client experience. It should serve as an inviting gateway that reflects luxury and professionalism. Include comfortable waiting spaces, display service menus prominently, showcase your nail art portfolio, and incorporate brand elements like logos and signature colors to create a welcoming atmosphere.
What color scheme works best for nail studios?
Calming and professional colors work best, including neutrals and soft pastels that create a serene, relaxing environment. These colors convey cleanliness and promote relaxation. Strategically incorporate your brand colors throughout the space to reinforce identity. Test your chosen palette under various lighting conditions to ensure it looks appealing and functions well for detailed nail work.
What are the key elements of functional nail workstations?
Functional workstations require ergonomic design with adjustable tables, comfortable seating with lumbar support, and proper storage within easy reach. Include multi-functional furniture to optimize space, ensure adequate ventilation systems for chemical fume protection, and install quality task lighting at each station. Organization by category and frequency of use streamlines workflow efficiency.
How can I create Instagram-worthy photo opportunities in my studio?
Design dedicated photo backdrops with colorful, textured surfaces that enhance nail art photography. Use ring lights for optimal, even illumination and combine natural light with artificial lighting. Create seasonal display areas with themed decorations and organized product displays. Update backdrops seasonally to keep content fresh and strategically place photo-worthy elements throughout the studio.
What lighting is essential for professional nail services?
Quality lighting is critical for precision work and client experience. Install adjustable task lighting at each workstation, such as desk lamps and recessed can lights. Use LED systems with high Color Rendering Index (CRI) ratings for accurate color representation. Combine ambient lighting for atmosphere with focused task lighting, and don’t rely solely on natural light for consistent results.
How can I maximize storage in a small nail studio?
Maximize vertical wall space with wall-mounted shelves and pegboards to keep tools accessible. Use mobile storage solutions for flexibility, organize supplies by category and frequency of use, and invest in multi-functional furniture. Consider DIY solutions using reclaimed wood or repurposed crates to create custom storage that fits your specific needs while maintaining aesthetic appeal.
What are some budget-friendly DIY ideas for nail studio design?
Repurpose vintage furniture like old dressers and tables for unique character at lower costs. Create custom wall art using reclaimed materials, build DIY photo displays to showcase nail art, and construct storage solutions from repurposed crates. Use wall-mounted organizers and multi-functional pieces to maximize space while keeping costs down through creative upcycling projects.


