Transform your ordinary manicure into a dazzling masterpiece with stunning nail rhinestone designs that’ll make heads turn wherever you go. We’ve all been there – staring at our plain nails wishing they had that extra sparkle and glamour we see on social media feeds and red carpets.
Nail rhinestones aren’t just for special occasions anymore. They’ve become the go-to accessory for anyone wanting to elevate their nail game from basic to absolutely breathtaking. Whether you’re preparing for a wedding, heading to a party, or simply want to add some everyday luxury to your look, rhinestone nail art offers endless possibilities to express your unique style.
We’re about to share the most creative and eye-catching rhinestone nail ideas that’ll have you booking your next nail appointment immediately. From subtle accent designs to full-blown crystal extravaganzas, these trends will help you discover the perfect rhinestone style that matches your personality and lifestyle.
Classic Rhinestone French Manicure Ideas
French manicures get an instant upgrade when we add rhinestones to their timeless appeal. These elegant variations maintain the sophisticated look while introducing subtle sparkle.
Traditional White Tips With Clear Rhinestones
White tips create the perfect canvas for clear rhinestone placement along the smile line. We recommend positioning 3-5 small rhinestones evenly across each nail tip for balanced sparkle. Clear crystals in sizes 1.5mm to 2mm work best to maintain the classic aesthetic without overwhelming the design.
Single rhinestones placed at the center of each white tip offer understated elegance for professional settings. Alternating between different sized clear stones creates visual interest while keeping the overall look refined. We suggest using nail glue specifically designed for rhinestones to ensure long lasting wear.
Colored French Tips With Matching Rhinestones
Colored French tips paired with coordinating rhinestones bring modern flair to traditional designs. Pink tips with rose gold rhinestones create romantic femininity perfect for date nights or weddings. Blue tips enhanced with sapphire colored stones offer bold sophistication for evening events.
Nude tips accented with champagne rhinestones provide versatile elegance suitable for any occasion. We find that matching rhinestone colors to tip shades creates cohesive designs that photograph beautifully. Three rhinestones per nail tip typically provides optimal coverage without appearing cluttered.
Reverse French With Rhinestone Accents
Reverse French manicures showcase rhinestones at the nail base instead of tips. We create curved lines of small rhinestones following the natural nail bed shape for dramatic impact. This technique works exceptionally well with gradient color combinations and metallic base coats.
Clear rhinestones against dark base colors create striking contrast that catches light beautifully. Placing rhinestones in decreasing sizes from center to edges creates elegant tapered effects. We recommend starting with larger 3mm stones at the center and graduating down to 1mm stones at the edges for professional looking results.
Gradient Rhinestone Nail Art Designs

Moving beyond traditional French manicures, we discover sophisticated techniques that create seamless transitions using carefully placed rhinestones. Gradient designs offer endless possibilities for artistic expression while maintaining elegance.
Ombre Rhinestone Fade Techniques
Starting with an ombre base creates the perfect foundation for rhinestone placement. We combine ombre nail art with strategically positioned rhinestones to achieve a stunning fade effect that transitions from dark to light. Concentrating rhinestones in the lighter areas adds extra sparkle and draws attention to the gradient’s most dramatic section.
Applying rhinestones in a gradual pattern from one end of the nail to the other achieves a seamless gradient look. We use varying sizes of rhinestones to enhance the transition effect, placing larger stones at the darkest point and smaller ones toward the fade. This technique creates depth and visual interest while maintaining the overall gradient flow.
Rainbow Gradient With Multi-Colored Stones
Creating vibrant rainbow effects requires arranging multi-colored rhinestones in exact patterns across the nail surface. We apply stones in horizontal or vertical gradients to achieve the most striking rainbow appearance. Each color flows naturally into the next, mimicking the smooth transitions found in actual rainbows.
Selecting complementary stone colors ensures the rainbow gradient maintains visual harmony. We recommend following the traditional ROYGBIV color sequence for authentic rainbow effects. Spacing stones evenly prevents color clustering while maintaining the gradient’s smooth appearance.
Metallic Gradient Rhinestone Placement
Using metallic polish as a base enhances both shine and sophistication in rhinestone gradient designs. We apply rhinestones over metallic backgrounds to create depth and dimension that standard colors can’t achieve. The reflective properties of metallic polish amplify the rhinestones’ natural sparkle.
Positioning stones to follow the metallic gradient’s natural flow creates cohesive designs. We place rhinestones more densely at the gradient’s peak intensity and gradually decrease density toward the fade. This approach maintains the metallic base’s visual impact while adding textural interest through strategic rhinestone placement.
Geometric Rhinestone Pattern Ideas

We’re moving into the industry of structured nail art where precision meets creativity. Geometric patterns with rhinestones offer endless possibilities for those who love clean lines and bold shapes.
Triangle And Diamond Formations
Triangular rhinestone patterns create ever-changing visual movement across your nails. We recommend starting with small triangular stones arranged in a row along your nail bed, then building outward to form larger triangular shapes. Diamond formations work beautifully when you alternate between clear and colored rhinestones, creating depth and dimension that catches light from every angle.
Multi layered geometric designs emerge when you combine triangular and diamond shaped rhinestones together. Place larger diamond stones as focal points, then surround them with smaller triangular pieces to create complex patterns. We’ve found that using three different sizes of stones produces the most visually striking results.
Linear Rhinestone Arrangements
Straight line formations provide the foundation for sophisticated geometric nail art. We suggest creating parallel lines using uniform sized rhinestones, spacing them evenly across your nail surface for a clean, modern look. Grid patterns develop naturally when you intersect horizontal and vertical rhinestone lines, forming perfect squares or rectangles.
Sequential sizing arrangements add visual interest to linear designs. Start with the smallest rhinestones at your cuticle area, gradually increasing size toward your nail tip. We recommend using square and rectangle shaped stones alternately to create a brick like pattern that’s both structured and eye catching.
Chevron And Zigzag Patterns
Chevron rhinestone designs bring energy and movement to your manicure through strategic V shaped arrangements. We place rhinestones in connecting V patterns, starting from one side of the nail and working across to create a continuous chevron flow. Using graduated sizes within each chevron section adds depth and prevents the pattern from appearing flat.
Zigzag formations offer a playful alternative to straight geometric lines. Create these patterns by placing rhinestones in a continuous wavy line across your nail, alternating the direction every few stones. We’ve discovered that mixing round and square rhinestones in zigzag patterns creates texture variation that enhances the overall geometric effect.
Seasonal Rhinestone Nail Themes

We’ve discovered that adapting rhinestone designs to seasonal themes creates year-round opportunities for stunning nail art. Each season brings unique inspiration that transforms ordinary rhinestone placements into captivating thematic masterpieces.
Summer Beach-Inspired Rhinestone Designs
Seashell accents use iridescent rhinestones to create authentic beach-inspired designs on your nails. Combine these shimmering stones with glitter for a complete beachy aesthetic that captures the essence of ocean shores.
Mermaid scales feature rhinestones in shimmering blues and greens that mimic underwater glamour. Apply these oceanic colors strategically to create the illusion of scaled patterns across your nail surface.
Starfish formations incorporate small rhinestones arranged to resemble starfish and sand dollars. These coastal creatures add authentic beach elements that enhance your summer nail theme with recognizable oceanic motifs.
Winter Snowflake And Holiday Patterns
Snowflake designs use delicate rhinestones to create intricate winter patterns on each nail. These crystalline formations capture the magic of falling snow while adding elegant sparkle perfect for holiday celebrations.
Holiday trees feature green and red rhinestones arranged to create festive evergreen designs. Apply these seasonal colors on one accent nail or across multiple fingers for comprehensive holiday cheer.
Frozen landscapes combine clear and silver rhinestones to simulate ice crystal formations. These wintry arrangements reflect light beautifully while maintaining the cool elegance of the winter season.
Spring Floral Rhinestone Arrangements
Floral patterns use pastel-colored rhinestones to create daisies and roses on your nail canvas. These delicate flower designs capture spring’s renewal with soft pinks, purples, and yellows that embody the season’s gentle beauty.
Leafy accents add small green rhinestones that resemble fresh spring foliage. These botanical elements complement floral patterns while creating depth and natural authenticity in your springtime nail art.
Garden scenes combine multiple pastel rhinestones to create miniature spring landscapes. Arrange these colorful stones to simulate blooming gardens with flowers, stems, and leaves for comprehensive seasonal storytelling.
Fall Autumn Leaf-Inspired Designs
Leaf motifs use gold and orange rhinestones to create authentic autumn foliage designs. These warm-toned stones add seasonal depth while capturing the rich colors of changing leaves during fall months.
Acorn arrangements incorporate brown and golden rhinestones to mimic forest elements like acorns and pinecones. These natural formations enhance your fall theme with recognizable autumn symbols that celebrate the harvest season.
Woodland elements combine various earth-toned rhinestones to create comprehensive fall landscapes. Apply these seasonal colors in patterns that reflect the warmth and richness of autumn’s natural beauty.
Wedding And Special Occasion Rhinestone Ideas

Special occasions deserve nail art that captures the magic of life’s most memorable moments. Wedding and formal event rhinestone designs elevate your overall look with sophisticated sparkle that complements elegant attire.
Bridal White And Pearl Rhinestone Combinations
Pearl and rhinestone accent nails create a timeless elegance that complements most wedding dresses with their classic sophistication. We recommend placing white pearls alongside clear rhinestones on the ring finger for a subtle yet striking focal point.
Rhinestone and pearl borders along nail edges provide delicate yet dramatic design elements that catch light beautifully during ceremonies. These combinations work particularly well when applied to the nail tips or cuticle areas for refined definition.
French tip designs with pearl accents transform traditional manicures into bridal masterpieces by incorporating small pearls between rhinestone placements. The contrast between smooth pearls and faceted rhinestones adds textural interest while maintaining wedding appropriate elegance.
Anniversary And Date Night Elegant Designs
Minimalist rhinestone accents strategically placed on simple nail designs add sophistication and glamour without overwhelming the overall look. We suggest using 3 to 5 rhinestones per nail for optimal visual impact during intimate occasions.
Heart shaped rhinestones symbolize love and romance perfectly for anniversaries or date nights with their meaningful design elements. These specialty stones work best when placed on accent nails or incorporated into delicate pattern arrangements.
Single statement rhinestones on each nail create understated luxury that pairs beautifully with romantic dinner attire. Choose larger stones in clear or rose gold tones for maximum elegance with minimal effort.
Prom And Formal Event Glamorous Styles
Ombre nails with rhinestone accents create dramatic and eye catching effects through gradually changing colors enhanced by strategic stone placement. We recommend concentrating rhinestones at the gradient transition points for seamless visual flow.
Chrome nails with rhinestones offer modern and glamorous appearances suitable for formal events with their mirror like finish and sparkling accents. This combination works particularly well with silver or holographic rhinestones that complement the metallic base.
Full coverage rhinestone designs make bold statements perfect for prom night with their maximum sparkle factor. These elaborate arrangements require careful planning but deliver show stopping results that photograph beautifully under formal event lighting.
Color-Coordinated Rhinestone Combinations

Color coordination transforms ordinary rhinestone nail art into sophisticated designs that reflect your personal style. We’ll explore how strategic color matching creates harmony between your nail polish and rhinestone choices.
Monochromatic Single-Color Schemes
Monochromatic designs create elegant simplicity by using a single color family for both polish and rhinestones. Nude bases paired with silver or clear rhinestones offer refined sophistication perfect for professional settings. Pink tones work beautifully together, with soft pink polish complemented by matching pink rhinestones for a cohesive feminine look.
Deep red polish paired with matching red rhinestones creates bold drama while maintaining visual unity. Black nail polish combined with black rhinestones delivers stunning monochromatic impact for evening occasions. Silver rhinestones on gray polish provides understated glamour that photographs beautifully.
| Monochromatic Scheme | Base Polish | Rhinestone Color |
|---|---|---|
| Soft Feminine | Nude/Soft Pink | Silver/Clear |
| Bold Dramatic | Deep Red | Matching Red |
| Evening Glamour | Black | Black |
Complementary Color Pairings
Complementary colors sit opposite each other on the color wheel, creating ever-changing visual contrast that makes your rhinestones pop. Lavender polish paired with gold rhinestones produces striking balance between cool and warm tones. Navy blue bases look stunning with yellow or orange rhinestone accents, creating vibrant energy.
Purple nail polish combined with green rhinestones offers unexpected sophistication for creative personalities. Orange bases work magnificently with blue rhinestone details, perfect for summer designs. Red polish paired with green rhinestones creates classic holiday appeal that’s both festive and stylish.
Bold Contrast Rhinestone Arrangements
Bold contrast arrangements use dramatically different colors to create statement making nail art that demands attention. Black polish serves as the perfect backdrop for bright pink, silver, or multicolored rhinestone combinations that create striking visual impact. Pastel yellow nails accented with purple and blue gems deliver playful contrast perfect for spring celebrations.
White bases paired with rainbow rhinestones create cheerful designs that showcase multiple colors simultaneously. Dark plum polish combined with gold and silver rhinestones offers luxurious contrast suitable for formal occasions. Bright coral polish paired with turquoise rhinestones creates tropical vibrancy that captures summer energy perfectly.
Minimalist Rhinestone Accent Ideas

Sometimes the most striking rhinestone designs are the ones that exercise restraint and elegance. We’ll explore how strategic placement of fewer stones can create maximum impact while maintaining sophistication.
Single Statement Stone Placement
Placing a single large rhinestone at the center of your nail creates an elegant focal point that commands attention. We recommend positioning this statement stone slightly off center for a more ever-changing and modern appearance than traditional center placement.
Large rhinestones work best when paired with simple nail polish colors like nude or soft pink. This combination allows the stone to become the star while maintaining overall sophistication. Clear or crystal rhinestones offer versatility and complement any outfit or occasion.
Statement stones positioned at the nail’s sweet spot draw the eye naturally. We find that placing the rhinestone about two thirds up from the cuticle creates the most visually pleasing proportion. This placement technique ensures your accent doesn’t compete with rings or other jewelry.
Delicate Scattered Rhinestone Designs
Scattering small rhinestones across your nails in random patterns adds whimsical charm without overwhelming the design. We suggest using 3 to 5 tiny stones per nail to maintain the delicate aesthetic while still creating visual interest.
Light pastel colors serve as the perfect backdrop for scattered rhinestone designs. Baby blue, soft lavender, and pale yellow provide gentle contrast that makes small stones sparkle without competing for attention. This combination creates a dreamy, ethereal effect that’s perfect for everyday wear.
Random placement patterns should still follow basic design principles for the best results. We recommend avoiding straight lines or geometric arrangements when creating scattered designs. Instead, think of how raindrops might naturally fall or how stars appear in the night sky.
Subtle Corner And Cuticle Accents
Small rhinestones placed at nail corners or along cuticles provide subtle glamour that enhances rather than dominates your manicure. We love this technique because it adds sparkle while maintaining a professional appearance suitable for any environment.
Corner placements work particularly well with French manicures and solid color polish. Two small stones positioned at opposite corners create balance, while a single corner stone offers asymmetrical interest. This approach lets you experiment with rhinestone placement without committing to full nail coverage.
Cuticle line rhinestones create a delicate border that frames your entire nail. We suggest spacing small stones evenly along the cuticle area, leaving small gaps between each stone for breathing room. This technique works beautifully with both clear and colored rhinestones, depending on your desired level of drama.
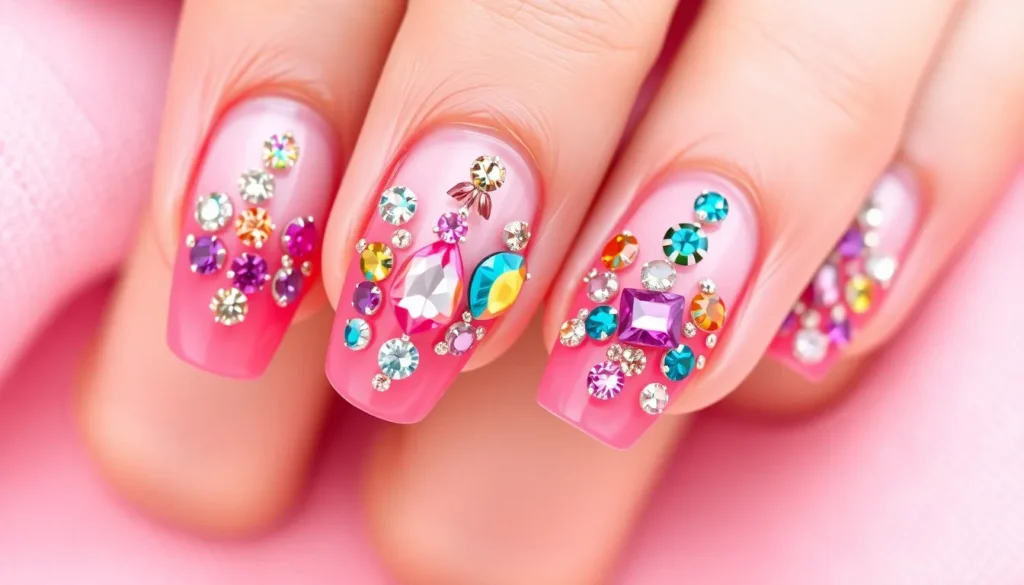
Bold And Dramatic Rhinestone Statements

Creating maximum visual impact requires stepping beyond subtle accents into the area of show stopping nail art. These dramatic approaches transform your nails into sparkling masterpieces that command attention and showcase your bold style.
Full-Coverage Rhinestone Nails
Crystal Faerie Method delivers complete nail coverage through a strategic layering technique. We apply a coat of gel or nail polish as our foundation then sprinkle small crystals over the entire nail surface. Pressing the crystals gently ensures they adhere properly before sealing everything with a topcoat for lasting wear.
Gel and Rhinestone Blend creates a fully covered sparkling finish by mixing gel polish with small rhinestones during application. This technique produces an even distribution of sparkle across the nail surface. We recommend using rhinestones no larger than 1mm for this method to maintain smooth coverage.
Dense Packing Patterns involve placing rhinestones so closely together that no base color shows through. Starting from the cuticle and working toward the tip ensures even coverage. Large rhinestones work best for this approach on longer nails while smaller stones suit shorter nail lengths.
3D Rhinestone Cluster Designs
Clustered Centers place multiple rhinestones in the center of the nail to create a stunning focal point. We position the largest stone first then surround it with smaller rhinestones in decreasing sizes. This creates depth and draws the eye naturally to the nail’s center.
Rhinestone Flowers transform nails into blooming gardens using rhinestones of different sizes and shapes. Five or six medium rhinestones form the petals while a contrasting center stone completes the flower. Multiple flowers across different nails create a cohesive garden theme.
Textured Layering builds dimension by stacking rhinestones at different heights. Placing larger stones as the base layer and adding smaller ones on top creates dramatic shadows and light reflection. This technique works especially well with clear and AB finish rhinestones.
Mixed-Size Stone Dramatic Effects
Gradual Size Transition uses small rhinestones at the cuticle and gradually increases stone size toward the nail tip. This creates visual movement that elongates the nail and adds sophisticated drama. We recommend using at least four different sizes for the most striking effect.
Rhinestone Patterns alternate between large and small rhinestones to create geometric designs that catch light from multiple angles. Diamond patterns work particularly well with this technique. Triangular arrangements also produce striking visual interest when executed with contrasting stone sizes.
Cascading Stone Arrangements flow from large statement stones to tiny accent pieces creating waterfall effects. Starting with one oversized rhinestone at the base and trailing smaller stones toward the tip mimics natural flow patterns. This approach works beautifully on almond and coffin shaped nails.
Application Tips And Techniques

Creating stunning rhinestone nail art requires mastering exact application methods that ensure professional results. We’ll guide you through the essential techniques that transform ordinary manicures into sparkling masterpieces.
Proper Rhinestone Placement Methods
Central placement creates the most striking visual impact when we position rhinestones directly in the center of each nail. This technique works especially well with larger stones that serve as focal points for the entire design.
Accent placement allows us to enhance existing nail art by strategically positioning small rhinestones around patterns or designs. We recommend using this method to highlight exact elements like flower centers or geometric intersections.
Pattern placement enables us to create intricate designs by arranging rhinestones in predetermined formations. Popular patterns include diagonal lines, curved swirls, and clustered arrangements that follow the nail’s natural shape.
Edge alignment helps us achieve clean professional lines by placing rhinestones along the nail’s perimeter or smile line. This technique requires steady hands and careful spacing to maintain symmetry across all nails.
Adhesive Selection And Longevity Tips
Strong nail glue designed specifically for rhinestones provides the most reliable adhesion for long lasting results. We always choose professional grade adhesives that resist chipping and peeling under daily wear.
Proper surface preparation significantly improves rhinestone longevity when we thoroughly clean and buff nails before application. Removing existing polish and oil residue ensures maximum adhesion between the stone and nail surface.
Top coat application extends the life of rhinestone designs when we carefully apply it around the edges of each stone. This technique creates a protective barrier that prevents lifting while maintaining the stones’ brilliant shine.
Curing time plays a crucial role in adhesion strength when we allow sufficient drying time between each application step. We recommend waiting at least 30 seconds between placing each rhinestone to ensure proper bonding.
Tools And Equipment Recommendations
Crystal katana tools offer the most precise control for picking up and placing rhinestones with professional accuracy. These specialized instruments feature angled tips that grip stones securely without damaging delicate surfaces.
Rhinestone picker tools provide excellent alternatives when crystal katanas aren’t available for detailed placement work. We find these tools particularly useful for handling smaller stones that require careful positioning.
High quality nail glue forms the foundation of any successful rhinestone application when we select products specifically formulated for nail art. Professional grade adhesives maintain their strength through hand washing and daily activities.
Preparation tools including buffers and shapers ensure smooth nail surfaces that promote better rhinestone adhesion. We always use fine grit buffers to create the ideal texture for long lasting results.
Toothpicks serve as effective makeshift tools for picking up small rhinestones when specialized equipment isn’t available. This budget friendly option works well for beginners learning proper placement techniques.
Conclusion
We’ve explored the endless possibilities that rhinestones bring to nail art – from subtle elegance to show-stopping glamour. Whether you’re drawn to classic French tips with crystal accents or bold geometric patterns that command attention these sparkling gems offer something for every style preference.
The key to stunning rhinestone nails lies in thoughtful placement strategic color coordination and proper application techniques. Remember that less can be more with minimalist designs while full-coverage looks create unforgettable drama.
Now it’s time to let your creativity shine. Start with simple accent placements to build your confidence then experiment with seasonal themes geometric patterns and color combinations that reflect your unique personality. Your nails are your canvas – make them sparkle!
Frequently Asked Questions
What are rhinestone nails and why are they popular?
Rhinestone nails feature decorative crystals or gems applied to nail polish to create sparkling, glamorous designs. They’ve become increasingly popular because they transform ordinary manicures into eye-catching statements. Once reserved for special occasions, rhinestone nails are now trendy for everyday wear, offering endless creative possibilities from subtle accents to bold, dramatic looks that reflect personal style.
How do you apply rhinestones to French manicures?
For classic French manicures with rhinestones, place clear stones along the smile line using nail glue or a dotting tool. Apply rhinestones while the topcoat is slightly tacky for better adhesion. You can also try reverse French designs by placing stones at the nail base, or use colored tips with matching rhinestones for a modern twist on the traditional look.
What tools do I need for rhinestone nail art?
Essential tools include a crystal katana or rhinestone picker tool for precise placement, strong nail glue for secure adhesion, tweezers for handling small stones, and a dotting tool for positioning. Having various rhinestone sizes and colors on hand allows for more creative designs. Proper lighting and a steady surface are also important for accurate application.
How long do rhinestone nails typically last?
With proper application and quality adhesive, rhinestone nails can last 1-2 weeks. Longevity depends on nail preparation, adhesive strength, and daily activities. To maximize wear time, ensure nails are clean and dry before application, use strong nail glue, and apply a protective topcoat around (not over) the rhinestones to prevent catching.
Can I create seasonal rhinestone nail designs?
Yes! Seasonal designs are very popular. Summer themes include beach-inspired seashells and starfish patterns. Winter designs feature snowflakes and holiday trees. Spring calls for floral arrangements with pastel rhinestones, while fall designs incorporate leaf motifs and woodland elements. Seasonal themes transform basic rhinestone placement into captivating, themed masterpieces that reflect the time of year.
What’s the difference between minimalist and bold rhinestone designs?
Minimalist designs use fewer stones strategically placed for maximum impact, such as a single statement stone or delicate scattered accents. Bold designs feature full-coverage rhinestones, 3D clusters, or dramatic mixed-size arrangements. Minimalist styles maintain elegance through restraint, while bold designs create show-stopping statements that command attention and photograph beautifully.
How do I choose colors for rhinestone nail art?
Consider monochromatic schemes using one color family for elegant simplicity, or try complementary colors that make rhinestones pop against contrasting backgrounds. Bold contrast arrangements use dramatically different colors for statement looks. Match rhinestone colors to your outfit, occasion, or personal preference. Light polish colors allow rhinestones to shine, while dark bases create dramatic contrast.
What are some popular geometric rhinestone patterns?
Popular geometric patterns include triangular and diamond formations that create visual movement, linear grid arrangements for modern looks, and chevron or zigzag patterns for dynamic appeal. Multi-layered designs combine different stone sizes for striking results. Use graduated sizes and mix stone shapes to enhance texture and create sophisticated, structured nail art with clean lines.


