The holiday season brings magic to everything we touch – and that includes our fingertips! Christmas nail polish ideas transform ordinary manicures into festive masterpieces that capture the season’s sparkle and joy. Whether you’re attending holiday parties or cozy family gatherings, the right nail design becomes your personal celebration accessory.
We’ve discovered that Christmas nails aren’t just about red and green anymore. Today’s holiday nail art embraces everything from elegant winter whites and shimmering golds to playful candy cane stripes and sophisticated burgundy hues. These festive designs let you express your holiday spirit while maintaining that polished, put-together look we all crave during the busy season.
Ready to make your nails the star of every holiday photo? We’ll explore stunning Christmas nail polish combinations that work for every skill level and occasion. From simple two-tone designs you can create at home to intricate patterns that’ll have everyone asking where you got your nails done – we’ve got the perfect festive look waiting for you.
Classic Red and Green Christmas Nail Polish Combinations
These timeless color pairings capture the essence of Christmas tradition while offering endless creative possibilities for your holiday manicure.
Traditional Holly Berry Red Designs
Berry red polish creates the perfect foundation for classic Christmas nail art. We recommend using deep crimson shades like OPI’s “Big Apple Red” or Essie’s “Really Red” as your base color. Simple holly leaf accents painted in forest green add festive charm without overwhelming the design.
Glossy red nails with tiny white dots mimic holly berries beautifully. Apply two coats of your chosen red polish and let it dry completely. Using a dotting tool or bobby pin, create small clusters of white dots near the cuticle area. Finish with a clear top coat to seal the design and add shine.
Matte red finishes offer a sophisticated twist on traditional holiday colors. Transform any glossy red polish into a velvety matte texture using a matte top coat. This modern approach works especially well for shorter nails and professional settings where subtle elegance is preferred.
Emerald Green Accent Nails
Deep emerald green on accent fingers elevates classic red manicures instantly. Paint your ring fingers and thumbs in rich forest green while keeping the remaining nails in your chosen red shade. This balanced approach prevents the look from becoming too overwhelming while maintaining festive appeal.
Metallic green accents catch light beautifully against matte red bases. Choose shimmery emerald polishes like China Glaze’s “Emerald Sparkle” or Sally Hansen’s “Green With Envy” for your accent nails. The metallic finish adds dimension and creates visual interest under different lighting conditions.
Green glitter gradients on accent nails create stunning focal points. Start with a clear base coat on your chosen accent fingers. Apply green glitter polish heavily at the tips and blend it down toward the cuticle using a makeup sponge. This technique creates a beautiful fade effect that draws attention without competing with your red base color.
Red and Green Ombre Effects
Gradient blending techniques create seamless transitions between Christmas colors. Start with red polish at the base of each nail and gradually blend into green at the tips using a makeup sponge. Work quickly while the polish remains workable and build up the color slowly with multiple light layers.
Horizontal ombre designs offer easier application for beginners. Apply red polish to the bottom half of each nail and green to the top half. While both colors are still wet, use a clean brush to blend the meeting point back and forth until you achieve a smooth transition.
Vertical ombre effects work particularly well on longer nail shapes. This technique involves blending colors from one side of the nail to the other rather than from base to tip. The result creates a unique sideways gradient that stands out from traditional ombre applications and showcases both colors equally across each nail.
Festive Glitter and Sparkle Nail Polish Ideas

Glitter transforms ordinary Christmas manicures into dazzling holiday statements that catch light beautifully. We’ll explore sophisticated sparkle techniques that elevate your festive nail art beyond traditional solid colors.
Gold Glitter Gradient Techniques
Apply a clear base coat first, followed by a single layer of gold glitter polish for optimal adhesion. Gradually decrease the glitter intensity as you move toward the tip of each nail to create that stunning gradient effect we love during the holidays.
Use a clean makeup sponge to dab on multiple layers of gold glitter polish instead of brushing it directly. Blend each layer seamlessly by gently patting the sponge in overlapping motions until you achieve a smooth gradient transition.
Start with the heaviest glitter concentration at your nail base and work upward with lighter applications. This technique creates depth while maintaining the sophisticated sparkle that makes gold gradients perfect for Christmas parties and holiday gatherings.
Silver Sparkle Topcoats
Apply silver sparkle topcoat over any base color to instantly add that subtle yet festive shine your nails need for the season. This versatile approach works beautifully whether you’re starting with classic reds, deep greens, or even winter whites.
Layer silver glitter polish as a finishing topcoat over different colored bases like burgundy, forest green, or navy blue for varied festive looks. Each combination creates its own unique sparkle pattern that reflects light differently throughout your holiday celebrations.
Use silver topcoats strategically by applying them only to accent nails or creating patterns like tips and stripes. This selective application gives you control over the sparkle intensity while maintaining an elegant, professional appearance for office holiday parties.
Multi-Color Glitter Nail Art
Create multi-dimensional nail art by layering glitters in complementary Christmas colors and varying textures. Mix fine shimmer particles with chunky hexagonal glitters to add visual depth that changes as you move your hands.
Design festive holiday scenes using different colored glitters to form mini Christmas trees, delicate snowflakes, or holly leaves directly on your nails. These detailed designs become conversation starters at holiday gatherings while showcasing your creative nail art skills.
Combine red, green, gold, and silver glitters in strategic patterns across your nails for maximum holiday impact. Apply each color in sections or create scattered confetti effects that capture the joyful spirit of Christmas celebrations.
Winter Wonderland White and Blue Nail Designs

We’re shifting from warm holiday sparkles to cool, sophisticated winter palettes that capture the serene beauty of a snowy industry. These frosty color combinations create an elegant alternative to traditional Christmas colors while maintaining that festive holiday charm.
Snowflake Nail Art Patterns
Delicate snowflake designs transform your nails into miniature winter masterpieces using white or light blue base coats. We recommend starting with a crisp white background to make intricate snowflake patterns pop with maximum contrast. Paint each snowflake using a fine nail art brush, creating unique six pointed designs that mirror nature’s perfect symmetry.
Glitter accents elevate basic snowflake patterns by adding dimensional sparkle to each delicate design. Apply clear or white glitter polish directly over freshly painted snowflakes while they’re still slightly tacky for better adhesion. Choose between subtle white shimmer for daytime elegance or bold silver glitter for evening festivities.
Color variations expand your snowflake options beyond traditional white, incorporating soft pastels like baby blue, lavender, or mint green. We suggest testing different color combinations on practice nails first, as pastel snowflakes work best against darker base colors like navy or deep purple.
Icy Blue Gradient Effects
Gradient techniques create stunning icy effects by blending multiple blue shades from light to dark across each nail. Start with the lightest blue at your cuticle area, gradually deepening the color toward your nail tip using a makeup sponge for smooth transitions. Layer each shade while the previous coat remains slightly wet to achieve seamless blending.
Glossy topcoats enhance the gradient’s icy appearance, creating depth and dimension that mimics frozen surfaces. Apply two thin coats of high quality topcoat, allowing each layer to dry completely between applications. This technique amplifies the blue tones while adding professional looking shine.
Frosty finishing touches complete the winter effect by adding silver or white accents at nail tips. We recommend using a fine striping brush to paint thin white lines that resemble ice crystals, or apply silver metallic polish in small dots to mimic frozen dewdrops.
Pearl White Accent Details
Pearl polish applications create sophisticated accents that complement any winter nail design using lustrous white shades with natural depth. Apply pearl white polish to nail tips for classic French manicure variations, or use it as a base coat under sheer blue tones for subtle elegance. The iridescent quality of pearl polish catches light beautifully under holiday lighting.
Rhinestone embellishments add glamorous touches to pearl accented nails, creating focal points that sparkle like fresh snow. Place small clear or white rhinestones strategically along the nail bed or cuticle line using tweezers and nail glue for secure application. We suggest limiting rhinestones to one or two per nail to maintain elegant balance.
Combination designs merge pearl accents with other winter elements like snowflakes or icy gradients for cohesive holiday looks. Try pairing pearl French tips with blue gradient bases, or add pearl dots around hand painted snowflakes for extra dimension. These mixed techniques create unique nail art that perfectly captures winter’s magical essence.
Metallic Christmas Nail Polish Trends

Metallic finishes bring unprecedented sophistication to Christmas nail art. These lustrous shades create stunning focal points that complement any holiday outfit.
Rose Gold Holiday Glamour
Rose gold accents deliver timeless elegance for Christmas manicures. We recommend applying rose gold as accent nails over a bold red base to create sophisticated contrast. This metallic shade pairs beautifully with softer neutral bases like nude or cream for subtle holiday glamour.
Professional application starts with a quality base coat followed by two thin layers of rose gold polish. Building color gradually prevents streaking and ensures even coverage across all nails. Gold polish works equally well as an alternative to rose gold, offering classic metallic appeal.
Design versatility makes rose gold perfect for various Christmas looks. Try incorporating rose gold glitter gradients over traditional red bases for added dimension. These metallic shades transition seamlessly from casual holiday gatherings to formal Christmas events.
Bronze and Copper Festive Looks
Bronze tones offer warm and inviting festive appeal for holiday manicures. We love how copper metallics create earthy sophistication that stands out from traditional Christmas colors. These warm metallics provide excellent alternatives to standard gold finishes.
Pairing techniques maximize bronze and copper’s festive potential. Bold red bases underneath bronze accents create rich, luxurious combinations perfect for Christmas parties. Soft pastel backgrounds allow copper tones to shine while maintaining subtle holiday elegance.
Application methods for bronze polish require steady hands and patience. Use thin coats to prevent bubbling and ensure smooth metallic coverage. Bronze finishes look stunning when applied over dark bases like deep burgundy or forest green.
Chrome Mirror Finish Techniques
Chrome finishes provide sleek mirror shine that’s trending for Christmas 2025. We’ve seen incredible results using chrome powders over gel base coats for maximum reflectivity. Popular chrome colors include gold, rose gold, and silver for versatile holiday applications.
Application process begins with proper nail preparation and quality base coat application. Chrome powders require exact gel base formulations to achieve that perfect mirror finish. Professional buffing creates the smooth surface necessary for flawless chrome reflection.
Design possibilities expand dramatically with chrome finishes. Simple chrome applications over neutral bases create elegant holiday looks suitable for any occasion. Intricate patterns using chrome accents over traditional Christmas colors deliver show stopping results at holiday gatherings.
Chrome maintenance requires gentle handling to preserve the mirror effect. Top coats specifically designed for chrome finishes extend wear time and protect the reflective surface. These metallic trends continue gaining popularity throughout the holiday season.
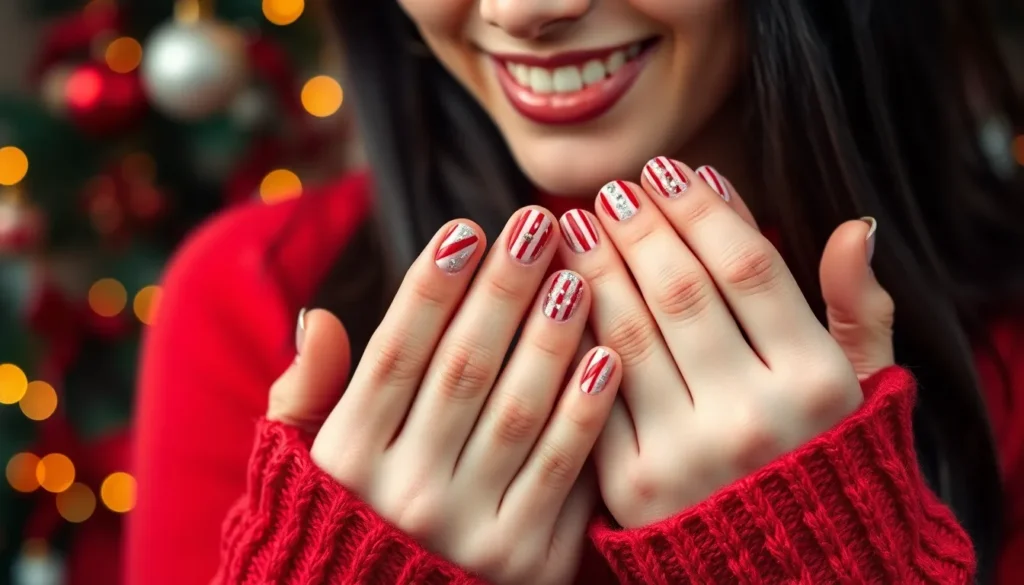
Candy Cane Striped Nail Art Ideas

Candy cane striped nail art brings the iconic holiday treat directly to your fingertips with playful red and white patterns. These festive designs capture the sweet spirit of Christmas while offering versatile styling options for any holiday celebration.
Classic Red and White Stripes
Classic red and white striped nails create the most recognizable candy cane look with alternating bands across each nail. We recommend starting with a red or white base color, then applying the contrasting stripes using thin nail brushes or striping tape for clean lines. Vertical stripes offer a lengthening effect for shorter nails, while horizontal stripes work beautifully on wider nail beds.
Glitter accents transform these traditional stripes into glamorous holiday statements. Adding metallic touches between the stripes creates dimension and catches light beautifully during festive gatherings. This timeless design pairs perfectly with solid red or white nails on alternating fingers for a cohesive manicure.
Peppermint Twist Designs
Peppermint twist patterns feature spiral swirls of red and white that mimic the playful curves of peppermint candies. These ever-changing designs work best as accent nails on one or two fingers, paired with solid colors or subtle glitter on the remaining nails. Using thin nail art pens or fine brushes ensures precise spiral lines that create authentic peppermint candy effects.
Combining peppermint twists with other festive motifs like snowflakes or tiny bows enhances the overall Christmas theme. The swirling patterns add movement and visual interest to your manicure, making each nail a miniature work of art. This design technique works particularly well on longer nails where the spiral has room to develop fully.
Diagonal Candy Cane Patterns
Diagonal candy cane stripes offer a modern twist on traditional horizontal or vertical designs, creating movement and contemporary appeal. These slanted patterns work especially well for 2025 nail trends, as they add uniqueness to each nail while maintaining the festive candy cane theme. Striping tape helps achieve perfectly straight diagonal lines, or you can paint them freehand for a more organic look.
Pairing diagonal stripes with complementary holiday patterns creates cohesive Christmas nail art collections. Snowflakes, holly leaves, or gingerbread motifs work beautifully alongside diagonal candy cane designs. This versatile pattern suits both DIY enthusiasts and professional salon manicures, offering flexibility in application techniques and design complexity.
Christmas Tree Inspired Nail Designs

Moving from candy cane stripes to nature inspired motifs, we’re diving into Christmas tree nail designs that bring the magic of evergreen forests to your fingertips.
Green Base with Ornament Details
We start with a vibrant green base coat that serves as our canvas for festive ornament details. Forest green or emerald shades work beautifully as foundation colors for this design approach. Small dots in red, blue, gold, and silver create the perfect ornament effect across your nails.
Application technique involves painting tiny circles using a dotting tool or toothpick for precision. We recommend spacing ornaments randomly rather than in perfect rows for a more natural Christmas tree appearance. Metallic polishes in gold and silver add extra sparkle that catches light beautifully during holiday gatherings.
Color combinations expand beyond traditional ornament shades to include purple, pink, and turquoise for modern interpretations. We suggest adding a glossy topcoat to make the ornament details pop against the green background.
Tree Silhouette Nail Art
We create stunning minimalist designs by painting dark tree silhouettes against light colored backgrounds. Black or deep forest green work perfectly for the tree shapes while white, cream, or pale blue bases provide striking contrast.
Silhouette techniques require steady hands and thin brushes for clean lines. We start from the bottom of the nail and work upward, creating triangular shapes that resemble classic Christmas tree forms. Nail art brushes or striping brushes help achieve the precise lines needed for professional looking results.
Design variations include multiple tree sizes on different nails or single statement trees on accent nails. We often add tiny star details at the tree tops using yellow or gold polish for extra festive appeal. Matte topcoats create sophisticated finishes that work well in professional settings.
Pine Branch Accent Patterns
We incorporate delicate pine branch patterns that capture winter wonderland themes across your manicure. These designs work exceptionally well as accent patterns on one or two nails per hand. Various green shades create depth and dimension in the branch artwork.
Branch painting methods involve using fan brushes or splayed bristles to create realistic pine needle textures. We layer different green tones from sage to hunter green for authentic looking evergreen effects. Subtle glitter applications enhance the frosty appearance of winter pine branches.
Accent placement strategies focus on ring fingers or thumbs for maximum visual impact without overwhelming the overall design. We combine pine branches with snowflake details or small red berry accents for comprehensive winter nail art. Clear or slightly tinted base coats allow the green branch patterns to stand out prominently.
Holiday Ornament Nail Polish Concepts

Transform your nails into miniature holiday ornaments with these stunning three dimensional designs. We’ll explore techniques that bring the sparkle and joy of Christmas tree decorations directly to your fingertips.
Bauble-Inspired Rounded Designs
Create spherical ornament shapes using acrylic or gel polish to achieve the perfect rounded bauble effect. We recommend building up the polish in multiple thin layers on the center of each nail to form a dimensional dome. Metallic colors like silver, gold, and rose gold work exceptionally well for mimicking authentic Christmas ornaments.
Apply your base coat first, then use a small dotting tool to create the rounded shape with your chosen metallic shade. Silver baubles offer classic elegance while gold provides warm festive charm. Rose gold delivers a modern twist that complements both traditional and contemporary holiday outfits.
Finish with a high gloss topcoat to enhance the ornament’s reflective quality. The dimensional effect catches light beautifully, making your nails shimmer like real Christmas decorations throughout the day.
Ornament Hook Detail Art
Add realistic ornament hooks using a fine nail art brush and contrasting colors for authentic detailing. We suggest using silver or gold polish to paint tiny hook shapes at the top of your bauble designs. This small detail transforms simple rounded designs into convincing Christmas ornament replicas.
Position the hook slightly off center for a more natural, hanging ornament appearance. Black or dark gray polish works well for creating shadow effects beneath the hook. Practice the hook shape on a practice nail first to perfect your technique.
Use a steady hand and draw the hook in one smooth motion for the cleanest lines. Allow each hook to dry completely before adding any additional details or topcoat to prevent smudging.
Colorful Christmas Ball Effects
Combine bright festive colors like red, green, blue, and yellow to create vibrant Christmas ball designs. We recommend starting with a clear base and applying each color in small sections to build your ornament pattern. Blend the colors while they’re still wet for seamless transitions between shades.
Create striped patterns by alternating colors in thin vertical or horizontal lines across the nail. Geometric designs work beautifully when you section the nail into triangular or diamond shapes using different colors. Bold color combinations make the biggest visual impact at holiday gatherings.
Add white highlights using a thin brush to simulate light reflecting off the ornament surface. These small details enhance the three dimensional illusion and make your nail art appear more professional and polished.
Snowman and Winter Character Nail Art

Winter characters bring whimsical charm to your holiday manicure, transforming ordinary nails into festive storytelling canvases. These playful designs capture the magic of snowy days and beloved seasonal figures.
Simple Snowman Face Designs
Creating adorable snowman faces starts with a crisp white polish base that mimics fresh snow. We recommend applying two thin coats of white polish for full opacity and a smooth finish. Black polish creates the classic coal eyes and smile, while a tiny orange dot adds the perfect carrot nose detail.
Small dotting tools make precise facial features effortless to achieve on shorter nails. You can enhance these designs by adding small black dots for buttons running down the nail. Glitter topcoat transforms simple snowman faces into sparkling winter wonderlands that catch holiday lights beautifully.
Reindeer Silhouette Patterns
Reindeer silhouettes offer elegant simplicity against white or light-colored backgrounds for maximum contrast. We suggest using dark brown or black polish to paint the distinctive antler shapes and body outline. Red dots for Rudolph’s nose add a playful Christmas touch to these sophisticated designs.
Practice the antler shape on paper first to perfect your technique before applying to nails. Light blue or silver backgrounds create stunning alternatives to traditional white bases. These silhouette patterns work exceptionally well on accent nails paired with solid holiday colors on remaining fingers.
Santa Hat Accent Nails
Santa hat accents transform any manicure into a festive celebration with minimal effort required. We recommend painting these charming details on one or two nails using bright red polish for the hat portion. White polish creates the fluffy trim and pompom, while a thin black line adds the belt detail.
Start with the red triangular hat shape, then add white details once the base color dries completely. These accent designs pair beautifully with solid red or green polish on other nails. Tiny rhinestones can replace painted details for extra sparkle during holiday parties and gatherings.
Plaid and Tartan Christmas Nail Patterns

Plaid patterns bring cozy sophistication to holiday nail art, offering endless possibilities for creating festive designs that capture the warmth of winter fashion. These timeless patterns transform your nails into stunning conversation pieces that perfectly complement your holiday wardrobe.
Buffalo Check Nail Designs
Buffalo check patterns create bold, striking nail art that instantly captures attention during holiday gatherings. We recommend starting with a red base coat and adding black squares using a fine detail brush to achieve the classic alternating pattern. Green and white combinations offer a fresh take on traditional buffalo check, while navy and cream provide sophisticated alternatives for professional settings.
Achieving clean lines becomes easier when you use nail tape or stencils to create precise geometric shapes. We suggest practicing the pattern on a nail wheel before attempting your final design to ensure consistent spacing. Adding a matte topcoat transforms glossy buffalo check into a modern, textured finish that perfectly complements winter sweaters and scarves.
Traditional Scottish Tartan Looks
Scottish tartan patterns bring rich heritage and elegance to Christmas nail art through their intricate intersecting lines and bold color combinations. We love incorporating the Royal Stewart tartan with its vibrant red base, navy lines, and yellow accents for a truly regal holiday look. Black Watch tartan offers a more subdued option with deep green, navy, and black creating sophisticated winter elegance.
Creating authentic tartan requires layering thin horizontal and vertical lines over your base color using a striping brush or nail art pen. We recommend starting with the dominant color as your base, then adding the secondary lines before finishing with accent colors. Metallic gold or silver lines can replace traditional yellow accents to add festive sparkle while maintaining the pattern’s authenticity.
Cozy Winter Plaid Effects
Winter plaid effects combine traditional tartan techniques with seasonal elements like snowflakes and frost patterns for uniquely festive designs. We suggest using burgundy and forest green as your primary colors, then adding white intersecting lines to create that cozy cabin aesthetic. Incorporating small snowflake decals at line intersections transforms simple plaid into winter wonderland art.
Textured plaid effects become possible when you layer different finishes within the same pattern, such as combining matte and glossy polishes. We love creating depth by using slightly different shades of the same color family for the intersecting lines. Adding tiny rhinestones or glitter at strategic intersection points creates dimensional plaid that catches light beautifully throughout your holiday celebrations.
Conclusion
The holiday season offers endless opportunities to transform your nails into festive masterpieces. From timeless red and green combinations to whimsical winter characters these diverse nail polish ideas ensure there’s something perfect for every holiday celebration.
Whether you’re drawn to elegant metallic finishes sophisticated winter wonderland themes or playful candy cane stripes the key is choosing designs that reflect your personal style. Don’t be afraid to mix techniques or combine different elements to create truly unique looks.
Remember that practice makes perfect when it comes to nail art. Start with simpler designs and gradually work your way up to more intricate patterns as your skills develop.
This Christmas let your nails be the finishing touch that completes your holiday look. With these inspiring ideas at your fingertips you’re ready to create stunning manicures that’ll sparkle throughout the entire festive season.
Frequently Asked Questions
What are the most popular Christmas nail polish colors for 2025?
The most popular Christmas nail polish colors include classic red and green combinations, elegant whites and shimmering golds, icy blues, and metallic finishes like rose gold, bronze, and copper. Modern holiday nail art has expanded beyond traditional colors to include sophisticated winter palettes and chrome mirror finishes for a contemporary festive look.
How do I create a perfect candy cane striped nail design?
Start with a white base coat and let it dry completely. Use nail tape or striping brushes to create clean red stripes diagonally across your nails. For peppermint twist effects, alternate between thin and thick stripes. Apply a glossy topcoat to seal the design and add glitter accents for extra glamour.
What’s the best way to apply glitter gradient nail polish?
Begin with a clear base coat, then use a makeup sponge to dab gold or silver glitter polish from the nail tip toward the cuticle, creating a gradient effect. Build up layers gradually for intensity. Focus the heaviest glitter concentration at the tips and blend downward for a smooth transition.
How can I make my Christmas nail art last longer?
Use a quality base coat before applying any color, apply thin layers of polish rather than thick coats, and always finish with a high-quality topcoat. Avoid exposing your nails to excessive water and wear gloves when cleaning. Touch up the topcoat every few days to maintain shine and prevent chipping.
Are Christmas nail designs suitable for professional settings?
Yes, many Christmas nail designs work well in professional environments. Opt for subtle designs like matte red finishes, pearl white accents, or simple metallic details. Avoid overly bold glitter or three-dimensional elements. Classic red and green combinations with minimal embellishments maintain festive spirit while remaining workplace-appropriate.
What tools do I need for Christmas nail art?
Essential tools include nail tape for clean lines, fine detail brushes for intricate patterns, dotting tools for ornament effects, makeup sponges for gradients, and striping brushes for precise designs. Additionally, have quality base coats, topcoats, and various festive polish colors including metallics and glitters.
How do I create realistic snowflake nail art?
Start with a crisp white or light blue base. Use a thin nail art brush to draw delicate snowflake patterns with white or silver polish. Create six-pointed designs with branching details. Add small dots and lines for intricate patterns. Finish with glitter accents and a glossy topcoat for dimension.
Can I combine different Christmas nail art techniques?
Absolutely! Mixing techniques creates unique, personalized designs. Combine glitter gradients with snowflake patterns, add metallic accents to plaid designs, or incorporate character elements with traditional Christmas trees. Start with simpler combinations and gradually experiment with more complex layering techniques for stunning results.


