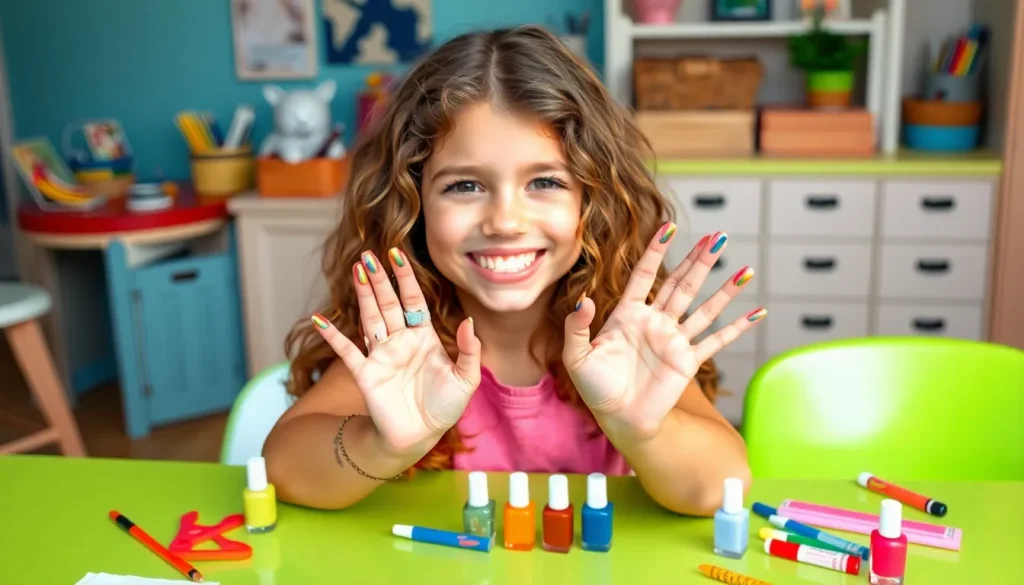
When it comes to expressing creativity and personal style, nail art offers the perfect canvas for 11-year-olds to explore their artistic side. We understand that preteens want to feel grown-up while still maintaining age-appropriate looks that parents can feel good about.
Finding the right balance between fun and suitable can be challenging for both kids and parents. That’s why we’ve curated a collection of nail designs that are colorful, creative, and completely appropriate for middle schoolers. From simple polka dots to seasonal themes, these ideas will help young nail artists develop their skills without breaking any school dress codes.
Our carefully selected nail ideas focus on creativity over complexity, using safe, washable polishes and easy techniques that kids can master at home. We’ll show you how to create stunning looks that boost confidence and allow for self-expression while keeping parents happy with the results.
Cute and Colorful Nail Ideas for 11 Year Olds
We’ve curated the most vibrant and age-appropriate nail designs that’ll make any 11-year-old the envy of their friends. These colorful creations strike the perfect balance between fun expression and school-appropriate style.
Rainbow Gradient Nails
Creating a rainbow gradient transforms ordinary nails into miniature works of art that capture every color of the spectrum. Start with a white base coat to make the colors pop, then use a makeup sponge to blend red, orange, yellow, green, blue, and purple polishes from cuticle to tip. Blending technique requires dabbing the sponge gently rather than dragging it across the nail surface. Each color should fade seamlessly into the next, creating that dreamy sunset effect that’s perfect for summer days or anytime you want to add extra brightness to your look.
Tips for perfect rainbow gradients include working quickly before the polish dries and using thin coats to prevent clumping. We recommend practicing on a piece of paper first to get the color placement just right. Cleanup becomes easier when you apply petroleum jelly around the nail area before starting the gradient process.
Pastel Ombre Effect
Pastel ombre nails offer a softer approach to gradient designs using gentle shades like mint green, lavender, peachy pink, and sky blue. Begin with the lightest shade at the base and gradually transition to slightly deeper tones toward the tip. This technique works beautifully for spring and creates an elegant look that’s still playful enough for young nail artists. Sponge application remains the key to achieving smooth color transitions without harsh lines.
Blending pastel shades requires a lighter touch since these colors are naturally more subtle than their vibrant counterparts. We suggest using three coordinating pastel shades maximum to maintain that dreamy, cloud-like appearance. Popular combinations include pink to purple to blue or yellow to peach to coral for a sunrise effect.
Bright Color Blocking
Color blocking involves painting each nail a different bold color to create a fun, mismatched rainbow effect across all ten fingers. Choose five vibrant shades like hot pink, electric blue, sunny yellow, lime green, and bright orange for maximum impact. This design lets you experiment with multiple favorite colors without committing to just one shade. Each nail becomes its own statement piece while the overall look remains cohesive and intentionally playful.
Strategic color placement can make your color blocking design even more eye-catching. We recommend alternating warm and cool tones or placing complementary colors next to each other for visual interest. Some nail artists prefer using the same color family but in different intensities, like various shades of pink from pale to magenta.
Simple DIY Nail Art Techniques Perfect for Beginners

Now that we’ve explored colorful nail designs, let’s jump into easy techniques that young artists can master at home. These methods require minimal tools and provide impressive results for beginners.
Polka Dot Designs Using Bobby Pins
Bobby pins transform into perfect dotting tools for creating charming polka dot patterns. We recommend dipping the end of a bobby pin into nail polish and gently pressing it onto the nail surface to form uniform dots. Start with a base color and let it dry completely before adding contrasting dots on top.
Different sized dots create visual interest across your nail art design. Use the larger end of the bobby pin for bigger dots and the smaller end for tiny accents. Alternate colors between nails or create gradient effects by using multiple shades of the same color family.
Clean the bobby pin between colors using nail polish remover to prevent muddy mixtures. Practice the pressure needed to create consistent dot sizes on a paper plate before applying to nails.
Striping Tape Patterns
Striping tape creates professional looking geometric designs with crisp, clean lines. We suggest applying the tape to dry base coat nails in various patterns like diagonal stripes, chevrons, or intersecting lines. Press the tape edges down firmly to prevent polish from seeping underneath.
Paint over the entire nail with your chosen contrast color while the tape remains in place. Remove the tape immediately after painting and before the polish dries completely for the sharpest lines. This timing prevents the polish from peeling off with the tape.
Experiment with different tape widths to create varying line thicknesses throughout your design. Combine multiple tape applications to build complex geometric patterns that look sophisticated yet remain achievable for beginners.
Easy Stamping Methods
Nail stamping plates offer intricate designs that would be impossible to paint freehand. We recommend starting with simple patterns like flowers, hearts, or basic geometric shapes before attempting complex designs. Apply a base coat and let it dry completely before beginning the stamping process.
Roll the stamping polish across the chosen design plate to fill all the etched lines completely. Scrape excess polish away using the included scraper tool held at a 45-degree angle. Press the stamper onto the plate design and immediately transfer it to your nail with a rolling motion.
Work quickly during the stamping process since the polish on the plate dries rapidly. Clean both the plate and stamper with nail polish remover between different designs to maintain crisp pattern transfers.
Fun Themed Nail Designs That Match Your Personality

We’ve found that themed nail designs let 11-year-olds showcase their unique interests and favorite things. Personalizing your nails with exact themes creates a fun way to express who you are.
Animal Print Patterns
Leopard print nails capture that wild side with golden yellows and brown spots dotted across each nail. We recommend starting with a light base coat and adding irregular spots using a small brush or dotting tool for the most authentic look.
Zebra stripe designs create bold statements using black and white alternating patterns that work perfectly for kids who love dramatic contrasts. The stripes can run vertically, horizontally, or diagonally depending on your preferred style.
Giraffe print patterns offer a softer animal theme with tan backgrounds and darker brown irregular patches that appeal to those who prefer earth tones. These designs work especially well when you vary the patch sizes across different nails for a natural appearance.
Floral Nail Art
Simple daisy designs feature white petals around yellow centers that we can easily create using a thin brush or even a toothpick. These classic flowers work beautifully on pastel backgrounds like light pink or mint green.
Cherry blossom patterns bring delicate pink and white blooms to your fingertips with small five-petaled flowers scattered across the nail surface. We suggest adding tiny dots in the flower centers using a contrasting color for extra detail.
Sunflower motifs brighten up any manicure with their cheerful yellow petals and dark brown centers that radiate positive energy. These larger flowers work best as accent nails paired with coordinating solid colors on the remaining fingers.
Galaxy and Space Themes
Glittery star patterns transform nails into miniature night skies using dark blue or black bases topped with silver and gold star stickers or hand-painted stars. We recommend layering different sized stars for a realistic cosmic effect.
Planet designs feature colorful orbs representing different planets in our solar system, with Saturn’s rings being particularly popular among space enthusiasts. Each nail can showcase a different planet, creating an educational and beautiful set.
Nebula effects combine purple, pink, and blue colors blended together with a sponge technique, then topped with fine glitter to mimic the swirling gases of distant galaxies. These dreamy designs work perfectly for kids who love astronomy and science fiction.
Safe and Age-Appropriate Nail Products for Young Teens

Choosing the right nail products becomes crucial when helping 11-year-olds explore their creativity safely. We’ll guide you through the safest options that protect young nails while still delivering beautiful results.
Non-Toxic Nail Polish Options
Kid Licks stands out as our top recommendation for safety conscious parents, offering nail polish made from 100% edible ingredients that won’t harm kids if accidentally ingested. This food-based formula provides peace of mind while delivering vibrant colors.
SuncoatGirl delivers water-based formulas that eliminate harsh odors and toxic fumes completely. Their polishes apply smoothly and come in dozens of appealing shades perfect for young nail artists.
Piggy Paint creates water-based polishes free from harsh chemicals that typically cause nail damage. These formulas dry quickly and resist chipping better than many traditional polishes.
Little Lady Products offers 17-toxin free options that align with vegan and cruelty-free standards. Their extensive color range includes metallics, glitters, and classic shades that appeal to tweens.
We recommend checking for “5-Free,” “7-Free,” and “10-Free” certifications when shopping for youth nail products. These labels guarantee the absence of harmful chemicals like formaldehyde, toluene, and dibutyl phthalate.
Peel-Off Base Coats
Peel-off base coats revolutionize nail care for young users by eliminating the need for harsh nail polish removers. These innovative products create a protective barrier that allows polish to be removed like a sticker.
Application becomes simple when you apply one thin coat and let it dry completely before adding color. The base coat should cover the entire nail surface evenly for best results.
Removal takes just seconds by gently lifting one edge and peeling the entire polish layer off in one piece. This method prevents nail damage and makes cleanup effortless for busy parents.
Brands specializing in kid-friendly formulas often include peel-off technology in their base coat offerings. We suggest looking for water-based peel-off bases that complement the non-toxic polishes mentioned above.
Gentle Nail Art Tools
Soft brushes designed specifically for delicate hands make detailed nail art achievable for young artists. These tools feature shorter handles and softer bristles that won’t scratch or damage developing nails.
Nail art stickers provide professional looking results without requiring advanced skills or steady hands. Kids can choose from thousands of designs including animals, flowers, geometric patterns, and seasonal themes.
Dotting tools with various tip sizes allow for perfect polka dots, flower centers, and decorative accents. We recommend sets that include different sized tips for creating varied design elements.
Stamping plates offer mess-free nail art options perfect for beginners who want complex looking designs. These tools work best with specially formulated stamping polishes that transfer cleanly.
Nail art pens provide precision control for drawing lines, writing words, or adding fine details to existing designs. Look for pens with non-toxic, washable ink that won’t stain skin or clothing.
Seasonal Nail Ideas for Every Time of Year

We love celebrating each season with themed nail designs that capture the magic of every time of year. These seasonal nail ideas help 11-year-olds connect with nature’s changing beauty while expressing their creativity through fun, age-appropriate designs.
Spring Flower Designs
Delicate daisies bring fresh spring energy to young nails with their simple white petals and sunny yellow centers on pastel backgrounds. We recommend using a thin brush or dotting tool to create these charming flowers that symbolize new beginnings.
Pink flower nails offer a sweet springtime look by combining soft pink blooms with neutral base colors like cream or light beige. These gentle designs work perfectly for school settings while still showing off artistic flair.
Hibiscus flowers add tropical vibrancy to spring manicures with their bold petals in coral, magenta, and yellow hues. We suggest starting with simple five-petal shapes and adding small dots for the flower centers to create these eye-catching designs.
Summer Beach Themes
Seashells transform nails into miniature beach scenes using small shell stickers or hand-painted designs in pearly whites and soft corals. These ocean-inspired patterns capture summer vacation memories and work beautifully with sandy beige base colors.
Mermaid scales create magical underwater effects using iridescent polishes in blues, purples, and sea greens applied with a fish-scale stencil. We love how these shimmery designs catch the light and remind us of mythical sea creatures.
Surfboard stripes bring beach culture to fingertips with colorful horizontal bands reminiscent of classic surfboard designs. These playful patterns use bright combinations like orange and blue or pink and yellow to capture summer’s energetic vibe.
Fall Leaf Patterns
Autumn leaves showcase fall’s natural beauty through leaf shapes painted in traditional orange, red, and golden yellow shades. We recommend using a small brush to create maple leaf outlines or simple oval shapes for easier application.
Golden leaves add sophisticated autumn elegance by combining metallic gold accents with neutral backgrounds in taupe or cream. These designs capture falling leaves’ shimmer when sunlight filters through autumn trees.
Acorn designs create whimsical fall themes using small brown ovals topped with golden caps on earthy base colors. We suggest adding tiny dots or lines to represent acorn textures for extra detail.
Winter Holiday Nails
Snowflakes bring winter magic to manicures through delicate white designs on light blue or silver backgrounds. These intricate patterns can be created using nail art pens or stamping plates for precise, symmetrical shapes.
Candy cane stripes evoke festive holiday spirit with classic red and white diagonal or curved patterns that remind us of peppermint treats. We love alternating these stripes with solid red or green accent nails for variety.
Santa hats add playful Christmas cheer through small triangular red shapes topped with white pom-poms and trim details. These adorable holiday designs work perfectly as accent nails paired with solid red or green base colors.
Quick 15-Minute Nail Art Ideas for Busy School Days

Busy school mornings don’t have to mean boring nails. We’ve curated these speedy nail art techniques that take just 15 minutes or less to complete.
Single Accent Nail Designs
Single accent nails create maximum impact with minimal effort. Choose one nail on each hand to showcase a special design while keeping the other nails a solid color.
Glossy bee accents transform ordinary nails into buzzing masterpieces. Paint your ring finger with a bright yellow base coat and add tiny black stripes using a thin nail art brush. Complete the look by dotting on white wings and a small black head for an adorable bee design.
Rainbow accent nails bring instant joy to any manicure. Select your favorite finger and paint horizontal rainbow stripes using a small brush or nail art pen. Keep the remaining nails in a neutral shade like white or clear to make your rainbow pop.
Star accent designs add celestial sparkle to school appropriate nails. Paint one nail with a dark blue or purple base and use a dotting tool dipped in white polish to create constellation patterns. Small star stickers work perfectly as an even quicker alternative.
French Tip Variations
French tips get a playful makeover with these kid friendly twists. Traditional white tips become canvases for creative expression while maintaining an elegant foundation.
Pastel French tips soften the classic look with gentle colors. Replace white tips with soft pink, lavender, mint green, or baby blue for a dreamy effect. Apply the pastel shade to just the nail tips using steady strokes or nail guides for crisp lines.
Glitter French tips add sparkle without overwhelming young nails. Choose fine glitter in silver, gold, or rainbow colors to coat the nail tips. Press the glitter gently into wet polish and seal with a clear top coat for long lasting shine.
Colored French variations break traditional rules with fun alternatives. Try bright coral tips with nude bases, or reverse the classic by painting colored bases with white tips. Multiple color combinations like pink and orange create vibrant, youthful designs.
Simple Geometric Shapes
Geometric patterns offer structured beauty that’s surprisingly easy to achieve. These clean line designs work perfectly for school settings while showcasing artistic flair.
Chevron patterns create ever-changing zigzag effects using just two colors. Apply a base coat in your lighter shade and let it dry completely. Use striping tape to create chevron templates, then paint over with your second color before carefully removing the tape.
Stripe designs alternate between two or three colors for classic appeal. Vertical stripes elongate shorter nails, while horizontal stripes create width. Apply each color in thin, even coats and use a cleanup brush dipped in acetone to perfect the edges.
Triangle accents add modern geometric interest to any manicure. Paint small triangles at the base of each nail using contrasting colors, or create triangle tips for a fresh take on French manicures. Nail art tape helps achieve perfectly straight triangle edges.
School-Friendly Nail Ideas That Follow Dress Codes

Handling school dress codes while expressing creativity becomes simple with these polished nail designs. We’ve selected age-appropriate options that maintain elegance while ensuring compliance with most educational institutions’ guidelines.
Neutral Color Palettes
Neutral colors create the perfect foundation for school-appropriate nail art that administrators and parents appreciate. We recommend soft pink shades, gentle beiges, and light gray tones that complement any school uniform or casual outfit. Pastel colors like lavender, mint green, and peachy pink offer subtle beauty without drawing unwanted attention in the classroom.
These understated shades work exceptionally well for everyday wear because they look neat and professional throughout the school week. We suggest brands like SuncoatGirl and Piggy Paint for their non-toxic formulas in beautiful neutral tones. Light colors also make it easier to spot chips or wear, helping maintain a polished appearance between touch-ups.
Subtle Glitter Accents
Glitter accents add sparkle to neutral nails without overwhelming the overall look or violating dress codes. We recommend applying light glitter to just one or two accent nails rather than all ten fingers for a balanced appearance. Silver, gold, and soft holographic glitters complement neutral base colors beautifully while maintaining school-appropriate subtlety.
Tip application works particularly well for glitter accents because it mimics a French manicure while adding playful shimmer. We suggest using fine glitter particles instead of chunky pieces for a more refined finish that catches light gently. This technique allows young nail artists to express creativity while keeping their manicures classroom-ready.
Classic French Manicures
French manicures remain timeless choices for school settings because they offer sophistication without flashiness. We love how white tips paired with natural or light pink bases create clean, polished looks that work with any school attire. This classic design teaches proper nail care habits while maintaining an elegant appearance.
Modern French variations include using pale pink or beige tips instead of stark white for a softer appearance. We recommend keeping the smile line neat and even, which helps develop steady hand control for future nail art endeavors. Short nails work best for French manicures in school settings because they appear professional and won’t interfere with writing or other classroom activities.
Special Occasion Nail Designs for Parties and Events

Special occasions give 11-year-olds the perfect opportunity to experiment with bolder, more creative nail designs that go beyond everyday school-appropriate styles. These festive nail art ideas help young artists celebrate memorable moments while expressing their personality through fun, age-appropriate designs.
Birthday Party Nail Art
Cute character designs steal the show at birthday celebrations, featuring beloved cartoon characters and colorful emojis that add instant playfulness to any party look. We love using bright colors like hot pink, electric blue, and sunshine yellow to make these characters pop against the nail base.
Confetti nail art captures the excitement of birthday festivities by painting small dots in various vibrant colors across each nail to perfectly resemble scattered party confetti. This technique works beautifully when you alternate between metallics like gold and silver with bright primary colors.
Number nails create a personalized birthday statement by highlighting the special age in bold, contrasting colors on one or two accent nails. Consider using glitter polish or rhinestones to make the birthday number extra special and eye-catching for photos.
Holiday Celebration Themes
Christmas nail designs bring festive cheer with classic symbols like delicate snowflakes, adorable reindeer faces, and tiny Santa hats painted in traditional red and green color schemes. We recommend adding small white dots to create realistic snowflake patterns or using a thin brush to paint reindeer antlers.
Halloween nail art embraces spooky fun through friendly ghost designs, cute bat silhouettes, and smiling jack-o’-lantern faces using the iconic orange and black color combination. These designs work especially well when you alternate between matte and glossy finishes for added texture.
Easter celebration nails welcome spring with pastel-colored Easter eggs, sweet bunny faces, and delicate spring flowers that capture the season’s fresh, cheerful spirit. Soft lavender, mint green, and butter yellow create the perfect Easter palette for these charming designs.
Sleepover Nail Ideas
Glow in the dark polish creates magical nighttime effects that make sleepovers extra special, transforming ordinary nails into glowing conversation starters once the lights go out. We suggest applying two coats of glow polish over a white base for maximum luminosity.
Friendship symbol designs celebrate special bonds through matching heart patterns, infinity symbols, or coordinating friendship bracelets painted in bright neon colors like electric pink and lime green. Each friend can choose complementary colors to create a unified group look.
Movie night themed nails honor sleepover entertainment with fun popcorn bucket designs, classic film reel patterns, or favorite movie character silhouettes painted in bold, eye-catching colors. These designs spark conversation and create lasting memories of special nights with friends.
Nail Care Tips for Healthy Young Nails

We believe healthy nails are the perfect foundation for any nail art adventure. Teaching proper nail care habits early helps 11-year-olds maintain strong, beautiful nails that can handle creative designs.
Proper Nail Hygiene
We recommend washing hands thoroughly and drying them completely after each wash, paying special attention to cleaning under the nails to prevent infections. Regular nail cleaning prevents dirt and bacteria from accumulating in hard-to-reach areas. Clean clippers or scissors work best for trimming nails straight across to prevent ingrown nails from developing. Short, clean nails trap less dirt and bacteria than longer ones, making them healthier overall. Gentle nail files smooth rough edges without causing damage to the nail plate.
Cuticle Care Basics
We suggest leaving cuticles alone completely to prevent infection and protect the nail root naturally. Cuticles act as protective barriers that shouldn’t be pushed back or cut with harsh tools. Dry cuticles benefit from nourishing cuticle oil or gentle moisturizer applied regularly. Natural oils keep cuticles soft and healthy without requiring aggressive manipulation. Avoiding harsh chemicals and metal tools protects this delicate area from unnecessary damage.
Strengthening Techniques
We know that balanced diets rich in protein, fruits, vegetables, and whole grains support overall nail health from within. Biotin-rich foods like eggs, bananas, and nuts may help strengthen nails naturally over time. Moisturizing nails and cuticles after washing hands prevents dryness and breakage that weakens nail structure. Limiting exposure to harsh chemicals such as acetone-based nail polish removers protects nails from becoming brittle. Wearing gloves during household chores shields nails from cleaning products and physical damage. Well-fitting shoes prevent toenail problems that can affect overall nail health and comfort.
Budget-Friendly Nail Art Using Household Items

Creating stunning nail art doesn’t require expensive tools or professional supplies. We can achieve amazing results using simple items found around our homes.
Creating Designs with Tape
Striped nails become effortless when we place strips of regular household tape across our nails before applying polish. We apply different colored polishes over the tape sections and carefully remove the tape once the polish dries completely for crisp, professional-looking lines.
Geometric patterns emerge beautifully when we cut tape into various shapes like triangles, diamonds, or squares. We position these tape pieces strategically on our nails to create modern art-inspired designs. The key lies in pressing the tape edges firmly to prevent polish from bleeding underneath.
Negative space designs work wonderfully by covering portions of our nails with tape before painting. We create interesting patterns by leaving some areas unpainted, resulting in sophisticated two-tone effects that look much more expensive than they actually are.
Using Toothpicks for Detail Work
Dotting patterns come to life when we dip clean toothpicks into nail polish and gently press them onto our nails. We create polka dots, flower centers, or even constellation patterns by varying the pressure and spacing between dots.
Fine line details become achievable as we drag the pointed tip of a toothpick through wet polish to create delicate swirls, hearts, or intricate border designs. We clean the toothpick between colors to maintain crisp, clean lines throughout our artwork.
Marbling effects develop naturally when we drop different colored polishes onto our nails and use a toothpick to swirl them together. We work quickly while the polish remains wet to achieve beautiful, organic patterns that resemble natural stone or tie-dye effects.
Sponge Gradient Techniques
Sponge application transforms ordinary makeup sponges into powerful nail art tools by dabbing them into polish and pressing onto our nails. We build up colors gradually, creating smooth transitions that rival professional salon techniques.
Ombre effects develop through layering different shades from light to dark across our nails using small pieces of makeup sponge. We blend the colors while they’re still slightly wet to achieve seamless gradients that look incredibly sophisticated.
Multi-color gradients emerge when we apply several colors to different sections of a damp sponge and press it onto our nails in one smooth motion. We rotate the sponge slightly between applications to create unique color combinations and prevent repetitive patterns.
Conclusion
We’ve explored countless creative possibilities for 11-year-old nail artists to express themselves safely and stylishly. From budget-friendly household techniques to seasonal celebrations these ideas prove that stunning nail art doesn’t require expensive tools or complicated methods.
Remember that the journey of nail art is about building confidence and discovering personal style. Whether your young artist prefers subtle school-appropriate designs or bold weekend statements there’s something here for every personality and occasion.
The key to successful nail art lies in patience practice and most importantly having fun with the process. We encourage you to start with simple techniques and gradually build skills as confidence grows. With safe products proper care and these creative ideas your 11-year-old is ready to embark on an exciting nail art adventure.
Frequently Asked Questions
What nail art designs are best for 11-year-olds?
Age-appropriate designs like polka dots, rainbow gradients, pastel ombre, and simple color blocking work best. These designs are fun, colorful, and easy to learn while remaining school-friendly. Focus on creativity over complexity using safe techniques that kids can master at home with minimal supervision.
Which nail polishes are safe for children to use?
Non-toxic brands like Kid Licks, SuncoatGirl, Piggy Paint, and Little Lady Products are recommended. These polishes are free from harmful chemicals like formaldehyde, toluene, and DBP. Look for water-based formulas and peel-off base coats for easy removal without damaging young nails.
How can kids create nail art without expensive tools?
Use household items like bobby pins for polka dots, tape for stripes, toothpicks for detailed work, and sponges for gradient effects. These simple tools can create professional-looking designs while keeping costs low and encouraging creativity with readily available materials.
What are quick nail art ideas for school days?
Try single accent nail designs, simple French tip variations, or neutral colors with subtle glitter accents. These 15-minute designs are perfect for busy mornings while still allowing self-expression. Focus on one statement nail or minimal patterns that won’t distract from schoolwork.
How do you create rainbow gradient nails?
Use a makeup sponge to blend vibrant colors from light to dark across the nail. Apply thin coats of different colored polishes to the sponge, then gently dab onto the nail surface. Blend while wet for smooth transitions and finish with a clear top coat.
Are there school-appropriate nail art options?
Yes! Stick to neutral color palettes, subtle glitter accents, and simple designs that comply with dress codes. Soft pastels, nude shades with minimal patterns, and understated geometric designs typically meet school requirements while still allowing creative expression.
What seasonal nail art ideas work for young artists?
Spring designs feature delicate flowers, summer includes beach themes, fall showcases autumn leaves, and winter highlights festive holiday elements. Use seasonal colors and simple motifs that reflect the time of year while maintaining age-appropriate styling.
How can beginners learn nail stamping techniques?
Start with simple patterns using nail stamping plates and follow step-by-step instructions. Apply polish to the design, scrape excess, press with the stamper, then transfer to the nail. Practice on paper first to master the technique before trying on nails.


