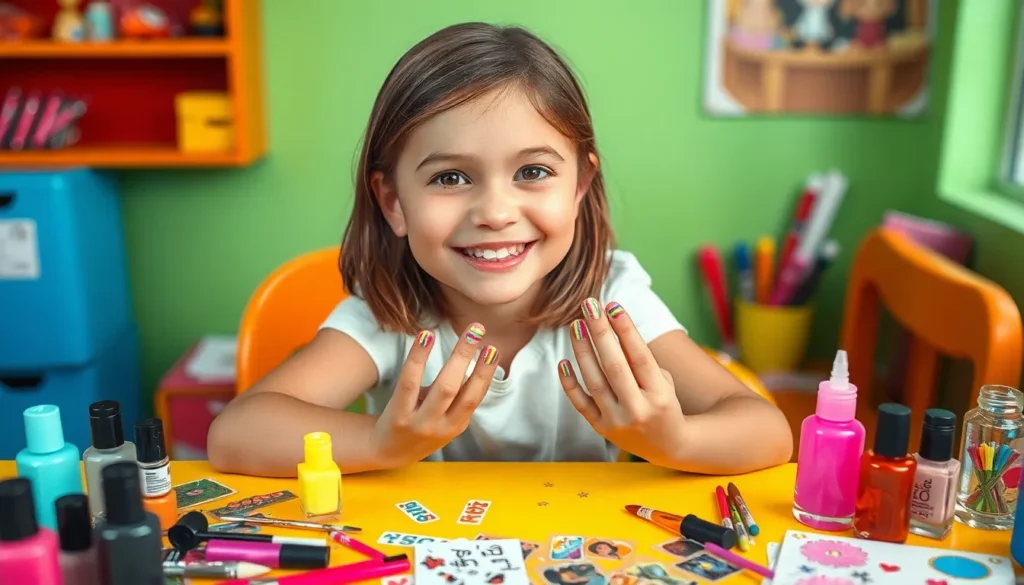
Getting your nails done for the first time is such an exciting milestone! At 11 and 12 years old, you’re ready to explore fun nail art that expresses your personality while staying age-appropriate. We’ve gathered the most adorable nail ideas that’ll make you feel confident and stylish without going overboard.
From cute rainbow designs to simple glitter accents, there’s something magical about having pretty nails that match your unique style. We understand that finding the perfect balance between trendy and appropriate can be tricky at this age, which is why we’ve curated designs that parents will love too.
Fun and Age-Appropriate Nail Designs for Tweens
These creative nail designs offer the perfect balance between trendy style and appropriate choices for young tweens ready to express themselves.
Simple Polka Dot Patterns
Polka dots create timeless nail art that’s perfect for beginners wanting to practice their technique. We recommend starting with a light base color like pink, mint green, or lavender, then adding small white or contrasting colored dots using a dotting tool or bobby pin. Classic combinations include white dots on pastel blue, gold dots on coral, or silver dots on purple bases.
Try creating different sized dots for added visual interest. Large dots work beautifully as accent nails, while tiny dots can cover entire nails for a playful confetti effect. Mix and match dot sizes across different fingers to create a coordinated yet varied look that’s both sophisticated and fun.
Rainbow Stripes
Rainbow stripes bring vibrant energy to tween nail designs while remaining tastefully colorful. We suggest using thin nail art brushes or striping tape to create clean, even lines across each nail. Popular rainbow combinations include traditional red, orange, yellow, green, blue, and purple sequences, or softer pastel versions with baby pink, peach, butter yellow, mint, sky blue, and lilac.
Vertical stripes elongate the appearance of shorter nails and create a modern geometric look. Horizontal stripes offer a different aesthetic and work especially well on wider nail beds. Consider alternating rainbow stripes with solid colored nails to prevent the design from becoming overwhelming while maintaining that cheerful, youthful vibe.
Glitter Accent Nails
Glitter accent nails add sparkle without going overboard, making them ideal for school appropriate nail art. We recommend applying glitter polish to just one or two nails per hand, typically the ring finger or thumb, while keeping other nails in coordinating solid colors. Fine glitter in silver, gold, or holographic finishes creates elegant shimmer that catches light beautifully.
Layer glitter over existing polish colors to create depth and dimension in your nail design. Clear glitter over pastel bases creates subtle sparkle, while colored glitter over matching bases intensifies the overall effect. Chunky glitter pieces work well for special occasions, but fine glitter remains more practical for everyday wear and easier removal.
Easy DIY Nail Art Techniques Perfect for Beginners

Creating beautiful nail art doesn’t require professional skills or expensive tools. We’ve compiled the most effective beginner-friendly techniques that’ll help you achieve stunning results every time.
Using Nail Stickers and Decals
Nail stickers and decals offer the perfect starting point for intricate designs without requiring artistic experience. These versatile accessories come in countless shapes, colors, and patterns that transform plain nails into eye-catching masterpieces instantly.
Application becomes simple when you follow these steps: clean your nails thoroughly, apply base coat, place stickers on dry polish, and seal with top coat. We recommend choosing stickers that match your personality, whether you prefer cute animals, geometric shapes, or floral patterns.
Removal proves just as easy as application since quality stickers peel off cleanly without damaging your natural nails. This technique allows you to experiment with different looks frequently while building confidence in your nail art abilities.
Tape Method for Clean Lines
Geometric patterns and crisp borders become achievable through the strategic use of nail tape. We position tape strips to protect areas we want to keep clean, then paint over the exposed sections for professional-looking results.
Success depends on timing since you must remove the tape while the polish remains slightly wet to avoid peeling. This method works exceptionally well for creating stripes, chevron patterns, and color-blocking designs that look sophisticated yet age-appropriate.
Practice makes perfect with tape techniques, so we suggest starting with simple two-tone designs before advancing to more complex geometric patterns. The sharp, clean lines you’ll achieve rival those created by professional nail technicians.
Dotting Tool Designs
Dotting tools unlock endless creative possibilities through their versatility in creating both simple and complex patterns. We can create everything from basic polka dots to intricate flower designs using just this single tool and various polish colors.
Size variation becomes possible by adjusting pressure and choosing different tool ends, allowing you to create dimensional designs with multiple dot sizes. Popular patterns include gradient dots, floral motifs, and abstract designs that showcase your personal style.
Budget-friendly alternatives work just as well if you don’t own professional dotting tools—bobby pins, toothpicks, or pencil erasers create similar effects. These accessible options mean you can start experimenting with dotted designs immediately using household items.
School-Safe Nail Ideas That Follow Dress Codes

Handling school dress codes while expressing personal style requires nail designs that are both beautiful and appropriate. We’ve curated the perfect options that keep you looking polished without breaking any rules.
Clear Base with Subtle Sparkles
Clear base coats with subtle sparkles offer the ideal balance between elegance and discretion for school environments. This design adds just enough shimmer to catch the light without drawing unwanted attention from teachers or administrators. We recommend using a transparent base polish and applying a light layer of fine glitter polish over the entire nail or just at the tips.
The beauty of this approach lies in its versatility and school appropriate nature. Students can choose from silver, gold, or iridescent sparkles depending on their personal preference and skin tone. Application takes less than 10 minutes and the subtle nature means it works perfectly for both casual school days and special events like school dances or presentations.
Light Pink and Nude Shades
Light pink and nude shades represent the safest choice for school nail colors while maintaining a stylish appearance. These neutral tones complement any outfit and skin tone without violating even the strictest dress code policies. Popular shades include ballet pink, peachy nude, and soft rose that provide just enough color to look intentional.
We find these colors particularly effective because they mimic natural nail tones while adding a polished finish. Students can apply these shades in a single coat for a sheer look or build up to two coats for more opacity. The understated elegance of these colors makes them perfect for everyday wear and helps establish good grooming habits for young teens.
French Manicure Variations
French manicures with subtle modifications offer a timeless look that works within school guidelines while adding personality. Traditional white tips can be replaced with soft pastels like lavender, mint, or pale yellow to create interest without being disruptive. We suggest keeping the base nude or clear and using thin tip lines for the most school appropriate appearance.
Modern variations include reversing the traditional pattern by painting the base of the nail instead of the tip or using multiple thin lines in complementary colors. These adaptations maintain the classic French manicure sophistication while incorporating contemporary trends that appeal to 11 and 12 year olds. The key is selecting colors that remain within the pastel family to ensure dress code compliance.
Seasonal Nail Designs for Every Time of Year

We’ll transform your nail art throughout the year with designs that celebrate each season’s unique beauty. These seasonal nail ideas let you express your creativity while staying age appropriate and stylish.
Spring Flower Motifs
Flower patterns bring nature’s beauty to your fingertips using nail art stickers or simple painting techniques. Delicate daisies work perfectly on a light pink base while tiny roses add elegance to pastel purple nails. Spring colors like soft pink, baby blue, and sunshine yellow create the perfect backdrop for floral designs. Cherry blossom branches painted across multiple nails create a stunning garden effect that’s surprisingly easy to achieve.
Butterfly stickers complement flower motifs beautifully when placed strategically on accent nails. Garden themed designs featuring ladybugs, bees, or small leaves enhance the spring feeling without overwhelming young nails. Simple dot flowers using a toothpick or dotting tool let beginners create professional looking blooms in minutes.
Summer Beach Themes
Rainbow nails steal the spotlight with each nail painted in a different bright color from red to purple. Ocean blues paired with sandy beiges capture the beach vibe perfectly for summer adventures. Beach stickers featuring flip flops, ice cream cones, or tiny fish transform plain nails into vacation memories.
Watermelon tips combine green and pink polish to create refreshing fruit inspired designs that scream summer fun. Polka dots in bright coral or turquoise add playful energy to any summer outfit. Trendy patterns like ombre designs blend tropical colors seamlessly from fingertip to cuticle. Pastel French tips with glitter lines create elegant summer sophistication that parents absolutely love.
| Summer Design | Base Color | Accent Color | Difficulty |
|---|---|---|---|
| Rainbow Nails | Multiple | N/A | Easy |
| Watermelon Tips | Green | Pink | Medium |
| Beach Polka Dots | Coral | White | Easy |
| Glitter French | Clear/Pink | Silver | Medium |
Fall Leaf Patterns
Leaf designs capture autumn’s magic using nail art stickers or freehand painting techniques. Maple leaves in deep red look stunning against cream colored base coats while oak leaves in golden yellow celebrate harvest season. Warm colors including burnt orange, deep red, and chocolate brown create cozy fall feelings on your fingertips.
Acorn patterns add whimsical touches to autumn nail art when paired with falling leaf motifs. Gradient designs from orange to red mimic changing leaves without requiring advanced painting skills. Tree branch silhouettes painted across multiple nails create dramatic fall landscapes that impress friends and family alike.
Winter Snowflake Designs
Snowflake patterns create winter wonderlands using nail art tools or simple stamping techniques. Intricate crystalline designs look amazing on dark blue bases while simple six pointed stars work perfectly for beginners. Icy colors like frosted blue, shimmering silver, and pure white capture winter’s sparkle beautifully.
Silver glitter over light blue base coats mimics freshly fallen snow on frozen ponds. Candy cane stripes using red and white polish celebrate holiday festivities with playful charm. Penguin or polar bear stickers add adorable winter characters that make everyone smile during cold months.
Holiday-Themed Nail Art for Special Occasions

Special celebrations call for themed nail designs that capture the festive spirit while staying perfect for young hands. We’ll explore creative holiday nail art ideas that transform ordinary manicures into celebration ready masterpieces.
Birthday Party Nails
Birthday celebrations deserve nails that sparkle with party excitement and colorful joy. We recommend creating balloon inspired designs using bright base colors like pink, purple, or turquoise with white dots to mimic balloon highlights. Confetti patterns work beautifully by dabbing multiple colors randomly across light colored bases using small makeup sponges.
Number stickers representing the birthday age add personal touches that make the celebration extra special. Glitter gradients create stunning effects by applying clear base coats then concentrating glitter polish near the nail tips, fading toward the cuticles. Polka dot swirls combine circular patterns with curved lines, creating movement that captures party energy.
Party themes can incorporate the birthday person’s favorite color combinations, ensuring the nail art reflects personal style preferences. Simple painting techniques using nail art brushes or even toothpicks allow for easy application without professional tools.
Halloween Spooky Designs
Halloween nail art brings friendly spooky fun without being too scary for young nail artists. We suggest creating adorable ghost designs using white polish as the base with small black dots for eyes and mouths. Pumpkin patterns use orange backgrounds with black vertical lines and green stems painted at the nail tips.
Black cat silhouettes work perfectly on light colored bases, requiring only simple curved lines and triangle ears. Candy corn designs layer white, orange, and yellow sections horizontally across each nail, mimicking the classic Halloween treat. Orange, black, and white color palettes dominate these designs, creating cohesive Halloween themed looks.
Nail stickers offer easy alternatives for complex designs, allowing young artists to achieve professional looking results. Simple painting techniques using basic brushes make these designs accessible for beginners who want to create their own spooky nail art.
Christmas and Winter Holiday Ideas
Winter holidays bring magical nail art opportunities featuring snowflakes, festive characters, and celebratory colors. We love creating snowflake designs using white polish on light blue or silver bases, painting simple six pointed stars with delicate branch extensions. Santa hat patterns use red triangles with white tips and tiny black bands near the nail bases.
Christmas tree designs work beautifully by painting green triangles with colorful dot ornaments and gold star toppers. Snowmen require white base coats with black dot eyes, orange triangle noses, and tiny black button details. Red, green, white, gold, and silver color combinations create traditional holiday aesthetics that capture festive spirit.
Glitter gradients add sparkle to winter themes, concentrating shimmer near nail tips for elegant effects. Press on winter themed nail wraps provide convenient options for achieving complex designs without painting skills. Simple hand painted accents using nail art brushes allow for personalized touches that make each design unique.
Adult supervision ensures neat application and safe removal, making these holiday nail art projects perfect family activities during celebration seasons.
Quick 5-Minute Nail Looks for Busy Schedules

When time is limited but you still want fabulous nails, these speedy designs deliver maximum impact with minimal effort. We’ve curated the fastest nail art techniques that work perfectly for busy 11 and 12-year-olds juggling school, activities, and social plans.
Single Color with Accent Nail
Bold color combinations create instant drama when you paint four nails in one shade and the ring finger in a contrasting hue. We recommend choosing vibrant colors like coral, turquoise, or purple for the main nails while selecting gold, silver, or white for the accent.
Baby blue nails with glittery accents offer a playful yet sophisticated look that takes just minutes to achieve. Apply your base color first, then add stars or polka dots to the accent nail using a dotting tool or the end of a bobby pin while the polish is still slightly tacky.
Metallic accent nails pair beautifully with pastel bases and require zero artistic skill. Simply paint your nails in soft pink, lavender, or mint green, then swipe a metallic polish across one nail on each hand for an instant upgrade.
Simple Geometric Shapes
Star designs become effortless when you use nail polish directly from the brush to create simple five-pointed shapes. We suggest practicing on paper first, then applying stars to just one or two nails for a balanced look that won’t overwhelm young hands.
Triangle patterns work best when you use tape to create clean, straight lines that look professionally done. Cut small pieces of tape into triangle shapes, press them onto dry base color, paint over with contrasting polish, then remove tape immediately for crisp edges.
Square and rectangle shapes offer modern geometric appeal when arranged in different sizes across the nail. Layer small squares over larger ones using different shades from the same color family for depth and visual interest.
Gradient Ombre Effects
Rainbow watercolor effects blend multiple colors seamlessly when you apply polish in small sections while still wet. We recommend using a makeup sponge to dab colors together, creating soft transitions that look like professional nail art.
Glitter gradients combine light and dark shades of sparkly polish to create stunning dimensional effects. Start with the darker glitter at the base of your nail and blend upward with the lighter shade, using a dry brush to soften the transition line.
Two color gradients work perfectly for beginners who want to master the technique before attempting rainbow designs. Choose colors that naturally blend well together, like pink to purple or blue to green, for foolproof results every time.
Budget-Friendly Nail Art Using Household Items

Creating stunning nail art doesn’t require expensive tools or professional supplies. We can achieve amazing results using simple items found around our house.
Toothpick Designs
Toothpicks become powerful nail art tools for creating precise dots and intricate patterns. We can dip the pointed end into nail polish and gently press it onto our nails to make perfect polka dots of various sizes. Swirling the toothpick through wet polish creates beautiful marbled effects and flower petals.
Drawing borders and outlining shapes becomes effortless with toothpick precision. We recommend starting with simple dot patterns along the nail’s edge before progressing to more complex designs like daisies or geometric shapes. Cleaning the toothpick between colors ensures crisp, clean lines every time.
Sponge Techniques
Makeup sponges transform ordinary nail polish into textured masterpieces with minimal effort. We dab the sponge into our chosen polish color and gently press it onto the nail surface to create a stippled, marbled effect. Layering multiple colors creates depth and visual interest that rivals salon techniques.
Blending different shades produces stunning gradient effects using this simple sponge method. We apply the lightest color first as a base, then use the sponge to gradually add darker tones toward the nail tip. Dampening the sponge slightly helps colors blend more smoothly together.
Tape and Paper Methods
Masking tape and sticky notes become precision tools for creating clean geometric designs. We place tape strips across our nails in various patterns, paint over them with contrasting colors, then carefully remove the tape to reveal sharp, professional looking lines. Diagonal stripes, chevron patterns, and color blocking become achievable with this simple technique.
Creating triangular shapes and negative space designs requires strategic tape placement before painting. We can use hole punch reinforcement stickers to make perfect circles or cut tape into custom shapes for unique patterns. Ensuring the base coat is completely dry before applying tape prevents smudging and ensures clean removal.
Essential Nail Care Tips for Healthy Young Nails

Before diving into all those fun nail designs, we need to establish healthy nail care habits that’ll keep young nails strong and beautiful. Building these essential routines now creates the perfect foundation for years of creative nail art adventures.
Proper Nail Hygiene
Trimming nails correctly forms the cornerstone of healthy nail care for young hands. We recommend keeping fingernails trimmed straight across with slightly rounded corners, while toenails should always be cut straight across to prevent painful ingrown nails. Shorter nails stay cleaner and break less frequently, making them perfect for active 11 and 12 year olds.
Using appropriate tools makes all the difference in nail health and safety. Nail clippers or nail scissors work best for trimming, and we always smooth rough edges with a nail file moving in one direction only. Filing back and forth weakens the nail structure, so consistent one direction filing prevents splits and breaks.
Cleaning underneath nails removes dirt and bacteria that can cause infections. We suggest using a soft nail brush during regular hand washing, especially after outdoor activities or art projects. Regular cleaning keeps nails healthy and ready for beautiful nail art applications.
Safe Removal Techniques
Choosing acetone free removers protects young nails from harsh chemical damage. We prioritize gentle formulas that remove polish effectively without drying out the nail bed or surrounding skin. These gentler options work perfectly for frequent nail art changes that tweens love.
Applying base coats creates a protective barrier between nails and colored polish. We always recommend this crucial step before any nail art to prevent staining and minimize potential damage from pigmented polishes. Base coats also help nail polish last longer and apply more smoothly.
Removing polish gently prevents nail damage and keeps cuticles healthy. We suggest soaking cotton pads with remover and pressing them onto nails for 30 seconds before gently wiping away polish. Scrubbing or picking at polish can thin the nail plate and cause permanent damage.
Moisturizing and Strengthening
Moisturizing cuticles regularly keeps the nail area healthy and prevents painful hangnails. We recommend applying cuticle oil or cream daily, especially after hand washing or nail art sessions. Healthy cuticles create the perfect frame for beautiful nail designs.
Using nail strengtheners helps fortify thin or brittle young nails. We suggest applying these treatments weekly to build nail strength over time, creating a better canvas for nail art. Consistent use prevents breaks and chips that can ruin beautiful designs.
Avoiding over polishing gives nails time to breathe and recover between art sessions. We recommend polish free days or using restorative nail baths to maintain nail health. This balance lets young nail artists enjoy frequent design changes without compromising nail strength.
Conclusion
We’ve shown you that creating beautiful nail art doesn’t have to be complicated or expensive. With simple techniques and household items you can achieve stunning designs that are perfect for school and special occasions.
Remember that healthy nails are the foundation for any great manicure. Taking proper care of your nails while experimenting with fun designs will keep them strong and beautiful for years to come.
Whether you’re trying quick 5-minute looks or seasonal themes these age-appropriate ideas let you express your creativity while staying within school guidelines. Start with the basics and gradually work your way up to more intricate designs as your skills develop.
Most importantly have fun with the process! Nail art is all about self-expression and there’s no wrong way to create something that makes you happy.
Frequently Asked Questions
What are the best nail designs for 11 and 12-year-olds?
Age-appropriate nail designs for tweens include simple polka dots, rainbow stripes, and glitter accent nails. These designs are fun and trendy while remaining suitable for young individuals. Light base colors with contrasting dots create playful looks, while glitter accents add sparkle without being overwhelming. These options allow personal expression while staying parent-approved.
How can beginners create nail art at home?
Beginners can start with nail stickers and decals for intricate designs without professional skills. The tape method creates clean lines and geometric patterns, while dotting tools (or alternatives like bobby pins and toothpicks) make various patterns. These DIY techniques are budget-friendly and perfect for young nail art enthusiasts to experiment safely.
What nail designs are appropriate for school?
School-safe options include clear base coats with subtle sparkles, light pink and nude shades, and soft pastel French manicures. These designs provide a polished, discreet look that complies with most dress codes while allowing personal expression. They’re stylish yet appropriate for educational environments.
What are some quick nail art ideas for busy schedules?
Five-minute nail looks include bold color combinations with accent nails, simple geometric shapes using tape, and gradient ombre effects. These designs deliver maximum impact with minimal effort, perfect for tweens’ busy lifestyles. Single colors with geometric accents or glitter gradients create stunning results quickly.
How can I create nail art on a budget?
Use household items like toothpicks for precise dots, makeup sponges for gradients and textures, and masking tape for clean geometric designs. These everyday materials can create professional-looking nail art without expensive tools, making creativity accessible and encouraging experimentation among young artists.
What nail care tips should young people follow?
Essential nail care includes proper trimming with appropriate tools, cleaning underneath nails to prevent infections, and moisturizing cuticles regularly. Use nail strengtheners for brittle nails and avoid over-polishing to allow recovery time. These healthy habits create a strong foundation for creative nail art adventures.
What are good seasonal nail art ideas?
Seasonal designs include spring flowers with soft pastels, summer rainbows and beach themes, fall leaf patterns in warm colors, and winter snowflakes with festive stripes. These designs celebrate each season’s beauty while remaining age-appropriate and allowing year-round creative expression for young nail artists.
How do I safely remove nail art?
Safe removal involves using proper nail polish remover and avoiding harsh scraping. Nail stickers and decals are designed for easy removal. Allow nails to breathe between applications and use moisturizing treatments afterward. Adult supervision is recommended for young children to ensure safe application and removal processes.


