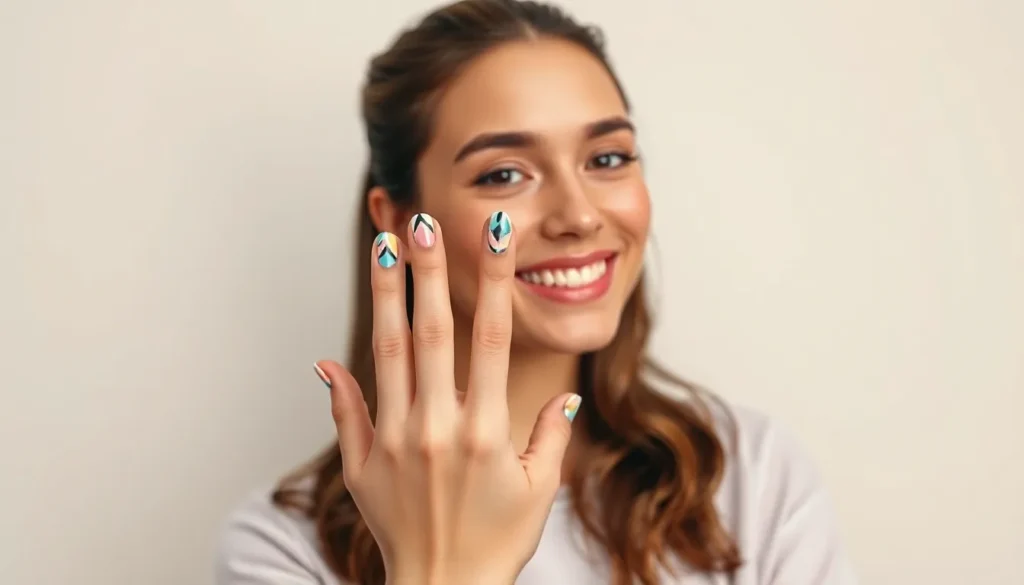
We’ve all been there – staring at our nails and feeling like they need something special to complete our look. Whether you’re prepping for a special occasion or simply want to express your creativity, nail decor offers endless possibilities to transform your fingertips into tiny canvases of art.
From minimalist geometric patterns to bold statement designs, today’s nail decor trends go far beyond basic polish. We’re talking about 3D embellishments, stunning foil accents, delicate hand-painted florals, and eye-catching textures that’ll have everyone asking where you got your nails done. The best part? Many of these gorgeous looks are totally achievable at home with the right techniques and tools.
Ready to discover nail decor ideas that’ll elevate your style game? We’ve curated the most stunning and on-trend designs that work for every skill level, occasion, and personal aesthetic. Let’s jump into the industry of nail artistry and find your next signature look.
Classic French Manicure With A Modern Twist
We’re transforming the timeless French manicure into contemporary nail art that captures today’s style trends. Modern updates breathe fresh life into this classic design while maintaining its elegant foundation.
Colored Tips Instead of White
Vibrant hues replace traditional white tips to create stunning nail decor variations that suit every personality. Bold colors like electric blue, coral pink, or emerald green make your manicure pop against neutral base shades. Pastel options such as lavender, mint, or peach offer subtle sophistication for everyday wear.
Color combinations that work beautifully:
| Base Color | Tip Color | Occasion |
|---|---|---|
| Nude pink | Rose gold | Office/Daily |
| Clear/Sheer | Neon yellow | Summer/Beach |
| Soft gray | Deep burgundy | Fall/Winter |
| Cream white | Sky blue | Spring/Casual |
We recommend using gel polish for longer lasting colored tips that won’t chip easily. Metallic shades like gold or silver create luxurious nail decor perfect for special events.
Geometric French Lines
Sharp angles and creative shapes transform traditional curved lines into striking geometric patterns. Triangle tips create edgy nail art that makes a bold statement at any gathering. Diagonal stripes offer modern sophistication while maintaining the French manicure’s classic appeal.
Popular geometric variations include:
- Chevron patterns pointing toward the cuticle
- Double lines creating negative space designs
- Angular cuts that follow your nail’s natural shape
- Intersecting lines forming diamond shapes
We achieve precise geometric lines using striping tape or nail stencils for professional looking results. Contrasting colors between the geometric sections enhance the visual impact of your nail decor.
Reverse French Manicure
Flipping the design places decorative elements at the cuticle area instead of nail tips. We create this trendy look by painting a curved line near the base of each nail using contrasting colors. This technique draws attention to well groomed cuticles while offering a fresh take on traditional French styling.
Application techniques for reverse French:
- Use a thin brush to create smooth curved lines
- Apply base coat first for better color adhesion
- Start with lighter shades before adding darker accents
- Seal with top coat for extended wear
Glitter gradients work exceptionally well with reverse French designs, creating sparkling nail decor that catches light beautifully. We often combine this style with small rhinestones or metallic foil for added glamour.
Minimalist Nail Art For Everyday Elegance

Simplicity takes center stage in minimalist nail art, offering sophisticated designs that complement any outfit while maintaining professional polish. We’ll explore subtle yet striking approaches that transform your everyday manicure into an elegant statement.
Single Accent Nail Designs
Contrasting colors create stunning focal points when applied to just one nail per hand. We recommend choosing bold shades like deep burgundy or midnight blue against neutral bases to achieve maximum visual impact. Professional settings benefit from this approach since you maintain sophistication while adding personality to your look.
Geometric patterns elevate single accent nails beyond simple color contrasts. Small triangles, dots, or thin rectangles positioned on your ring finger create modern appeal without overwhelming your overall aesthetic. These designs work particularly well for special occasions when you want subtle glamour.
Metallic touches transform ordinary manicures into luxury statements. Gold or copper accents on your accent nail provide warmth, while silver creates cool elegance that pairs beautifully with business attire.
Thin Line Art
Delicate metallic lines offer the perfect entry point into nail art for beginners. We suggest using gold or silver striping brushes to create simple horizontal or vertical lines across one or two nails. These accents add sophistication without requiring advanced artistic skills.
Minimalist geometric shapes work beautifully with thin line techniques. Small triangles, circles, or diamond outlines created with fine brushes provide modern flair while maintaining the clean aesthetic that defines minimalist design. Practice on a nail wheel first to achieve steady, confident strokes.
Intersecting patterns create visual interest through strategic line placement. Crossing diagonal lines or creating simple grid patterns on accent nails adds dimension while preserving the understated elegance that makes minimalist nail art so versatile.
Negative Space Patterns
Unpainted sections become design elements in negative space nail art, creating intricate patterns through strategic polish placement. We love how this technique allows your natural nail to contribute to the overall design while reducing application time and product usage.
Delicate cutout designs showcase your nail’s natural beauty while adding artistic flair. Half moon shapes at the cuticle, geometric windows in the center, or diagonal strips create sophisticated patterns that work perfectly for professional environments or casual outings.
Tape assisted patterns make negative space designs accessible to everyone. Use striping tape or stencils to create clean lines and precise shapes, then remove them before your polish fully dries to reveal crisp, professional looking results that rival salon quality work.
Bold Geometric Patterns That Make A Statement

Geometric nail designs create striking visuals without being overly flashy, making them versatile for various outfits. We’ll explore three powerful geometric techniques that transform simple manicures into artistic statements.
Triangle and Diamond Shapes
Triangle patterns offer endless possibilities for modern nail art that suits both men and women. These angular shapes can be used individually as accent elements or combined to create complex mosaic-like patterns across all nails. We recommend starting with a single triangle on the ring finger nail, using contrasting colors like deep navy against nude base tones.
Diamond formations add sophisticated geometry to any manicure design. Position these shapes vertically to elongate shorter nails or arrange them in clusters for dramatic effect. Combine triangles with diamonds using metallic gold or silver outlines to create interconnected patterns that catch light beautifully.
Pattern combinations multiply your design options when mixing these geometric elements. Layer small triangles inside larger diamond outlines, or create chevron effects by aligning triangle points in zigzag formations. Use different colors, motifs, and additional patterns like dots or thin lines to enhance the overall geometric composition.
Striped Nail Designs
Vertical stripes enhance nail length and create an elegant elongating effect on shorter nails. Apply thin metallic strips in gold or silver over dark base colors like black or deep purple for maximum contrast. We suggest using striping tape to achieve perfectly straight lines that remain consistent across all nails.
Horizontal patterns work exceptionally well on longer nail shapes where you have more surface area to showcase the design. Thick colored stripes in alternating hues create bold statements, while thin parallel lines offer subtle sophistication. Mix matte and glossy finishes within the same striped design for added texture dimension.
Diagonal applications provide ever-changing movement that draws attention to your hands. Angle stripes at 45-degree slopes or create intersecting patterns that form diamond shapes where lines cross. Combine different stripe widths within the same design, using thick base stripes with thin accent lines for layered visual interest.
Color Block Techniques
Section division transforms each nail into a mini canvas with distinct color zones. Divide nails horizontally, vertically, or diagonally to create two or three separate sections filled with contrasting colors. We recommend using tape barriers during application to achieve clean, sharp lines between color blocks.
Bold combinations make powerful fashion statements through strategic color pairing. Try electric blue with coral pink, or forest green with bright yellow for eye-catching contrast. Neutral combinations like beige with soft gray offer sophisticated alternatives for professional settings while maintaining the geometric impact.
Pattern integration elevates basic color blocking into complex artistic designs. Add thin metallic dividing lines between color sections, or incorporate small geometric shapes within each blocked area. Layer semi-transparent colors over opaque bases to create depth, or use glitter accents in one section while keeping others matte for balanced visual weight.
Floral Nail Art For Feminine Charm

Floral designs bring an elegant softness that perfectly balances bold geometric patterns. We’ll explore three stunning approaches that transform your nails into blooming works of art.
Hand-Painted Flower Designs
Robin Moses tutorials offer comprehensive guides for mastering intricate floral techniques using specialized brushes and paints. Her methods cover everything from delicate petals to full botanical compositions that rival professional salon work.
Beginners can start with simple white flowers following TikTok step-by-step tutorials that break down complex designs into manageable steps. These easy approaches focus on basic brush strokes and color combinations that create impressive results without requiring advanced skills.
Summer nail art becomes effortless with Tinu Bello’s minimalist floral techniques that use just a few products. Her approach demonstrates how strategic color placement and simple brush movements create vibrant seasonal looks perfect for warm weather occasions.
Pressed Flower Applications
Real dried flowers create unique textures when applied with gel adhesives like Kokoist’s Non-Wipe Accessory Bond that securely holds delicate botanical elements. This technique preserves actual flower details while providing a three-dimensional effect that catches light beautifully.
Layered combinations enhance visual depth by mixing pressed flowers with other decorative elements like rhinestones or metallic accents. Designers often create stunning compositions by varying flower sizes and colors to achieve balanced, sophisticated arrangements.
Watercolor Floral Effects
Pinterest inspiration showcases countless variations of watercolor techniques that replicate the soft, blended appearance of traditional watercolor paintings on nails. These designs capture the organic flow and transparency that makes watercolor art so captivating.
Seasonal adaptations keep designs fresh by adjusting color palettes to match different times of year—bright coral and yellow combinations for spring energy or muted burgundy and gold tones for autumn elegance. Color temperature changes completely transform the mood while maintaining the same fundamental watercolor technique.
Glitter and Sparkle Accents For Special Occasions

Special occasions call for nails that catch the light and command attention. We’ll explore sophisticated techniques that transform ordinary manicures into dazzling statements perfect for celebrations.
Gradient Glitter Techniques
Gradient glitter creates seamless transitions that flow beautifully across your nails. We recommend applying glitter polish in layers from the cuticle to the tip using various colors for maximum impact. Start with the lightest shade near your cuticle and gradually build up to darker tones at the tip for a smooth gradient effect.
Materials you’ll need:
- Glitter polishes in various colors
- Sponge or makeup brush for blending
- Base coat and top coat
Layering different glitter colors requires patience and precision. We suggest working quickly while each layer remains slightly tacky to ensure proper adhesion. Apply thin coats rather than thick ones to maintain control over the gradient intensity.
Strategic Glitter Placement
Strategic placement transforms glitter from overwhelming to elegant by focusing sparkle on exact nail areas. We focus on creating focal points at the tips or small sections rather than covering the entire nail surface. This technique works particularly well for professional settings where subtle glamour is preferred.
Key placement areas include:
- French tip variations
- Accent nail sections
- Cuticle highlights
- Single nail statements
Precision application requires the right tools for clean lines. We use small brushes or dotting tools to apply glitter polish exactly where we want it. This controlled approach prevents messy application and creates more sophisticated results than random glitter distribution.
Holographic Nail Effects
Holographic effects create multidimensional sparkle that shifts and changes with movement and light. We enhance these effects by applying holographic powder or polish over dark colored bases like black or deep navy. The contrast makes the holographic elements more dramatic and visible.
Application process:
- Apply base coat and dark colored polish
- Use sponge or applicator for even holographic powder coverage
- Seal with clear top coat for protection and shine
Working in well lit areas ensures even coverage and prevents patchy application. We recommend applying holographic powder while the base polish is still slightly tacky for better adhesion. The final top coat not only protects your design but also amplifies the holographic shine for maximum impact.
Seasonal Nail Decor Ideas Throughout The Year

Seasonal nail designs allow us to celebrate each time of year with unique colors and themes. We can transform our manicures to reflect nature’s changing palette and festive moods.
Spring Pastel Themes
Pastel florals dominate spring nail art with soft colors and delicate flower patterns. We love creating designs featuring daisies or cherry blossoms using gentle pinks, lavenders, and mint greens. Glittery pastel accents elevate these springtime looks by adding gold glitter polish over our floral base designs.
Mismatched designs bring playful energy to spring manicures. We recommend using different floral or fruit patterns on each finger to create a whimsical garden party effect. Popular combinations include strawberry accents paired with tiny daisies, or mixing tulip designs with abstract botanical shapes.
Summer Bright Colors
Bright florals capture summer’s vibrant energy using bold colors like hot pink, electric orange, and sunshine yellow. We create eye-catching patterns with hibiscus flowers, tropical leaves, and exotic blooms that pop against tanned skin.
Beach themes transport us to coastal paradise with seashells, starfish, and ocean wave designs. We incorporate sandy beige bases with turquoise accents, or create gradient effects mimicking sunset colors over water. Neon accents add electric energy to summer nails, especially in lime green, hot coral, and electric blue combinations.
Fall Autumn Leaves
Leaf patterns showcase autumn’s natural beauty using warm hues like burnt orange, deep red, and golden yellow. We design intricate maple leaf silhouettes, oak leaf outlines, and scattered falling leaf effects that capture the season’s transformation.
Gradient nails mimic changing foliage by blending deep burgundy into lighter amber shades. We create smooth transitions that reflect how leaves shift from green to brilliant autumn colors. Metallic accents add sophisticated touches with copper, bronze, and gold finishes that complement fall’s rich color palette.
Winter Holiday Designs
Snowflakes and snowmen bring festive cheer with playful winter characters. We create detailed snowflake patterns using white polish on deep blue bases, or design cute snowman faces complete with tiny carrot noses and coal button details.
Glitter and metallic finishes create glamorous winter looks perfect for holiday parties. We apply mega-sparkle glitter in silver and gold, or use metallic polishes that catch light like fresh snow. Holiday symbols complete our seasonal collection with holly leaves, mistletoe sprigs, and Christmas tree designs that celebrate the festive spirit.
Textured Nail Art Using Different Materials

Moving beyond traditional flat designs, textured nail art creates stunning dimensional effects that catch light and add tactile interest to your manicure. We’ll explore several innovative materials that transform ordinary nails into captivating works of art.
Sand and Sugar Textures
Sand textures create sophisticated matte finishes that resemble fine sandpaper or sugar crystals. We apply a mixture of fine sand-like materials over a gel polish base while it’s still tacky, ensuring even distribution across the nail surface. Sugar textures offer a similar effect but with slightly larger granules that catch light differently.
Application requires pressing the textured material gently into the wet base coat using a small brush or applicator tool. We recommend working one nail at a time to prevent the base from drying before texture application. Sealing these effects with a specialized topcoat prevents the material from shedding and extends wear time significantly.
Color combinations work beautifully with these textures, particularly nude bases with gold sand particles or deep burgundy with silver sugar crystals. Gradient effects become possible by varying the density of texture application from cuticle to tip.
Velvet Flocking Powder
Velvet flocking powder transforms nails into luxurious fabric-like surfaces with an incredibly soft tactile experience. We apply this powder over wet nail polish or gel base while it’s still sticky, creating an instant velvety finish that resembles suede or velvet fabric.
Different powder colors produce dramatically different effects on the same base shade. Black flocking over red creates a rich burgundy velvet appearance, while white powder over pink produces a soft pastel velvet effect. Mixing multiple powder colors creates unique custom shades impossible to achieve with traditional polish.
Application technique matters significantly for even coverage. We use a dense makeup brush or specialized flocking brush to press the powder into the wet base, ensuring complete adhesion. Excess powder gets removed by gently tapping the nail, and we avoid topcoat application since it would flatten the velvet texture.
Storage considerations include keeping flocking powder in airtight containers to prevent moisture absorption, which can clump the fine particles together.
3D Nail Accessories
Three-dimensional accessories elevate nail art into sculptural territory using specialized materials and techniques. Acrylic powder mixed with liquid monomer creates strong, buildable structures perfect for detailed architectural designs or organic shapes. Polygel offers easier handling characteristics, combining acrylic’s strength with gel’s workability for complex 3D elements.
UV clay provides moldable texture that cures under LED or UV light, allowing intricate hand-sculpted details like flowers, leaves, or geometric patterns. Sculpting gels maintain their shape during application and cure to a hard finish suitable for everyday wear.
Construction techniques involve building layers gradually, curing each section before adding the next element. We use specialized brushes, dotting tools, and sculpting implements to shape and refine 3D structures. Molds and forms speed up the process for repeated shapes like roses or geometric elements.
Durability considerations include proper base preparation and strategic placement of 3D elements away from high-wear areas like nail tips and sides. Protective topcoats designed for dimensional nail art help preserve intricate details while maintaining structural integrity.
Ombre and Gradient Color Techniques

Ombre and gradient techniques create stunning visual transitions that add sophistication to any nail design. We’ll explore how these smooth color blends transform ordinary manicures into eye-catching statements using simple tools and strategic application methods.
Classic Color Fade Methods
Traditional French ombre designs start with a dusty nude-pink base at the cuticle and gradually fade to clean white at the tip. We achieve this timeless look by layering colors with brushes or makeup sponges for seamless transitions that create natural, refined appearances.
Monochrome fades offer sophisticated alternatives using single color families like black to gray or burgundy to soft pink. These minimal variations provide elegant looks perfect for professional settings while maintaining the visual interest of gradient effects.
Application techniques focus on overlapping color zones during the blending process. We recommend using makeup wedges to press colors onto nails after applying them in stripes on the sponge, ensuring smooth transitions without harsh lines.
Sunset Gradient Designs
Sunset inspired designs capture nature’s most vibrant moments by blending warm hues like deep reds, bright oranges, soft pinks, and golden yellows. We start with darker tones at the nail base and gradually fade into lighter shades toward the tips for authentic sky-like effects.
Multiple color blending requires strategic layering on makeup sponges before application. We overlap each shade slightly to create continuous transitions that mimic actual sunset progressions from horizon to sky.
Vibrant results make these designs perfect for summer events and special occasions when bold statements enhance overall style. The eye-catching nature of sunset gradients draws attention while maintaining wearable sophistication for various settings.
Multi-Color Blending
Ever-changing artistic designs emerge when we combine more than two colors in single gradient applications. Ocean-inspired combinations blend deep blues or teals into turquoise and seafoam greens, while metallic blends incorporate gold, silver, or bronze for luxurious finishes.
Application techniques involve overlapping each color on makeup sponges before gently pressing onto nails for smooth, continuous blends. We ensure even coverage by dabbing rather than dragging the sponge across nail surfaces.
Endless combination possibilities allow adaptation for any occasion through complementary or contrasting tone selections. Creative expression flourishes when we experiment with unexpected color pairings that reflect personal style preferences while maintaining gradient technique fundamentals.
Animal Print Nail Designs For Bold Personalities

Animal print nail designs unleash your wild side with fierce patterns that make unforgettable statements. These bold designs channel natural predator aesthetics into stunning manicure art.
Leopard Print Patterns
Leopard print patterns transform nails into fierce fashion statements using classic spotted techniques. We begin with a light brown or beige base coat that mimics the natural leopard fur foundation. Brown polish creates the distinctive spots by dabbing irregular circular shapes across each nail surface.
Application Process:
| Step | Action | Tool Required |
|---|---|---|
| 1 | Apply base coat | Light brown/beige polish |
| 2 | Create spots | Brown polish |
| 3 | Outline spots | Black polish + dotting tool |
| 4 | Add accent dots | Bobby pin |
| 5 | Seal design | Clear top coat |
Dotting tools or bobby pins outline each brown spot with precise black borders once the base layer dries completely. Black dots fill empty nail areas to complete the authentic leopard aesthetic. Clear top coat protection ensures your wild design lasts through daily activities.
Zebra Stripe Designs
Zebra stripe designs feature bold alternating black and white patterns that create striking visual impact. We recommend starting with a white base coat before applying black stripes using thin nail art brushes for precision control. Vertical stripes elongate nail appearance while horizontal patterns create width illusion.
Nail stickers offer perfect stripe placement for beginners who want professional looking results without advanced brush skills. We suggest varying stripe thickness throughout each nail to mimic natural zebra patterns. Diagonal stripe arrangements add ever-changing movement and contemporary flair to traditional zebra aesthetics.
Snake Skin Textures
Snake skin textures require shimmery polish that replicates the natural reflective quality of reptile scales. We apply metallic or iridescent base colors in gold bronze or silver tones as foundation layers. Textured top coats create authentic scale appearance through specialized formulations.
Nail art brushes help create individual scale patterns by dabbing small overlapping circles across the nail surface. We recommend using darker outline colors to define each scale edge for enhanced dimensional effect. Multiple thin coats build depth while maintaining the characteristic snake skin shimmer that catches light beautifully.
DIY Tools and Techniques For Perfect Nail Decor

Creating stunning nail art doesn’t require expensive professional equipment. We’ll explore essential tools and techniques that’ll help you achieve salon-quality results from the comfort of your home.
Essential Nail Art Brushes
Nail art brushes are essential for detailed work, such as painting stripes or flowers directly onto nails. Professional brushes come in various sizes for different effects, ranging from ultra-fine liners to broader flat brushes. We recommend starting with three basic brush types: a fine detail brush for precise lines, a flat brush for filling in larger areas, and an angled brush for creating clean geometric shapes.
Fine detail brushes work perfectly for creating delicate patterns like floral stems or intricate line work. Flat brushes excel at color blocking and gradient blending techniques. Angled brushes provide excellent control for French manicure tips and sharp geometric patterns.
Dotting Tool Applications
Dotting tools are versatile and can be used to create a range of designs from simple dots to intricate patterns. These specialized tools feature rounded metal tips in various sizes that pick up polish perfectly for consistent application. We’ve found that dotting tools create more uniform circles than improvised alternatives.
Toothpicks can be used to create dots or lines by dipping the tip into nail polish and applying it to the nail. Cutting the toothpick can vary the dot size, giving you multiple options from a single tool. Bobby pins prove useful as dotting tools for creating small dots or patterns when you’re in a pinch.
Creating polka dot patterns becomes effortless with proper dotting technique. Building mandala designs starts with a central dot and radiates outward using progressively smaller dots. Combining different dot sizes creates visual interest and professional-looking dimension.
Tape and Stencil Methods
Scotch tape proves useful for creating straight lines or geometric patterns by applying tape to the nail and painting over it. This method guarantees crisp, clean edges that would be difficult to achieve freehand. We suggest using low-tack tape to prevent damage to your base coat when removing.
Stencils allow for precise designs and can be used with nail polish or stickers to achieve intricate patterns. Commercial nail stencils offer professional results, but you can create custom stencils using contact paper or vinyl sheets. Pre-made stencils save time for complex designs like chevrons or tribal patterns.
Straws work great for creating splatter effects or circular patterns by dipping them in polish. Makeup sponges prove ideal for ombre or gradient effects by applying polish to the sponge and pressing it onto the nail. Cling wrap can be used to create textured patterns or marble effects by scrunching it up and dabbing it in polish for unique, unrepeatable designs.
Conclusion
Your nails are waiting to become your next masterpiece. We’ve shared countless techniques and ideas that’ll transform your manicure game from basic to breathtaking. Whether you’re drawn to delicate florals or bold geometric patterns there’s a style that perfectly matches your personality.
The beauty of nail decor lies in its accessibility – you don’t need expensive salon visits to create stunning designs. With the right tools and techniques we’ve outlined you can achieve professional-looking results right at home.
Remember that nail art is all about experimenting and having fun. Start with simpler designs to build your confidence then gradually work your way up to more complex creations. Your fingertips are your canvas so let your creativity flow and make each manicure uniquely yours.
Frequently Asked Questions
What is nail decor and how has it evolved?
Nail decor is the art of enhancing nails through creative designs and embellishments that serve as personal style expression. It has evolved from simple polish application to intricate designs featuring 3D elements, foil accents, hand-painted artwork, and textured materials. Modern nail art now includes techniques like ombre gradients, geometric patterns, and dimensional accessories that transform nails into miniature canvases.
How can I update a classic French manicure?
You can modernize French manicures by using bold colored tips instead of traditional white, such as electric blue or coral pink. Try geometric patterns like chevron designs, angular cuts, or reverse French manicures that place decorative elements at the cuticle. Use striping tape or stencils for precision, and add glitter gradients or rhinestones for extra glamour.
What are some beginner-friendly minimalist nail art ideas?
Start with single accent nail designs using contrasting colors as focal points. Try thin line art with metallic brushes, simple geometric shapes, or negative space patterns that incorporate unpainted sections. These techniques require minimal tools and skills while creating elegant, everyday-appropriate designs that emphasize simplicity and sophistication.
How do I create bold geometric nail patterns?
Use striping tape or stencils to achieve clean lines for triangles, diamonds, and color blocks. Apply base colors first, then add geometric shapes using contrasting polishes. Try vertical or diagonal stripes to elongate nails, or create dynamic movement with angular patterns. Color blocking transforms nails into mini canvases with distinct sections using bold color combinations.
What techniques work best for floral nail art?
For beginners, start with simple brush movements to create basic flower shapes using dotting tools for centers. Advanced techniques include hand-painted detailed flowers and watercolor effects that blend colors softly. Try pressed flower applications for unique textures, or opt for minimalist floral approaches with single blooms for elegant, understated designs.
How can I incorporate seasonal themes into my nail decor?
Spring features pastel florals and playful designs, while summer embraces bright colors and beach themes. Fall showcases leaf patterns and gradient nails mimicking changing foliage. Winter brings festive designs with snowflakes and holiday symbols. Adapt colors and motifs to reflect each season’s natural palette and celebratory moods throughout the year.
What’s the best way to apply glitter and sparkle accents?
Apply glitter polish in thin layers for gradient effects, transitioning from light to heavy coverage. Use precision tools for strategic placement as elegant focal points. Try holographic polishes for multidimensional sparkle, and always seal with a quality top coat. Build up glitter gradually rather than applying thick coats for smoother results.
How do I create textured nail art effects?
Use sand or sugar mixed with clear polish for matte textures, or apply velvet flocking powder while polish is wet. Add 3D accessories like studs, gems, or sculpted elements for dimensional effects. Ensure even coverage by working quickly, and always seal textured designs with appropriate top coats for durability.
What are the key techniques for ombre and gradient nails?
Use makeup sponges to blend colors seamlessly, applying in thin layers and building gradually. Start with lightest shade as base, then dab darker colors with sponge for smooth transitions. Try classic French ombre, sunset gradients with vibrant hues, or monochrome fades using different shades of the same color family.
How can I create animal print nail designs?
For leopard print, use a base color then add irregular spots with darker shade and black outlines. Zebra stripes require alternating black and white patterns using thin brushes or striping tape. Snake skin effects need shimmery polishes applied with textured techniques and specialized tools to replicate the reflective, scaled appearance.
What essential tools do I need for DIY nail art?
Invest in fine detail brushes for precision work, flat brushes for coverage, and angled brushes for geometric designs. Dotting tools create uniform circles and patterns. Use striping tape and stencils for clean lines, while makeup sponges, straws, and cling wrap can create unique textural effects for professional-looking results at home.


