Mardi Gras season brings out the most vibrant and festive spirit in all of us, and what better way to celebrate than with stunning nail art that captures the essence of this iconic celebration? We’re diving into the industry of Mardi Gras nail designs that’ll make your fingertips the star of every parade and party.
From classic purple green and gold combinations to intricate mask-inspired patterns, we’ve curated the most eye-catching nail ideas that perfectly embody the carnival spirit. Whether you’re planning to hit the streets of New Orleans or celebrating at home, these designs will add that perfect touch of festive flair to your look.
We’ll show you everything from beginner-friendly techniques to show-stopping designs that’ll have everyone asking where you got your nails done. Get ready to transform your manicure into a Mardi Gras masterpiece that’s worthy of the most spectacular celebration of the year.
Classic Mardi Gras Color Combinations
These time-honored Mardi Gras color palettes create stunning nail designs that capture the authentic carnival spirit. We’ll explore the essential techniques for mastering these traditional combinations.
Purple, Gold, and Green Traditional Trio
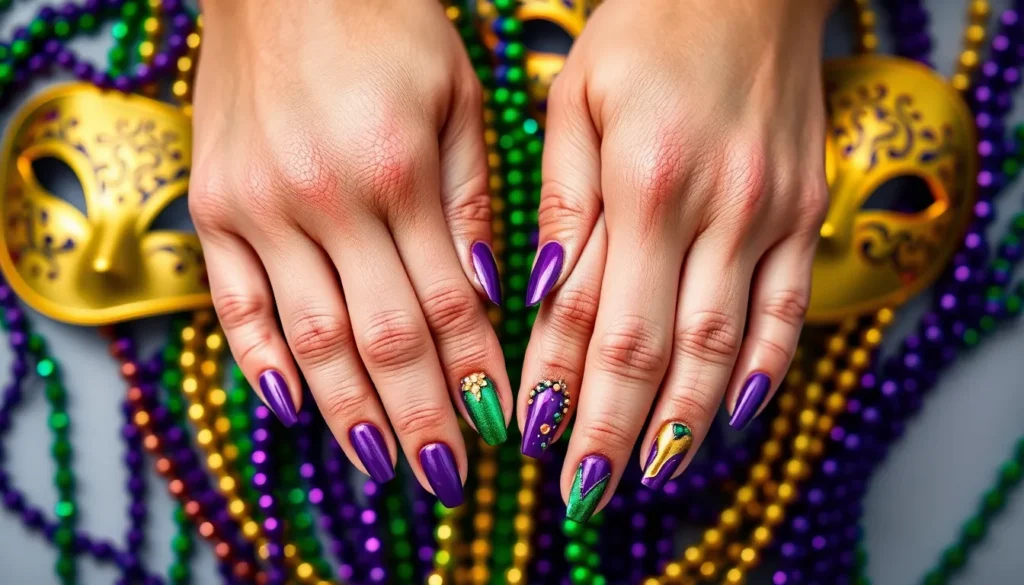
Purple represents justice in Mardi Gras tradition and makes an elegant base color for your carnival manicure. Apply this regal shade as your foundation before adding gold accents along the cuticle line or creating delicate crown patterns.
Gold symbolizes power and works beautifully as an accent color across all nail art skill levels. Paint thin stripes down the center of each nail or create small dots along the nail tips for a sophisticated look.
Green embodies faith and completes the sacred trinity of Mardi Gras colors with its vibrant energy. Use this bold shade for alternating nails or blend it into intricate fleur-de-lis designs that showcase your artistic skills.
| Color | Symbolism | Best Application |
|---|---|---|
| Purple | Justice | Base coat, crown patterns |
| Gold | Power | Accent stripes, nail tips |
| Green | Faith | Alternating nails, fleur-de-lis |
Bold Color Blocking Techniques
Geometric shapes create striking visual impact when you combine all three Mardi Gras colors on single nails. Paint diagonal sections using tape as your guide for clean lines that separate each vibrant shade.
Chevron patterns add modern flair to traditional carnival colors while maintaining the festive spirit. Create these zigzag designs by applying each color in alternating triangular sections down your nail length.
Half moon techniques work perfectly for showcasing the purple gold green combination in elegant curves. Paint your base color first then use reinforcement stickers to create precise semicircles near your cuticles.
Gradient and Ombre Effects
Vertical gradients blend all three Mardi Gras colors seamlessly from cuticle to tip for a stunning rainbow effect. Start with purple at the base then transition through gold into green using a makeup sponge for smooth color blending.
Horizontal ombre creates beautiful bands of color that flow naturally across your nail surface. Apply each shade in horizontal strips then use a clean brush to gently blend where the colors meet.
Glitter gradients add sparkle to your traditional color combinations while maintaining the carnival theme. Mix gold glitter with clear topcoat then apply it heaviest at your nail tips fading toward the cuticle for a glamorous finish.
Festive French Tip Variations

Transform your classic French manicure into a Mardi Gras masterpiece with these carnival inspired variations. We’ll show you how to incorporate traditional purple, green, and gold hues into elegant French tip designs that celebrate the festive spirit.
Mardi Gras Colored French Tips
Paint each nail tip with a different Mardi Gras color to create stunning multicolored effects. Purple tips on your thumb and pinky create royal elegance, while green tips on your index and ring fingers represent faith. Gold tips on your middle finger add powerful sparkle that catches parade lights perfectly.
Create colorful stripes across your tips using all three traditional colors for maximum visual impact. Thin purple, green, and gold stripes painted horizontally across each tip deliver classic Mardi Gras charm. Swirly patterns work beautifully when you blend these festival colors together, creating ever-changing designs that flow like carnival ribbons.
Glitter-Enhanced French Manicures
Apply glitter overlays on top of your colored French tips for extra carnival sparkle. Gold glitter over purple tips creates luxurious depth, while green glitter on gold tips adds emerald shimmer. Silver glitter works as a neutral accent that complements all three Mardi Gras colors beautifully.
Paint entire tips with glitter polish for bold, shiny statements that rival carnival floats. Purple glitter tips paired with gold accent nails create regal combinations. Green glitter tips with purple base coats deliver faith inspired designs that shine under party lights.
Reverse French with Festival Colors
Paint the tip section with vibrant Mardi Gras colors instead of traditional white for modern twists. Gold painted tips against deep purple base coats create striking contrasts. Green tips over cream colored bases offer fresh takes on classic carnival themes.
Leave the rest of each nail in contrasting festival colors to capture Mardi Gras essence completely. Purple bases with gold tips create royal combinations, while green bases with purple tips represent traditional carnival symbolism. Add small glitter accents along the color transition lines to enhance the festive feel and create professional looking finishes.
Glitter and Sparkle Nail Designs

Sparkle takes center stage when we want to create show-stopping Mardi Gras manicures that catch the light with every gesture. Glitter transforms ordinary nail designs into dazzling carnival masterpieces that perfectly capture the festive spirit.
Full Glitter Coverage Techniques
Full glitter coverage creates maximum impact by coating each nail in shimmering particles that reflect light from every angle. We start by applying a clear base coat to protect the natural nail and provide better adhesion for the glitter polish.
Generous application of glitter polish across the entire nail surface ensures complete coverage without any bare spots showing through. We apply the glitter in thin, even layers rather than one thick coat to prevent clumping and ensure smooth application.
Sealing with top coat prevents chipping and extends the wear time of our glittery Mardi Gras manicure. Two coats of clear top coat work best to lock in all the glitter particles and create a smooth, professional finish.
Glitter ombre effects add sophisticated dimension to full coverage designs by gradually increasing glitter density from cuticle to tip. We achieve this look by starting with less glitter near the base and building up intensity toward the nail tip for a stunning gradient effect.
Accent Nail Glitter Applications
Accent nail sparkle provides the perfect balance between subtle elegance and festive flair by featuring glitter on just one nail per hand. We typically choose the ring finger as our accent nail while keeping the remaining nails in solid Mardi Gras colors like purple, green, or gold.
Strategic placement of the glittery accent nail creates visual interest without overwhelming the overall design. This technique works especially well when we want to incorporate multiple Mardi Gras elements like beads or mask patterns on the other nails.
Color coordination between the accent nail glitter and the base colors ties the entire manicure together beautifully. We might use gold glitter over a purple base or green sparkles over a gold foundation to maintain the traditional carnival color scheme.
Mixed Glitter Size Combinations
Combining fine and chunky glitter creates incredible texture and visual depth that makes our Mardi Gras nails truly spectacular. We layer small, fine glitter as the base and add larger chunky pieces strategically for maximum impact.
Textured dimension emerges when we mix different glitter sizes, creating a multi-dimensional effect that catches light differently at various angles. Fine glitter fills in spaces while chunky pieces act as focal points that draw attention.
Strategic layering involves applying fine glitter first, then placing larger pieces where we want to create emphasis or patterns. We can create crown shapes, mask outlines, or abstract designs using the larger glitter pieces as our guide.
Color mixing with different sized glitters allows us to incorporate all three traditional Mardi Gras colors in one cohesive design. Purple fine glitter combined with gold chunky pieces and green medium glitter creates a truly authentic carnival celebration on our nails.
Mardi Gras Symbol and Pattern Ideas

Traditional Mardi Gras symbols transform ordinary manicures into stunning carnival masterpieces. We’ll explore iconic motifs that capture the festival’s vibrant spirit through elegant nail art designs.
Fleur-de-Lis Nail Art Designs
Fleur-de-lis designs bring New Orleans elegance directly to your fingertips. This intricate floral emblem works beautifully as a single accent nail or repeated across multiple nails for dramatic impact. Fine brushes create the most precise details, while nail stamps offer consistent results for beginners.
Gold outlines enhance the fleur-de-lis symbol’s sophistication and pair perfectly with purple or green base colors. Silver accents provide an alternative metallic finish that complements the traditional Mardi Gras palette. We recommend practicing the design on paper first to perfect your technique before applying it to nails.
Creating fleur-de-lis patterns requires steady hands and patience. Start with the central petal, then add the side elements using smooth, confident strokes. The symbol’s three petals represent faith, wisdom, and chivalry, making it a meaningful addition to your Mardi Gras celebration.
Mask-Inspired Decorative Patterns
Carnival masks inspire some of the most elaborate nail art designs for Mardi Gras celebrations. These patterns feature curved lines, ornate flourishes, and metallic detailing that mirror the grandeur of traditional masquerade masks. Negative space techniques create stylized mask outlines that appear sophisticated yet playful.
Miniature mask illustrations work exceptionally well on accent nails. We suggest using one or two nails per hand to showcase detailed mask designs while keeping other nails in complementary solid colors. This approach prevents the overall look from becoming overwhelming while maintaining visual interest.
Elaborate flourishes define authentic mask-inspired nail art. Swirling patterns, decorative scrollwork, and geometric details recreate the ornate beauty of carnival masks. Metallic polishes in gold and silver enhance these intricate designs and catch light beautifully during festivities.
Bead and Carnival Motif Applications
Carnival beads translate beautifully into nail art through creative application techniques. Small studs and rhinestones simulate actual beads when placed strategically across nail surfaces. Multicolored glitter evokes the energy and excitement of Mardi Gras parades while adding festive sparkle.
Confetti patterns create ever-changing carnival atmospheres on nails. We achieve this effect by layering different sized glitter pieces over solid color bases or combining them with other decorative patterns. The technique works particularly well when using all three traditional Mardi Gras colors together.
Sequin effects add authentic carnival flair to any manicure. These shimmery elements can be applied as full coverage or used selectively for accent details. Layered effects combine beads, glitter, and sequins for complex designs that capture the full spirit of Mardi Gras celebrations.
Textured and Dimensional Nail Art

We’re taking Mardi Gras manicures to the next level with textures and dimensional elements that bring carnival magic to life. These advanced techniques create stunning visual depth that captures light and attention at every celebration.
Rhinestone and Gem Embellishments
Rhinestone detailing pairs beautifully with abstract gold, green, and purple foil to create an elevated Mardi Gras look that sparkles like carnival lights. We recommend placing rhinestones strategically on accent nails, focusing on the ring finger or thumb for maximum impact without overwhelming the overall design.
Gemstone accents add luxurious touches to your festive manicure, transforming simple color combinations into jewelry-worthy masterpieces. Apply these embellishments using nail glue or a strong top coat, pressing each stone firmly into place while the polish remains slightly tacky.
Placement techniques matter significantly when working with rhinestones and gems on Mardi Gras designs. Position larger stones at the base of the nail near the cuticle, then graduate to smaller crystals toward the tip for a balanced, elegant appearance.
Crystal combinations work exceptionally well when you mix different sizes and shapes within the same color family. Choose amethyst purple stones, emerald green crystals, and golden topaz gems to maintain the traditional carnival palette while adding sophisticated sparkle.
3D Bead Application Techniques
Intricate 3D beads combine perfectly with mini Mardi Gras masks to create ever-changing nail art that tells the complete carnival story. We suggest starting with a base coat in your chosen Mardi Gras color, then applying beads while the top layer remains slightly wet for better adhesion.
Application methods for 3D beads require patience and precision to achieve professional results. Use tweezers to place each bead individually, starting from the center of your design and working outward to maintain symmetry and balance.
Bead patterns can follow the natural curve of your nail or create geometric shapes that complement traditional Mardi Gras motifs. Consider arranging small beads in fleur de lis patterns or mask-inspired swirls for authentic carnival flair.
Securing techniques become crucial when working with dimensional elements that need to withstand daily activities. Apply a generous layer of clear top coat over and around each bead, allowing it to fully cure before applying a second protective layer.
Textured Polish Layering Methods
Cat’s eye nail polish creates dazzling textured effects when applied in different shades of green, purple, and gold throughout your Mardi Gras design. We achieve this mesmerizing finish by holding a magnet over wet polish, creating the characteristic light-catching stripe that resembles a cat’s eye gemstone.
Solid sparkles provide another fantastic texturing option when you apply a base color and top it with glitter polish for a sparkling finish. Layer fine glitter over your base coat, followed by chunky glitter pieces for maximum dimension and visual interest.
Swirling patterns emerge beautifully when you use a toothpick or thin brush with purple and green nail polish on a white base. Create these organic designs while the polish remains workable, dragging the tool through wet colors to achieve fluid, carnival-inspired movements.
Criss crossed designs use thin brushes to paint intersecting lines in traditional Mardi Gras colors like purple, green, and gold. Build these geometric patterns layer by layer, allowing each color to dry completely before adding the next intersecting line for crisp, clean results.
Easy DIY Mardi Gras Nail Tutorials

We’ll show you how to create stunning Mardi Gras nail art using simple techniques that work perfectly for beginners. These methods require minimal tools while delivering professional-looking results that capture the carnival spirit.
Simple Striping Tape Designs
Striping tape transforms basic manicures into clean geometric patterns using traditional purple, green, and gold colors. Place the tape across your nail in straight lines or create chevron shapes for a modern twist on Mardi Gras themes.
Multi-color stripes work beautifully when you apply each Mardi Gras color side by side, mimicking the look of carnival beads or festive confetti. Remove the tape while your polish is still slightly tacky to achieve sharp, professional edges.
Diagonal tape placement creates ever-changing angles that catch light beautifully, especially when alternating between metallic gold and vibrant purple sections. Cross-hatch patterns using striping tape produce intricate diamond shapes that elevate your Mardi Gras nail design.
Dotting Tool Pattern Creation
Dotting tools create authentic beaded effects by applying small dots in varying sizes across your nails, perfectly replicating the look of traditional Mardi Gras beads. Start with your base color, then add dots in complementary shades for maximum visual impact.
Scattered bead patterns work best when you vary the size and spacing of your dots, creating an organic carnival feel that mimics thrown beads. Layer different colored dots to build depth and dimension in your Mardi Gras nail art.
Polka dot arrangements in purple, green, and gold create playful patterns that capture the festive energy of carnival celebrations. Connect some dots with thin lines to simulate actual bead strings draped across your nails.
Beginner-Friendly Stamping Techniques
Stamping plates featuring Mardi Gras themed designs make intricate patterns accessible for nail art beginners who want professional results. Choose plates with mask motifs, fleur-de-lis symbols, or carnival patterns for authentic festival flair.
Basic stamping starts with applying your base coat, then using a nail polish and stamping tool to transfer designs onto each nail cleanly. Practice the stamping motion on paper first to perfect your technique before applying to your manicure.
Layered stamping creates complex designs by applying multiple stamps in different colors over your base, building up carnival themed elements gradually. Finish with a quality top coat to seal your stamped Mardi Gras designs and ensure lasting wear throughout your celebrations.
Professional Salon-Style Techniques

Professional Mardi Gras nail artistry requires mastering advanced techniques that deliver stunning, durable results. These sophisticated methods elevate festive manicures from simple DIY projects to salon-quality masterpieces.
Advanced Airbrushing Methods
Airbrushing creates smooth gradients and intricate patterns that perfectly capture the carnival spirit. We use specialized airbrushes to achieve seamless color transitions between purple, green, and gold, producing effects impossible with traditional brushes. Professional manicurists employ stencils and masking tape to create precise geometric patterns and mask motifs.
Layered airbrushing techniques involve building up transparent color coats to achieve depth and dimension. Artists start with light base colors and gradually intensify with darker shades, creating stunning ombre effects that flow naturally across the nail surface. Multiple airbrush passes allow for complex abstract patterns that mimic the swirling energy of Mardi Gras celebrations.
Temperature control during airbrushing ensures optimal paint consistency and smooth application. Skilled technicians adjust air pressure settings to create different textures, from fine misting for subtle gradients to concentrated bursts for bold color blocks. Proper ventilation and precise hand movements result in professional-grade finishes that last throughout carnival season.
Hand-Painted Detailed Artwork
Hand-painted artwork allows for custom motifs featuring masks, fleur-de-lis, and intricate bead patterns. Professional nail artists use ultra-fine brushes and high-quality acrylic paints to create detailed designs that tell the carnival story. Steady hands and years of practice enable artists to paint miniature masterpieces on each nail surface.
Detailed mask paintings incorporate ornate flourishes, decorative swirls, and metallic accents that capture the mystery of Mardi Gras. Artists layer different paint consistencies to create texture and depth, using thicker paints for raised elements and thinned acrylics for delicate line work. Color mixing techniques produce custom shades that perfectly match traditional carnival aesthetics.
Precision tools like dotting implements and striping brushes help create consistent bead patterns and geometric elements. Professional artists work systematically across each nail, building up complex designs layer by layer. Sealing each painted element with clear topcoat ensures artwork remains vibrant and chip-resistant throughout extended wear.
Gel Polish Layering Strategies
Gel polish layering strategies are essential for achieving depth, durability, and high shine in Mardi Gras designs. Manicurists often start with nude or cream base coats, providing neutral foundations that enhance vibrant carnival colors. Building up thin gel layers prevents thickness buildup while maintaining flexibility and wearability.
Professional layering involves strategic color placement to maximize visual impact. Artists apply bold Mardi Gras colors in exact patterns, allowing each layer to cure completely under UV/LED lamps before adding the next element. Transparent glitter layers over colored bases create stunning dimensional effects that catch light beautifully.
Final finishing techniques include foil application and rhinestone detailing for extra sparkle and dimension. Specialists use tweezers to precisely place decorative elements, ensuring secure attachment through proper curing processes. Multiple topcoat applications seal all elements together, creating durable manicures that withstand carnival festivities while maintaining salon-perfect appearance.
Quick Last-Minute Nail Ideas

When time’s running short before your Mardi Gras celebration, we’ve got you covered with lightning-fast techniques that’ll have your nails party-ready in minutes.
Press-On Nail Decorating Tips
Preparation makes all the difference when working with press-on nails for your carnival look. Clean and gently buff your natural nails before application to ensure optimal adhesion. Select press-ons in traditional Mardi Gras shades of purple, green, and gold, or choose clear ones that serve as a blank canvas for your creativity.
Apply nail glue sparingly around the edges rather than covering the entire surface for secure attachment without messy overflow. Press each nail firmly for 10-15 seconds to create a lasting bond. We recommend decorating press-ons before attachment when possible, as this allows for easier handling and more precise placement of embellishments.
Embellish strategically with glitter, tiny beads, or nail stickers while the press-ons are still separate for better control. Alternatively, you can add decorations after wearing them if you prefer to see the full design on your hands first.
Nail Sticker Application Methods
Trim nail stickers to fit each nail’s unique shape before application to avoid overhang or gaps. Measure against your nail bed and cut slightly smaller than the actual nail size to prevent lifting at the edges.
Apply your base color first and allow it to dry completely before adding stickers to prevent smudging or bubbling. Peel the sticker carefully from its backing using tweezers or your fingernail to maintain its shape. Press the sticker onto the nail starting from one edge and smoothing across to eliminate air bubbles.
Smooth out imperfections using a cuticle pusher or orangewood stick to ensure full contact with the nail surface. Work from the center outward to push any trapped air toward the edges. Seal your design with a quality top coat for durability and a professional glossy finish that’ll last through your Mardi Gras festivities.
Fast Polish Change Techniques
Peel-off base coats revolutionize quick color changes by eliminating the need for harsh solvents. Apply this special base before your Mardi Gras colors, and when it’s time to switch looks, simply peel the entire polish layer off in one piece.
Nail polish remover pens offer precision removal for solid colors without affecting surrounding skin. Soak cotton pads with acetone for larger areas, pressing firmly for 30 seconds before wiping clean in one smooth motion.
Glitter polish requires special attention due to its stubborn nature. Wrap each nail with an acetone-soaked cotton pad, then cover with aluminum foil for 3-5 minutes. This technique softens the glitter particles, allowing for easier removal without excessive scrubbing.
Moisturize immediately after removal to protect your cuticles and nail beds from acetone’s drying effects. Apply cuticle oil or hand cream to restore moisture and prepare your nails for the next stunning Mardi Gras design.
Nail Care Tips for Festival Season

Festival season demands extra attention to nail health and maintenance. We’ll share essential care strategies that keep your Mardi Gras manicure looking stunning throughout the celebration.
Pre-Party Nail Preparation
Hydrate nails thoroughly before applying any festive designs. We recommend using nail oil to prevent dryness and create a healthy foundation for your carnival artwork.
Base coat application protects your natural nails from staining, especially important when using vibrant purple, green, and gold polishes. We suggest applying a strong base coat that prevents damage from heavy glitter and rhinestone embellishments.
Nail strengtheners become essential for weak nails that might struggle under the weight of dimensional decorations. We recommend using strengthening treatments at least three days before your Mardi Gras celebration.
Cuticle care involves pushing back and moisturizing the cuticle area to create clean lines for your mask inspired patterns. We find that well maintained cuticles enhance the overall appearance of fleur de lis designs and carnival motifs.
Maintaining Designs During Celebrations
Top coat reapplication prevents chipping during active festival participation. We suggest carrying a small bottle for quick touch ups between parade activities.
Nail polish remover wipes provide instant answers for minor smudges on your beaded effects or glitter gradients. We keep these handy for maintaining pristine carnival confetti designs throughout the day.
Water exposure minimization preserves your hand painted artwork and gel polish layers. We recommend wearing gloves when washing hands to protect intricate rhinestone placements and textured polish details.
Gentle handling protects dimensional elements like 3D beads and sequin effects from catching on clothing or accessories. We advise being mindful of your hands during dancing and crowd navigation.
Post-Celebration Nail Recovery
Nourishing treatments restore nail health after removing heavy festival designs. We apply nail cream or oil immediately after polish removal to counteract any drying effects from glitter removal.
Gentle removal techniques prevent damage when taking off stubborn carnival decorations. We use acetone free removers for rhinestones and recommend soaking cotton pads rather than aggressive scrubbing.
Recovery time allows nails to breathe between festival manicures. We suggest going polish free for 24 to 48 hours to let your natural nails recover from airbrushing treatments and gel polish applications.
Strengthening masks rebuild nail integrity after intensive festival wear. We recommend weekly treatments that restore flexibility and prevent brittleness from repeated polish changes.
Conclusion
We’ve covered everything you need to create show-stopping Mardi Gras nails that’ll make you the center of attention at any carnival celebration. From classic purple gold and green combinations to intricate mask designs and dazzling glitter effects these techniques work for every skill level.
Whether you’re planning weeks ahead or need a last-minute look we’ve got you covered with options ranging from simple DIY methods to professional salon techniques. Remember that proper nail care before during and after your festivities ensures your manicure stays stunning throughout the celebration.
Now it’s time to gather your supplies choose your favorite techniques and let your creativity shine. Your nails are about to become the perfect accessory for an unforgettable Mardi Gras experience!
Frequently Asked Questions
What are the traditional Mardi Gras nail colors?
The traditional Mardi Gras colors are purple, gold, and green. Purple represents justice, gold symbolizes power, and green stands for faith. These three colors form the foundation of authentic Mardi Gras nail art and can be used in various combinations including color blocking, gradients, ombre effects, and accent patterns to create stunning carnival-inspired manicures.
How can I create Mardi Gras nail art as a beginner?
Beginners can start with simple techniques like striping tape for clean geometric patterns, dotting tools for beaded effects, and nail stamping with Mardi Gras themes. Press-on nails with strategic embellishments and nail stickers are also excellent quick options. These methods require minimal tools and experience while still achieving professional-looking results that capture the carnival spirit.
What are some quick last-minute Mardi Gras nail ideas?
For quick nail art, try press-on nails with added rhinestones or glitter, nail stickers featuring carnival themes, or fast polish changes using peel-off base coats. You can also create simple accent nails with glitter overlays or use nail polish remover pens for easy color transitions. These techniques can get your nails party-ready in just minutes.
How do I incorporate glitter into my Mardi Gras manicure?
Apply glitter through full coverage for maximum impact, create ombre effects by varying density from cuticle to tip, or use accent nails with glitter while keeping others solid. Mix fine and chunky glitter sizes for texture and depth. Layer glitter over traditional Mardi Gras colors and seal with a strong top coat for durability and shine.
What symbols work best for Mardi Gras nail art?
Popular Mardi Gras symbols include fleur-de-lis designs, carnival masks with ornate patterns, bead-inspired rhinestone arrangements, and confetti patterns. These can be hand-painted, stamped, or created using stickers and embellishments. Focus on one statement nail per hand or incorporate subtle symbols across multiple nails for a cohesive carnival theme.
How can I make my Mardi Gras manicure last longer?
Use a strong base coat to prevent staining, apply thin polish layers, and seal with a quality top coat. Reapply top coat every few days during celebrations. Handle nails gently, wear gloves when possible, and avoid using nails as tools. Keep cuticles moisturized and consider gel polish for extended wear during the festival season.
What’s the difference between DIY and salon-style Mardi Gras nails?
DIY techniques focus on simple methods using basic tools like dotting tools, striping tape, and stamping plates. Salon-style techniques involve advanced methods like airbrushing for smooth gradients, hand-painted detailed artwork, and professional gel polish layering for superior durability and depth. Salon techniques typically require more skill and specialized equipment but deliver longer-lasting, more intricate results.
How do I care for my nails after Mardi Gras celebrations?
Remove nail art gently using acetone-free removers when possible. Apply nourishing cuticle oil and hand cream to restore moisture. Use nail strengtheners if nails feel weak or damaged. Take a break between heavy embellishments to let nails recover. Consider professional treatments if nails show signs of damage from frequent polish changes or heavy decorations.


