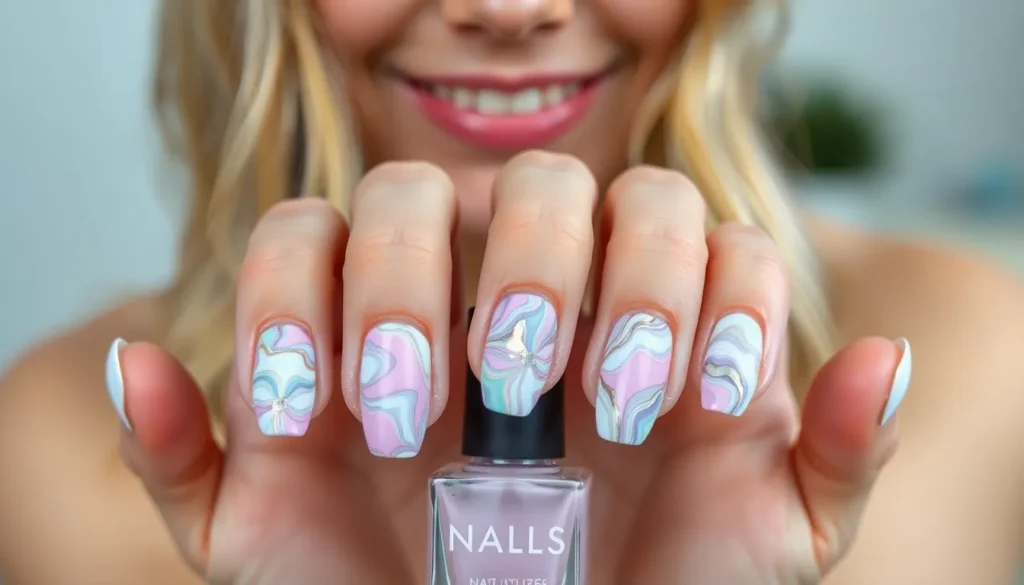
Marble nails have taken the beauty industry by storm and it’s easy to see why. This sophisticated nail art technique creates stunning veined patterns that mimic natural stone while adding an elegant touch to any look. Whether you’re heading to a formal event or simply want to elevate your everyday style marble nails deliver that perfect balance of artistry and refinement.
We’ve discovered that marble nail designs offer endless versatility – from classic black and white combinations to bold colorful swirls that make a statement. The best part? You don’t need to be a professional nail artist to achieve these gorgeous results. With the right techniques and tools anyone can master this trendy nail art style.
Ready to transform your nails into works of art? We’ll guide you through the most stunning marble nail ideas that’ll have everyone asking where you got your manicure done. Let’s jump into these breathtaking designs that are surprisingly simple to recreate at home.
Classic White and Gray Marble Nail Ideas
White and gray marble nails offer the perfect introduction to this sophisticated nail art trend. These timeless combinations create elegant patterns that complement any outfit or occasion.
Traditional Veining Techniques
Water marbling creates the most authentic marble appearance using simple household items. We recommend dropping white and gray nail polish into room temperature water, then swirling gently with a toothpick to form natural veining patterns. Dip your nail into the design at a 45-degree angle for optimal coverage.
Dry brush technique produces subtle marble veining without the mess of water marbling. Apply a white base coat and let it dry completely. Load a small makeup brush with gray polish, wipe most of it off, then lightly drag across the nail in irregular patterns.
Plastic wrap method delivers quick marble effects perfect for beginners. Paint your nails white, then while the polish is still wet, dab crumpled plastic wrap dipped in gray polish across the surface. The random texture creates instant marble veining.
Feathering technique uses a thin brush to draw delicate gray lines over a white base. Start with light pressure and gradually increase to create varying line thickness. Cross the lines at different angles to mimic natural stone patterns.
Matte Finish Options
Matte topcoat transforms glossy marble designs into sophisticated stone-like finishes. Apply your white and gray marble pattern normally, then seal with a matte topcoat for an authentic marble appearance. The flat finish eliminates shine and creates depth.
Textured matte techniques combine marble patterns with subtle texture for added dimension. Mix a small amount of fine glitter or texture powder into your matte topcoat before application. This creates a slightly rough surface that mimics real marble.
Gradient matte marble blends white and gray shades seamlessly before applying matte finish. Use a makeup sponge to blend the colors while wet, creating soft transitions between light and dark areas. The matte topcoat enhances the natural stone effect.
Glossy Marble Effects
High-shine finish amplifies the dramatic contrast between white and gray marble veining. Apply two coats of glossy topcoat for maximum reflection and depth. The glossy surface makes colors appear more vibrant and creates a luxurious appearance.
Holographic accents add subtle rainbow shimmer to classic marble designs. Mix a tiny amount of holographic powder into your gray polish before creating veining patterns. The shimmer catches light beautifully against the white base.
Metallic veining incorporates silver or gunmetal shades for modern marble looks. Replace traditional gray with metallic polish to create striking contemporary designs. The metallic elements add glamour while maintaining the classic marble aesthetic.
Layered gloss technique builds depth through multiple thin topcoat applications. Apply one coat, let dry for 10 minutes, then repeat twice more. This creates an almost glass-like surface that makes marble patterns appear three-dimensional.
Black and White Marble Nail Designs
 1")
Black and white marble nails offer the perfect balance of sophistication and drama. We’re exploring the timeless appeal of monochrome marble designs that work for any occasion.
High Contrast Patterns
Bold geometric swirls create stunning visual impact when we combine jet black and crisp white gel polishes. Apply your base coat first, then use a thin nail art brush to create zigzag patterns that blend naturally into each other. Striking metallic accents add depth to your monochrome marble when we incorporate silver or chrome polishes sparingly throughout the design.
Ever-changing color blocking transforms traditional marble by adding unexpected pops of red or gold alongside the classic black and white base. Create these patterns by applying colors in sections, then using a dotting tool to blend the edges for a seamless marble effect. Sharp contrast lines work beautifully when we use high quality gel polishes that maintain their opacity without muddying together.
Minimalist Approaches
Simple organic swirls capture the essence of natural marble using just two colors and basic tools. We recommend starting with a white base and adding black veining with a single brush stroke for the most authentic look. Clean geometric lines offer a modern take on marble when we focus on fewer, more deliberate patterns rather than complex swirling.
Subtle gradient effects create depth without overwhelming the design when we blend black and white gradually across the nail surface. Use a makeup sponge to dab colors together, creating soft transitions that mimic real marble veining. Negative space elements add contemporary flair when we leave portions of the natural nail visible within the marble pattern.
Accent Nail Variations
Single statement nails maximize impact when we apply intricate black and white marble to just one finger per hand. Paint the remaining nails in solid white or black to let your accent nail become the focal point. Metallic accent combinations create luxury appeal when we add gold or silver foil to one nail while keeping others in classic monochrome marble.
Reverse marble patterns offer creative contrast when we swap the dominant colors between nails. Make some nails primarily white with black veining, while others feature black bases with white marble details. Textured accent additions enhance the overall design when we add small rhinestones or matte topcoat to accent nails, creating tactile interest alongside the visual marble effect.
Colorful Marble Nail Art Inspirations
 2")
We’re ready to explore vibrant marble nail designs that’ll transform your fingertips into stunning works of art. These colorful marble techniques combine multiple hues to create eye-catching patterns that go far beyond traditional monochrome styles.
Pastel Marble Combinations
Soft pastels create the most delicate and feminine marble nail designs we’ve ever seen. Baby blue, pale pink, and mint green blend together beautifully when you apply a thin layer of gel base coat to help colors flow smoothly into each other.
Pearlescent pastels add an extra dimension of elegance to your marble nails with their subtle shimmer effects. These dreamy combinations work perfectly for spring weddings, brunch dates, or any occasion where you want a refined yet playful look.
Lavender and cream marble swirls offer another gorgeous pastel option that photographs beautifully under natural light. Creating these effects requires gentle blending motions with dotting tools to achieve that authentic marble veining we all love.
Bold Jewel Tone Marbling
Emerald and ruby combinations create the most dramatic jewel toned marble effects for special occasions. These rich colors blend together to form luxurious patterns that catch light from every angle and make a powerful style statement.
Sapphire and amethyst marbling brings deep, regal tones to your fingertips that complement both gold and silver jewelry perfectly. We recommend using high-quality gel polish for these darker shades to ensure the colors remain vibrant and true to their jewel tone inspiration.
Deep burgundy mixed with forest green creates another stunning jewel combination that works beautifully for fall and winter seasons. These sophisticated color pairings require careful blending with thin nail art brushes to maintain the distinct characteristics of each hue.
Sunset and Galaxy Marble Effects
Sunset marble designs capture warm colors like orange, pink, and yellow in flowing patterns that mimic nature’s most beautiful evening skies. These vibrant combinations create stunning gradient effects that transition seamlessly from one color to the next using specialized marbling techniques.
Galaxy marble effects use dark blues and purples as the base, then add silver or gold accents to create that mysterious cosmic appearance we’re all obsessed with. Creating these celestial designs requires layering techniques and strategic placement of metallic details to achieve that authentic galaxy depth.
Multi-colored marble designs combine vibrant colors like orange, blue, and yellow for unique mixed marble effects that truly stand out. A good top coat becomes essential for maintaining the glossy finish that makes these colorful marble designs pop with professional looking results.
Elegant Gold and Silver Marble Nails
 3")
Gold and silver marble nails elevate traditional marble designs into luxurious masterpieces that catch light beautifully. These metallic combinations create sophisticated looks perfect for formal events and special occasions.
Metallic Accent Techniques
Nail stamping plates offer the easiest way to achieve intricate marble patterns without complex water marbling techniques. We can create stunning turquoise and gold marble combinations using these specialized tools, which deliver chic and classy results every time. Stamping allows us to apply consistent patterns across all nails while maintaining professional looking finishes.
Layered metallic application involves building up gold and silver accents gradually over base marble patterns. Professional nail artists recommend applying the lightest metallic shade first, then adding darker tones to create depth and dimension. This technique works especially well when we want to highlight exact veining patterns within our marble design.
Foil Application Methods
Foil transfer techniques require special adhesive or nail glue for precise metallic accent placement. We apply the adhesive to exact areas where we want metallic highlights, then press foil sheets firmly before peeling away to reveal crisp lines. This method gives us complete control over where metallic elements appear in our marble pattern.
Foil stamping methods combine traditional stamping with metallic foil application for stunning effects. Stamping plates designed for foil use create raised patterns that grab foil more effectively than flat surfaces. We can layer different metallic foils using this technique to achieve complex gold and silver combinations.
Luxury Marble Finishes
Press on nail collections available on platforms like Etsy feature gold marble designs with additional embellishments including gemstones and pearls. These luxury options save time while delivering salon quality results that rival professional nail art. Custom designs often incorporate multiple metallic tones within single marble patterns.
3D crystal nail art transforms basic marble designs into high end luxury finishes with added depth and visual appeal. Abstract stone designs using crystals create texture that mimics natural marble formations while adding sparkle. We can position crystals along natural veining lines to enhance the organic flow of our marble patterns.
Easy DIY Marble Nail Techniques for Beginners
 4")
Creating professional-looking marble nails at home becomes achievable with these simple techniques. We’ll guide you through three foolproof methods that deliver stunning results without expensive salon visits.
Water Marbling Method
Water marbling creates the most authentic marble patterns using basic supplies you likely already own. We recommend gathering regular nail polish, a disposable cup, toothpicks, acetone, and Vaseline before starting.
Preparation involves protecting your skin by applying Vaseline around each nail to prevent staining. Drop 2-3 different colored polishes into room temperature water, then use a toothpick to swirl the colors into mesmerizing patterns.
Dipping technique requires steady hands as you lower your nail at a 45-degree angle into the water design. Pull the nail straight up through the floating polish to capture the marbled pattern on your nail surface.
Cleanup becomes effortless when you use the toothpick to collect excess polish from the water surface before removing your finger. Peel away the Vaseline barrier to reveal clean skin around your perfectly marbled nail.
Plastic Wrap Technique
Plastic wrap marbling offers complete control over your design placement and intensity. We start with a base coat application, followed by your chosen nail polish color while it’s still slightly wet.
Crumpling creates natural texture when you gently press plastic wrap onto the wet polish surface. Twist and dab the wrap against different areas of your nail to achieve varied marble effects.
Lifting reveals instant results as you carefully remove the plastic wrap to reveal organic marble patterns. Apply a second color using the same technique for more complex designs, then seal everything with a quality top coat.
Experimenting with different wrap sizes produces unique textures from fine cellophane for delicate patterns to thicker plastic for bold statement looks.
Nail Art Brush Approaches
Brush techniques provide precision control for creating custom marble veining patterns exactly where you want them. We use nail art brushes, dotting tools, and gel or regular polish for this method.
Dotting creates foundation patterns by placing small drops of contrasting colors randomly across your base color while it remains wet. Use a dotting tool to vary the size and spacing of these color drops.
Dragging motion forms realistic veins as you pull a fine brush or toothpick through the wet polish dots in organic curved lines. Work quickly before the polish begins to set for the smoothest marble lines.
Layering builds depth when you repeat the process with additional colors, creating complex marble patterns that rival natural stone. Finish with a high-quality top coat to protect your artistic creation and add professional shine.
Professional Marble Nail Salon Trends
 5")
Professional nail salons have elevated marble nail designs to sophisticated art forms that showcase advanced techniques and premium materials. We’re seeing innovative approaches that combine traditional marbling with cutting-edge technology.
Gel Polish Marble Applications
Gel polish creates stunning marble nail designs through layered color techniques that deliver long-lasting results. Professional technicians layer different gel colors while wet, then use fine brushes to create authentic swirly patterns that mimic natural stone veining. These applications cure under UV lights for durability that lasts up to three weeks without chipping.
Blended color techniques produce the most realistic marble effects in salon settings. Blue marble applications create serene oceanic looks perfect for summer clients, while brown marble designs offer rich autumnal vibes ideal for fall appointments. Colorful marble combinations featuring multiple hues provide vibrant appearances that make bold fashion statements.
Advanced gel polish methods include gradient layering and feathering techniques. Salons use specialized tools to blend colors seamlessly, creating depth that resembles authentic marble stone. These professional applications require exact timing and temperature control to achieve the signature veined patterns clients desire.
3D Marble Nail Extensions
3D marble nail extensions incorporate three-dimensional elements like resin and acrylic to enhance traditional marble effects. Professional nail artists build up textured surfaces that create realistic stone appearances with actual depth and dimension. These extensions allow for more intricate designs that aren’t possible with flat polish applications alone.
Resin applications create glossy raised patterns that catch light beautifully. Technicians apply clear or tinted resins over base marble designs, then cure them to create permanent dimensional effects. Acrylic sculpting techniques add structural elements that mimic natural marble formations and geological patterns.
Advanced extension methods combine multiple materials for complex artistic results. Salons layer gel polish, resin, and acrylic components to build sophisticated designs that showcase professional expertise. These techniques require specialized training and premium materials that justify higher service pricing.
Chrome and Marble Combinations
Chrome and marble combinations deliver striking looks through glossy reflective finishes mixed with organic stone patterns. Professional salons use metallic chrome powders applied over gel bases, then add marble veining on top for dramatic contrast effects. These designs feature mirror-like surfaces that create stunning visual impact under various lighting conditions.
Metallic color mixing produces unique chrome marble variations that stand out. Silver chrome bases with black marble veining create elegant sophisticated looks, while gold chrome foundations with white marble patterns offer luxurious appeal. Rose gold chrome applications paired with pink marble swirls provide trendy feminine options.
Reflective finish techniques require precise application timing for optimal results. Salons apply chrome powders while gel polish remains tacky, then seal with topcoat before adding marble elements. These multi-step processes demand professional expertise to achieve the seamless integration of reflective and organic design elements.
Seasonal Marble Nail Ideas Throughout the Year
 6")
We can transform our marble nail designs to perfectly capture the essence of each season. Different color palettes and techniques allow us to create stunning marble effects that complement the changing moods throughout the year.
Spring Marble Nail Designs
Pastel marble combinations create the most enchanting spring looks when we blend soft colors like pink, lavender, and mint together. These delicate hues swirl beautifully to produce floral effects that perfectly capture spring’s gentle awakening.
Gold accent incorporation elevates our spring marble designs with sophisticated touches reminiscent of blooming flowers. We can add metallic veining or small gold details to enhance the elegance of our pastel base colors.
Marble floral patterns combine two trending techniques when we use nail stamping plates or hand painting to create flower motifs within our marble designs. This approach allows us to layer botanical elements over our swirled base for truly unique spring nail art.
Summer Beach-Inspired Marble
Blue marble variations capture the ocean’s beauty when we work with aquatic shades like light blue and turquoise. These cooling colors instantly evoke beachy vibes and complement summer’s vibrant energy perfectly.
Colorful swirl techniques bring summer warmth to our fingertips using vibrant shades like coral, orange, and yellow. We can blend these energetic colors together to mimic the season’s natural warmth and create eye catching marble patterns.
Glitter accent applications add the perfect shimmer when we incorporate sparkly elements into our summer marble designs. This technique creates effects reminiscent of sea glass or sun kissed sand, improving the overall beachy aesthetic.
Fall and Winter Marble Themes
Fall marble color schemes embrace autumn’s cozy atmosphere when we combine warm tones like brown, orange, and red together. Adding smoky black accents enhances the autumnal feel and creates rich, sophisticated marble patterns.
Winter marble aesthetics capture the season’s icy beauty using cool blues and whites as our primary palette. We can incorporate frosty silvers and metallic gold or silver veining to mimic snow’s sparkle and icicles’ pristine elegance.
Seasonal metallic integration works beautifully across both fall and winter designs when we add strategic metallic elements. These accents create depth while reflecting each season’s unique lighting conditions and natural beauty.
Short Nail Marble Design Ideas
 7")
Short nails offer the perfect canvas for marble designs when we focus on refined, proportionate techniques that enhance rather than overwhelm the nail space.
Minimalist Marble for Short Nails
Minimalist designs create sophisticated elegance on shorter nail lengths by emphasizing clean lines and subtle color variations. We recommend starting with monochromatic marble using different shades of a single color to achieve a refined, understated look that won’t compete with the natural nail shape.
Dotting tool swirls work exceptionally well for creating small, controlled marble patterns that maintain a minimalist aesthetic. Simply dip the tool in your chosen colors and create gentle swirls across the nail surface, blending lightly for a natural stone appearance.
Thin brush strokes offer another excellent technique for short nails. Apply delicate strokes of complementary colors using a fine detail brush, then gently blend with a clean brush tip to create seamless marble veining without overwhelming the limited nail space.
Gradient marble effects work beautifully on shorter nails by focusing the marble pattern in exact areas rather than covering the entire nail surface.
Single Accent Marble Techniques
Single accent marble nails elevate simple manicures by adding one statement nail that draws attention without creating visual chaos across all fingers.
Marble tip designs concentrate the marbling effect at the nail tips, creating a sophisticated french manicure variation that’s perfect for professional settings. We suggest using neutral tones like gray and white for versatile everyday wear.
Center swirl patterns place the marble design in the middle of one accent nail while keeping the remaining nails in solid coordinating colors. This technique creates visual interest and allows the marble pattern to serve as the focal point of your manicure.
Ring finger accents traditionally work best for single marble designs, as this placement feels natural and balanced within the overall hand composition.
Petite Nail Art Answers
Petite nail art answers ensure that marble designs remain proportionate and visually appealing on smaller nail surfaces.
Delicate swirls created with ultra fine brushes prevent the marble pattern from appearing too busy or overwhelming on short nails. We recommend practicing these movements on a nail wheel first to perfect your technique.
Mini marble dots offer an alternative approach where small drops of color are applied and lightly blended to suggest marble texture without requiring extensive veining work. This technique works particularly well when combined with metallic accents for added dimension.
Scale appropriate tools make all the difference in petite nail art success. Using smaller brushes, dotting tools, and even toothpicks can help create marble effects that complement rather than overpower short nail lengths.
Strategic color placement ensures that marble patterns enhance the natural nail shape rather than making it appear shorter or wider than desired.
Long Nail Marble Masterpieces
 8")
Long nails provide the perfect canvas for showcasing intricate marble patterns and artistic designs. Extended nail lengths allow for more detailed work and dramatic visual impact that transforms your fingertips into stunning art pieces.
Dramatic Marble Patterns
Intricate designs capture attention with their sophisticated serpentine patterns that flow across extended nail surfaces. We apply gel polish in thin lines using a nail art brush, then use the brush tip to swirl colors together in flowing, organic shapes that mimic natural stone veining.
Flash cure techniques create professional results by layering colors strategically across the nail plate. Apply each color in separate layers while flash curing between applications to prevent over mixing, then add white polish to create neutral spaces that enhance the marble’s authentic appearance.
Zigzag marble swooshes deliver bold geometric elements combined with organic flow patterns. Start with a gel top coat base, use a dotting tool to create zigzag lines, then pull colors together with a brush across the entire nail plate for maximum dramatic effect.
Multi-Color Marble Designs
Color mixing palettes enable vibrant marble combinations that showcase multiple hues in harmonious designs. Place different colored polishes close together on your mixing palette, then gently swirl them with an orange stick to maintain distinct color boundaries while achieving seamless marble transitions.
Blooming gel applications produce the most vivid color payoff for complex multi tone marble effects. High quality blooming gel ensures vibrant colors maintain their intensity while blending naturally, creating professional finishes that rival salon quality work.
Gel X extension marbling maximizes color placement opportunities across extended surfaces. Apply a thin gel base coat layer, scoop mixed gel polish with a flat brush, then apply the mixture to each nail individually to achieve unique, unrepeatable marble patterns.
Statement Nail Art Ideas
Glitter marble combinations add dimensional sparkle that catches light from every angle. Incorporate glitter gel polish between color layers, then disperse the sparkle by swirling colors with a brush to create depth and visual interest throughout the marble design.
Mixed media marble art combines various materials for truly unique statement pieces. Layer gel polish with ink, metallic powders, or foil elements to create eye catching designs that stand out in any setting while maintaining the classic marble aesthetic.
Textural marble finishes create tactile elements that enhance visual appeal through varied surface treatments. Combine matte and glossy sections within the same marble pattern, or add raised elements using thick gel applications for nails that demand attention through both sight and touch.
Essential Tools and Products for Marble Nails
 9")
Creating stunning marble nail designs becomes effortless when you have the right tools and products at your fingertips. We’ll guide you through the must-have items that transform your marble nail aspirations into beautiful reality.
Must-Have Nail Polish Colors
Neutral colors serve as the foundation for every marble design, with white, beige, and clear polishes creating perfect base layers. These essential shades provide the canvas that makes marble veining patterns pop with authentic stone-like appearance.
Pastel colors bring delicate charm to your marble creations through soft pink, blue, yellow, and green hues. Spring inspired looks flourish when these gentle tones blend together, creating feminine marble effects that complement any seasonal wardrobe.
Metallic colors elevate your marble designs with luxurious gold and silver accents that catch light beautifully. These glamorous shades work particularly well for formal events and special occasions when you want your nails to make a statement.
Professional Marbling Tools
Nail art brushes enable precise color application and seamless blending that distinguishes professional-quality marble effects. Fine-tipped brushes help create delicate veining patterns while flat brushes spread colors evenly across the nail surface.
KOKOIST Tap Brush delivers precision marbling capabilities specifically designed for gel polish applications. This specialized tool helps achieve intricate patterns that would be impossible with standard brushes.
Gel polish applicators featuring flat brush heads ensure even color distribution when working with gel-based marble techniques. These tools spread polish smoothly without creating unwanted texture or streaking.
Toothpicks and orange sticks create beautiful patterns in both water marbling and gel techniques by allowing you to manipulate polish while it’s still workable. These simple tools give you control over swirl direction and pattern intensity.
Top and Base Coat Recommendations
High-quality gel top coats provide the glossy finish that makes marble designs truly shine with professional results. These protective layers seal your artwork while adding depth and dimension to the marble effect.
Base coats prevent nail staining and ensure even color application that’s crucial for authentic marble appearances. Quality base coats also extend the longevity of your marble designs by creating strong adhesion between your natural nail and polish layers.
Gel-exact formulations work best when using gel marbling techniques, as regular polish formulas aren’t suitable for water marbling methods according to professional nail artists. Choose products that match your preferred marbling technique for optimal results.
Conclusion
We’ve explored the endless possibilities that marble nail art offers from classic monochrome designs to vibrant seasonal inspirations. Whether you’re working with short nails or long extensions there’s a marble technique that’ll perfectly suit your style and skill level.
The beauty of marble nails lies in their versatility – you can create stunning looks at home with simple DIY methods or invest in professional salon treatments for show-stopping results. With the right tools and techniques we’ve shared you’re equipped to transform your nails into sophisticated works of art.
Start with basic water marbling or plastic wrap techniques then gradually experiment with metallic accents 3D elements and seasonal color combinations. Your marble nail journey awaits and the results will speak for themselves.
Frequently Asked Questions
What are marble nails and why are they so popular?
Marble nails feature sophisticated veined patterns that mimic natural stone, adding instant elegance to any look. They’ve gained popularity due to their versatility, ranging from classic black and white to vibrant colorful swirls. The designs are achievable at home without professional skills, making them accessible to everyone while delivering stunning, luxurious results.
Can I create marble nail designs at home without professional training?
Yes, marble nail designs can be easily recreated at home using simple DIY techniques. Three foolproof methods include water marbling with basic supplies, the plastic wrap technique for controlled design placement, and nail art brush approaches for custom veining patterns. These methods require no professional training and deliver impressive results.
What are the essential tools needed for creating marble nails?
Essential tools include various nail polish colors (neutrals, pastels, and metallics), professional marbling tools like nail art brushes, gel polish applicators for precise application, and quality top and base coats. These tools ensure proper blending, glossy finishes, and design longevity while facilitating both simple and complex marble patterns.
Do marble nail designs work well on short nails?
Absolutely! Short nails can showcase beautiful marble designs using refined techniques. Focus on minimalist marble patterns with clean lines and subtle color variations, or try single accent marble techniques. The key is maintaining proportionate designs that enhance shorter nail lengths while creating visually appealing, sophisticated results.
What’s the difference between matte and glossy marble nail finishes?
Matte marble finishes create textured, stone-like appearances using gradient techniques that enhance the natural marble effect. Glossy marble finishes feature high-shine effects with holographic accents, metallic veining, and layered gloss techniques that add depth and dimension. Both styles offer unique aesthetic appeals for different occasions and preferences.
How can I adapt marble nail designs for different seasons?
Seasonal marble nails reflect each season’s essence: spring features pastel combinations and floral patterns, summer showcases beach-inspired blues and vibrant swirls, fall embraces warm tones with smoky accents, and winter captures icy beauty with cool palettes and metallic elements. This adaptability keeps your manicure fresh year-round.
Are professional salon marble nails worth the higher cost?
Professional salon marble nails justify higher pricing through advanced techniques, premium materials, and sophisticated results. Salons offer gel polish applications for long-lasting effects, 3D marble extensions with resin and acrylic, and chrome combinations. These professional methods require expertise and deliver more complex, durable designs than DIY approaches.


