We’ve all fallen under the spell of Hello Kitty’s irresistible charm, and now it’s time to bring that adorable magic to our fingertips. Hello Kitty nail art has become one of the hottest trends in the beauty industry, transforming simple manicures into playful works of art that capture everyone’s attention.
Whether you’re a longtime Sanrio fan or just discovering the joy of kawaii culture, Hello Kitty nail designs offer endless possibilities to express your personality. From subtle pink accents featuring her iconic bow to elaborate 3D designs that showcase her full silhouette, there’s a Hello Kitty nail look for every style preference and skill level.
We’re about to jump into the most creative and stunning Hello Kitty nail ideas that’ll have you booking your next salon appointment or reaching for your nail art supplies. Get ready to discover designs that range from beginner-friendly to jaw-droppingly intricate – each one guaranteed to add a touch of sweetness to your everyday look.
Classic Hello Kitty Face Nail Designs
These timeless Hello Kitty face designs serve as the perfect foundation for anyone wanting to embrace kawaii nail art. We’ll explore the essential elements that make these classic looks instantly recognizable and utterly charming.
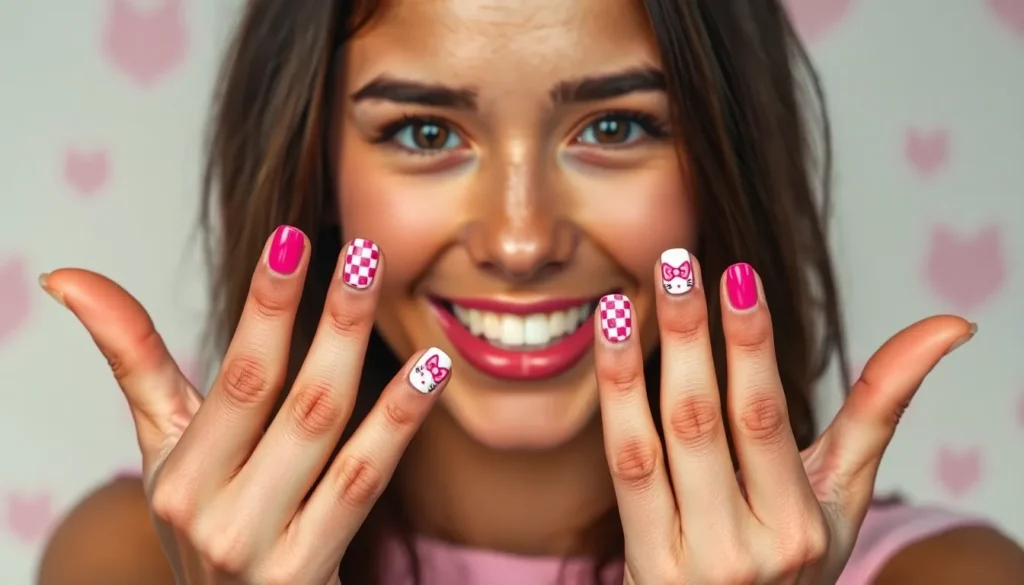
White Base With Pink Bow Details
White polish creates the ideal canvas for Hello Kitty’s iconic appearance on your nails. We recommend using a high-quality white base coat to achieve that perfect porcelain finish that mimics Hello Kitty’s pristine fur. The pink bow becomes the star of this design, typically placed at the top corner of your accent nail using either nail polish or small decorative elements.
Pink shades ranging from soft blush to vibrant fuchsia work beautifully for the bow details. We’ve found that using a small dotting tool or fine brush helps create precise bow shapes that maintain their cute proportions. Adding tiny pink dots around the bow creates additional visual interest while staying true to the classic aesthetic.
Red Bow Accent Variations
Red bow variations offer a bolder alternative to traditional pink designs while maintaining Hello Kitty’s signature charm. We love how crimson and cherry red shades create striking contrast against the white base, making your nails pop with vintage appeal. These deeper tones work especially well for fall and winter manicures.
Classic red bows can be enhanced with gold outlining or tiny rhinestone accents for extra glamour. We suggest experimenting with different red bow placements, such as centering them on the nail or creating asymmetrical designs across multiple fingers. Matte red finishes provide a modern twist on this timeless look.
Minimalist Black Feature Lines
Black feature lines define Hello Kitty’s facial expressions using the simplest possible strokes. We focus on creating two small dots for eyes and either a tiny triangle or oval for the nose using precision nail art brushes. These minimal elements capture Hello Kitty’s essence without overwhelming the overall design.
Thin black lines work best when applied with steady hands and quality nail art pens or brushes. We recommend practicing the facial features on paper first to perfect your technique before applying them to your nails. The beauty of this minimalist approach lies in its versatility, allowing you to combine these features with any bow color or additional decorative elements.
Pastel Hello Kitty Color Schemes
 1")
Pastel colors bring a dreamy, whimsical quality to Hello Kitty nail designs that captures the essence of kawaii culture. These soft hues create gentle contrasts while maintaining the playful spirit that makes Hello Kitty so beloved.
Soft Pink and White Combinations
Soft pink and white combinations create the most iconic Hello Kitty nail design that reflects the brand’s signature aesthetic. This timeless color duo works beautifully as a base for Hello Kitty’s classic facial features and bow details. We recommend starting with a soft pink base coat on your accent nails while keeping the remaining nails in crisp white for balance.
Gel polish enhances these colors with a glossy finish that makes the pink and white pop against each other. The reflective quality of gel creates depth that standard polish can’t achieve. Apply thin coats to prevent bubbling and ensure the colors remain vibrant throughout wear.
Classic combinations work best when you alternate the colors across your nails rather than using them together on single nails. Pink thumbnails paired with white ring fingers create visual interest without overwhelming the design. Add Hello Kitty’s face details using fine nail art brushes for precision work.
Baby Blue Hello Kitty Themes
Baby blue bases offer a fresh alternative to traditional pink that still maintains Hello Kitty’s sweet personality. This color choice works particularly well for spring and summer designs when you want something light and airy. We suggest using baby blue as your primary color across three nails while incorporating white or soft pink accents on the remaining two.
Mini details like tiny bows or whiskers in contrasting colors enhance the baby blue theme without competing for attention. White whiskers against baby blue create subtle definition that catches light beautifully. Pink bow details add just enough warmth to prevent the design from feeling too cool toned.
Fresh combinations emerge when you layer different shades of blue with white highlights. Light blue bases with powder blue accents create dimension while keeping the overall look cohesive. Consider adding small white dots around Hello Kitty’s face to mimic her classic background pattern.
Lavender and Cream Nail Art
Lavender and cream combinations offer the most subtle approach to Hello Kitty nail art while maintaining sophisticated appeal. This palette works perfectly for those who want Hello Kitty charm without bold statement colors. We find that lavender serves as an excellent base color that complements cream accents beautifully.
Soft contrasts between these colors create elegant designs that work in professional settings. Cream details against lavender backgrounds provide gentle definition without sharp lines. The muted tones allow for more intricate Hello Kitty face details since they won’t compete with busy colors.
Acrylic paint applications work exceptionally well with this color scheme since both colors blend seamlessly when slightly mixed. Use fine brushes to create Hello Kitty’s ears and facial features in cream against your lavender base. The result is a sophisticated take on kawaii culture that appeals to adult fans of the character.
Hello Kitty French Tip Variations
 2")
French manicures get a kawaii makeover when we incorporate Hello Kitty elements into these timeless designs. These variations blend classic elegance with playful charm to create sophisticated yet fun nail art.
Pink Bow French Tips
We recommend improving traditional French tips by adding Hello Kitty’s signature pink bow directly onto the white tip portion. Start with a classic white French tip using gel polish for durability and smooth application. Paint small pink bows on each nail tip using a fine detail brush, positioning them slightly off center for visual interest. This technique works beautifully on shorter nails where space is limited but you still want Hello Kitty’s iconic element.
For added dimension, we suggest using a slightly darker pink shade to create shadow effects beneath each bow. Apply a clear topcoat to seal the design and maintain the glossy finish that makes French tips so appealing. This variation is perfect for professional settings where you want subtle kawaii charm without overwhelming bold colors.
Hello Kitty Silhouette Tips
Silhouette designs offer a modern twist on French manicures by replacing traditional white tips with Hello Kitty’s recognizable outline. We create these by painting Hello Kitty’s head shape along the natural tip line of each nail. Use black or dark pink polish to form the silhouette, ensuring the ears are proportional to the head size.
This technique works exceptionally well on almond or oval shaped nails where the curved tip naturally complements Hello Kitty’s round head shape. We recommend using a striping brush for clean lines and steady hand control. For variation, alternate between full head silhouettes and simple ear outlines across different nails to create visual rhythm in your manicure.
Glitter Accent French Manicures
Glitter transforms Hello Kitty French tips into glamorous statement nails that catch light beautifully. We layer fine pink or silver glitter polish over the white French tip to create sparkly accents that enhance the overall design. Apply glitter in thin coats to avoid chunky buildup that can affect the manicure’s smooth appearance.
For bow accents specifically, we use glitter polish instead of solid color to paint Hello Kitty’s signature accessory. This creates a focal point that draws attention while maintaining the elegance of French tips. Rose gold glitter works particularly well for special occasions, while clear glitter with pink undertones suits everyday wear. Seal everything with a high quality topcoat to prevent glitter from chipping and to maintain the professional finish.
3D Hello Kitty Nail Art Techniques
 3")
We’re taking Hello Kitty nail art to the next level with three-dimensional techniques that create stunning depth and texture. These advanced methods transform flat designs into captivating sculptural masterpieces that’ll make your manicure the center of attention.
Raised Bow Applications
Raised bow applications create the most iconic Hello Kitty element with impressive dimensionality that catches light beautifully. We recommend using acrylic or gel medium to sculpt Hello Kitty’s signature bow directly onto your nail surface. Start by shaping the bow’s center knot first, then build the curved loops on each side for authentic proportions.
Bow-shaped molds offer consistent results when creating multiple raised bows across your manicure. Fill these specialized molds with your chosen gel or acrylic material, then carefully transfer the formed bow to your nail. We suggest using iridescent glitters or holographic powders to enhance the bow’s surface, creating a captivating shine effect that makes the design pop under any lighting.
Shadow effects add professional depth to your raised bow applications. Apply a slightly darker pink shade beneath the bow’s edges to create natural-looking shadows. This technique makes the bow appear to float above the nail surface rather than sitting flat against it.
Textured Hello Kitty Faces
Textured Hello Kitty faces bring the beloved character to life through raised facial features that you can actually feel. We use specialized nail art tools to create dimensional details like raised eyes, nose, and mouth areas. Start with Hello Kitty’s distinctive oval eyes, building them up slightly from the nail surface using small dots of thick gel or acrylic.
Stamping techniques combined with dimensional materials create impressive textured patterns across Hello Kitty’s face. Press your stamper into thick gel medium before applying the design, which leaves raised impressions that dry with beautiful texture. We recommend practicing this technique on practice nails first to perfect your pressure and timing.
Layering different textures creates visual interest across Hello Kitty’s facial features. Apply smooth raised areas for her cheeks, then add slightly rougher textures around her whisker placement. This contrast makes each facial element stand out while maintaining the character’s recognizable appearance.
Dimensional Charm Additions
Dimensional charm additions transform ordinary Hello Kitty nails into miniature works of art that showcase incredible detail. We secure small 3D charms shaped like Hello Kitty’s face, bows, or themed elements using high-quality nail glue for lasting adhesion. These charms create instant depth without requiring advanced sculpting skills.
Strategic charm placement enhances your overall nail design composition. Position larger charms on accent nails while using smaller elements across remaining fingers for balanced visual weight. We suggest mixing different charm sizes and styles within the same Hello Kitty theme to create ever-changing visual flow across your entire manicure.
Adhesive application techniques ensure your dimensional charms stay securely attached throughout daily activities. Clean both the nail surface and charm base with rubbing alcohol before applying nail glue. Press firmly for 10 seconds, then seal around the charm edges with clear topcoat for maximum durability and professional finish.
Hello Kitty Ombre and Gradient Styles
 4")
Blending colors seamlessly creates stunning visual effects that make Hello Kitty designs truly captivating. Gradient techniques add depth and dimension to your nail art while maintaining the adorable charm we all love.
Pink to White Gradient Backgrounds
Soft pink to white transitions form the perfect canvas for Hello Kitty’s iconic appearance. We recommend starting with a pink base coat and gradually blending toward white at the nail tips to create that dreamy ombre effect. This technique complements Hello Kitty’s signature red and white color palette beautifully.
Nail sponges deliver the smoothest color transitions when creating these gradients. Apply your pink polish to a makeup sponge, then dab white polish onto the tip area before pressing gently onto your nail. Freehand techniques work equally well if you prefer more control over the blending process.
Building up the gradient in thin layers prevents streaking and ensures even coverage. Each coat should be slightly lighter than the previous one as you work toward the white tip area.
Rainbow Hello Kitty Transitions
Vibrant rainbow gradients create a playful backdrop that makes Hello Kitty’s white face pop dramatically. Paint your base gradient transitioning from red through yellow, green, blue, and purple for maximum color impact. We suggest using high quality nail polishes to ensure smooth color transitions between each shade.
Center Hello Kitty’s white face over this colorful background for striking contrast. Add black details for her eyes and whiskers while using bright yellow for her nose to complete the cheerful design.
Blending each rainbow color while the polish is still slightly wet creates the most seamless transitions. Work quickly between colors to maintain that smooth gradient effect throughout the entire design.
Sunset Themed Hello Kitty Nails
Warm sunset gradients featuring orange, pink, and purple shades create romantic Hello Kitty designs perfect for evening occasions. These colors blend naturally together and provide a stunning backdrop for Hello Kitty’s sweet face. We love how the warm tones make her features appear more luminous and eye catching.
Highlight Hello Kitty’s facial features using brighter accent colors that complement the sunset theme. Her nose and bow can incorporate coral or bright pink shades that tie into the overall warm color scheme.
Layering translucent polishes over your base gradient adds depth and creates that authentic sunset glow effect. Each additional layer should be applied lightly to maintain the gradient’s smooth appearance while building color intensity.
Seasonal Hello Kitty Nail Concepts
 5")
Transform your Hello Kitty nail art throughout the year with designs that capture the spirit of each season. We’ll show you how to adapt our favorite kawaii character to match holidays and seasonal celebrations.
Halloween Hello Kitty Designs
Spooky cute Halloween transformations bring together the best of both worlds when you combine Hello Kitty’s sweetness with October’s mysterious charm. Paint Hello Kitty wearing a tiny witch hat using black acrylic paint over her signature white face design. Add purple or orange bow accents to maintain that festive Halloween spirit while keeping the kawaii aesthetic intact.
Pumpkin themed Hello Kitty variations create stunning seasonal nail art by incorporating classic Halloween colors into your manicure. Use orange as your base coat and paint Hello Kitty’s face in white with black details for contrast. Apply small black dots around the design to mimic pumpkin seeds or create tiny jack o lantern expressions on alternating nails.
Gothic Hello Kitty interpretations work beautifully on coffin shaped nails when you want a more dramatic Halloween look. Paint Hello Kitty in all black silhouette form against deep purple or midnight blue backgrounds. Finish with silver glitter accents to create an elegant spooky vibe that’s perfect for Halloween parties.
Christmas Holiday Themes
Snowy wonderland Hello Kitty designs capture the magic of winter holidays through delicate white and silver color combinations. Paint Hello Kitty wearing a red Santa hat with white fur trim details using fine nail art brushes. Add tiny snowflake patterns around the design using white acrylic paint or nail stamps for a cohesive winter theme.
Festive red and green Hello Kitty styles bring traditional Christmas colors into your kawaii nail art collection. Create Hello Kitty’s bow in deep red with green accent details or alternate between red and green base colors on different nails. Use gold foil accents to add holiday glamour and make your Christmas Hello Kitty nails shine under party lights.
Holiday sweater inspired Hello Kitty art recreates cozy winter fashion on your nails through textured painting techniques. Paint Hello Kitty wearing tiny knitted patterns using dotting tools to create cable knit effects. Choose warm colors like burgundy, forest green, or cream to match your favorite holiday sweaters.
Summer Beach Hello Kitty Styles
Seaside Hello Kitty adventures bring tropical vibes to your nail art through bright ocean inspired color palettes. Paint Hello Kitty wearing cute sunglasses and a sun hat using yellow and blue accents against white base designs. Add tiny seashell details or wave patterns in the background using light blue and turquoise shades.
Surfing Hello Kitty themes create playful summer nail art that’s perfect for beach vacations and pool parties. Design Hello Kitty holding a colorful surfboard using bright pink, orange, and blue gradient techniques. Paint small wave details around the character using white and light blue colors to simulate ocean foam.
Tropical fruit Hello Kitty combinations blend kawaii charm with summer’s freshest flavors through vibrant color mixing. Create Hello Kitty surrounded by tiny watermelon slices, pineapples, or strawberries using bright reds, greens, and yellows. Use gel polish to achieve the glossy finish that mimics fresh fruit surfaces and makes your summer Hello Kitty nails pop.
Hello Kitty Nail Art for Different Nail Lengths
 6")
We’ll adapt our Hello Kitty designs to complement your natural nail length perfectly. Each length offers unique opportunities to showcase this beloved character’s charm.
Short Nail Hello Kitty Ideas
Short nails work beautifully with minimalist Hello Kitty designs that won’t overwhelm the limited surface area. We recommend painting all nails with a light or hot pink base, then using a dotting tool to create delicate white flowers or bows on just one or two accent nails. Simple Hello Kitty faces shine on shorter nails when we focus on clean, bold outlines rather than intricate details.
Creating recognizable features becomes easier when we use a white oval shape with dot eyes, a small yellow nose, and carefully drawn whiskers using a black nail art striper. We’ve found that keeping designs cute and clear works best on this canvas size. Fewer details actually help make Hello Kitty’s signature features more recognizable and impactful.
Designers often choose this approach because it maintains the character’s essence without creating visual clutter. We suggest practicing your technique on a nail wheel first to perfect those clean lines that make short nail art so effective.
Medium Length Adaptations
Medium length nails provide the perfect canvas for expanding our Hello Kitty creativity beyond basic designs. We can add exciting elements like glitter accents, French tips featuring Hello Kitty faces, or even include other Sanrio friends alongside our main character. This length allows us to dedicate each nail to different Hello Kitty accessories such as her signature bow, delicate flowers, or that iconic red ribbon.
Freehand shapes become much more manageable on this larger surface, and we can incorporate multi color details without overwhelming the design. Mixing gel polishes with glitter creates beautiful dimension while keeping the look trendy and modern. We love combining classic Hello Kitty faces with complementary patterns like stripes, hearts, or seasonal themed backgrounds.
French manicures get a playful twist when we add Hello Kitty elements to the traditional white tips. We can also experiment with different base colors while maintaining that perfect balance between elegance and kawaii charm that medium length nails provide.
Long Nail Elaborate Designs
Long nails transform into stunning canvases for elaborate, hand painted Hello Kitty masterpieces that showcase true artistry. We can dedicate each nail to different scenes or characters, creating narratives that feature Hello Kitty with her friends against themed backgrounds like cherry blossoms, sweet desserts, or seasonal landscapes. Fine brushes become essential tools for adding sophisticated shading, highlighted features, and three dimensional elements that bring designs to life.
Artists often combine French tips with full face portraits of Hello Kitty, turning each nail into a mini canvas for ever-changing, story like illustrations. We recommend using this extended space to incorporate costume details, textured backgrounds, and intricate accessories that wouldn’t be possible on shorter nails. Charms, rhinestones, and textured embellishments find their perfect home on long nails, creating bold, eye catching finishes that make real statements.
Professional nail artists frequently choose long nails for competition pieces because they offer unlimited creative possibilities. We can layer different techniques, combine multiple Sanrio characters, and even create seasonal collections that tell complete visual stories across all ten nails.
DIY Hello Kitty Nail Stamping Methods
 7")
Creating professional-looking Hello Kitty designs at home becomes effortless when you master the art of nail stamping. We’ll guide you through proven techniques that deliver salon-quality results every time.
Stamping Plate Techniques
Purchase specialized Hello Kitty stamping plates from platforms like eBay or Amazon for the most authentic designs. These plates feature precise engravings that capture every detail of Hello Kitty’s iconic features. Apply nail polish directly to your chosen design on the plate, ensuring complete coverage of the etched pattern.
Scrape off excess polish using an old credit card or specialized scraper tool. Work quickly during this step to prevent the polish from drying in the grooves. Position the scraper at a 45-degree angle and sweep across the plate in one smooth motion.
Press the stamper firmly onto the design and immediately transfer it to your nail. Rolling the stamper from one side to the other creates even coverage without air bubbles. Practice this motion several times to achieve consistent pressure and timing.
Hand-Painted Detail Tips
Draw Hello Kitty’s signature bow using liner gel for the most precise results. Start with the center knot and work outward to each side of the bow. Allow each section to dry completely before adding adjacent details to prevent smudging.
Create facial features using a nail art brush and contrasting polish colors. Freehand small details like eyes and whiskers require steady hands and patience. Use dotting tools for perfectly round eyes and a liner brush for delicate whiskers.
Layer your hand-painted elements over stamped bases for dimensional effects. This combination technique adds depth while maintaining the crisp lines that stamping provides. Wait for each layer to cure completely before applying the next detail.
Stencil Application Guidelines
Clean and dry your nails thoroughly before applying any stencil designs. Residual oils or moisture can prevent proper adhesion and cause design bleeding. Use rubbing alcohol to remove any remaining nail oils for optimal results.
Apply polish through stencils using a light dabbing motion rather than brushing. Heavy application can cause polish to seep under the stencil edges, creating blurred lines. Build coverage gradually with multiple thin coats for crisp definition.
Remove stencils immediately while the polish remains wet for clean edges. Waiting too long can cause the polish to stick to the stencil, resulting in torn or uneven lines. Peel stencils away slowly at a low angle to maintain design integrity.
Choose vibrant colors like pink or red to match Hello Kitty’s iconic theme. These traditional Sanrio colors create authentic-looking designs that capture the character’s essence. Consider using white bases to make colored details pop more dramatically.
Hello Kitty Nail Accessories and Embellishments
 8")
Transforming basic Hello Kitty nail designs into stunning masterpieces becomes effortless when we incorporate the right accessories and embellishments. These decorative elements add luxury and sparkle while maintaining the character’s iconic charm.
Rhinestone and Crystal Accents
Rhinestones create instant glamour around Hello Kitty’s face or bow, elevating simple designs into luxurious statements. We recommend placing clear crystals strategically around the character’s silhouette to frame the design without overwhelming it. Small pink rhinestones work perfectly for accentuating Hello Kitty’s signature bow, while larger crystals can serve as the bow’s center focal point.
Crystal accents shine brilliantly when positioned at nail corners or along French tip lines. Applying rhinestones requires nail glue or gel medium for secure attachment, ensuring they won’t pop off during daily activities. Mix different crystal sizes to create visual depth, using larger stones as anchors and smaller ones as supporting details.
Nail Sticker Applications
Stickers offer the easiest method for applying Hello Kitty designs without requiring extensive nail art skills. We suggest choosing high quality vinyl stickers that resist chipping and maintain their vibrant colors through multiple hand washes. Position stickers on completely dry base coats to prevent bubbling or lifting around the edges.
Professional nail stickers come in various sizes, allowing us to customize designs for different nail lengths and shapes. Remove any air bubbles by gently smoothing from center outward using a cuticle pusher or orange stick. Seal sticker applications with two thin topcoat layers rather than one thick application for better durability.
Charm and Bow Attachments
Small charms attach beautifully to coffin or almond shaped nails, creating three dimensional Hello Kitty themes. We find that bow shaped charms work especially well on accent nails, drawing attention without cluttering the overall design. Metal charms in gold or silver tones complement both pastel and bold color schemes.
Securing charms requires strong nail adhesive applied to both the charm base and nail surface. Press firmly for 10 seconds to ensure proper bonding, then avoid water contact for at least one hour. Bow attachments look stunning when paired with matching rhinestone accents, creating cohesive designs that capture Hello Kitty’s playful elegance.
Matching Hello Kitty Nail Sets and Themes
 9")
Creating cohesive Hello Kitty nail art requires thoughtful coordination to achieve professional-looking results. We’ll explore various approaches to bring your entire manicure together with style and consistency.
Full Set Coordination Ideas
Unified character placement across all ten nails creates the most impactful Hello Kitty design approach. Paint Hello Kitty’s face or body on each nail using consistent sizing and positioning for a balanced appearance. Stick to the brand’s signature pastel color palette featuring soft pinks and crisp whites to maintain authenticity.
Thematic consistency works best when you incorporate complementary patterns like subtle stripes or polka dots alongside your Hello Kitty motifs. Choose three colors maximum to prevent visual overwhelm while ensuring each nail contributes to the overall design story. Apply gel polish as your base for enhanced durability and that coveted glossy finish that makes pastel colors pop.
Pattern repetition creates visual rhythm by alternating Hello Kitty faces with simple bow designs across your nail set. Use the same brush techniques and color ratios on each nail to maintain professional consistency. Consider incorporating glitter accents strategically rather than randomly to enhance the cohesive theme.
Accent Nail Combinations
Feature nail emphasis transforms one nail into the star of your manicure by showcasing a larger, more detailed Hello Kitty design. Choose your ring finger or thumb for maximum visual impact while keeping remaining nails simple with matching base colors. Apply contrasting colors like bold red bows against pastel backgrounds to make your accent nail stand out dramatically.
Color contrast strategies work effectively when you pair soft pastels with vibrant accent shades on designated nails. Use Hello Kitty’s signature pink for your accent while maintaining white or cream bases on supporting nails. Balance becomes crucial, so limit bold colors to one or two nails maximum to avoid competing focal points.
Textural variation adds sophisticated depth by combining smooth gel polish with glittery or textured finishes on accent nails. Apply fine glitter over Hello Kitty’s bow area on your feature nail while keeping other designs matte or glossy. This approach creates visual interest without sacrificing the overall cohesive theme.
Mix and Match Strategies
Texture combinations elevate basic Hello Kitty designs by incorporating different finish types across your nail set. Combine smooth gel polish with acrylic raised elements to create dimensional contrast that catches light beautifully. Mix matte and glossy finishes strategically, using matte backgrounds to make glossy Hello Kitty faces pop forward visually.
Charm integration adds three-dimensional elements that transform flat designs into interactive nail art pieces. Secure Hello Kitty charms or miniature bow attachments to exact nails using nail glue for lasting adhesion. Position these elements carefully to avoid interfering with daily activities while maximizing their visual impact.
Sticker layering provides an accessible way to achieve complex designs without advanced painting skills. Apply Hello Kitty stickers over complementary base colors, then seal with high-quality topcoat for professional durability. Combine different sticker sizes and orientations to create ever-changing compositions that feel intentionally designed rather than randomly placed.
Conclusion
We’ve explored an incredible array of Hello Kitty nail art possibilities that showcase just how versatile this beloved character can be on your fingertips. From simple stamped designs perfect for beginners to elaborate 3D masterpieces that demand attention these ideas prove there’s a Hello Kitty style for every skill level and occasion.
The beauty of Hello Kitty nail art lies in its ability to bring joy and personality to your everyday look. Whether you’re channeling kawaii culture with pastel gradients or adding seasonal flair with themed variations you’re creating more than just a manicure – you’re expressing your unique style.
We encourage you to experiment with different techniques and find what works best for your lifestyle. Remember that practice makes perfect and even the most intricate designs become achievable with patience and the right tools.
Frequently Asked Questions
What makes Hello Kitty nail art so popular?
Hello Kitty nail art combines nostalgic charm with kawaii culture, appealing to both longtime Sanrio fans and newcomers. The designs transform ordinary manicures into eye-catching art pieces that range from simple accents to complex 3D creations, making them suitable for various skill levels and personal styles.
What’s the best base for classic Hello Kitty face designs?
Use a high-quality white base coat to create a porcelain finish that mimics Hello Kitty’s iconic appearance. This provides the perfect canvas for adding her signature pink or red bow and facial features, ensuring clean, recognizable results.
How do I achieve smooth Hello Kitty gradient backgrounds?
Use nail sponges to create seamless color transitions from soft pink to white. Apply the lighter color first, then dab the sponge with darker polish to blend gradually. This technique creates the perfect dreamy backdrop for Hello Kitty designs.
Can Hello Kitty nail art work on short nails?
Absolutely! Short nails are perfect for minimalist Hello Kitty designs featuring clean outlines and simple features. Focus on essential elements like her bow and basic facial features to create charming, proportionate designs that won’t overwhelm smaller nail surfaces.
What’s the easiest way to create Hello Kitty nails at home?
DIY nail stamping is the most beginner-friendly method. Use specialized Hello Kitty stamping plates with vibrant polish to transfer professional-looking designs onto your nails. Alternatively, nail stickers offer quick application for instant Hello Kitty charm.
How can I make my Hello Kitty nails more glamorous?
Add rhinestones and crystal accents strategically around Hello Kitty’s face and bow area. Layer fine glitter over French tips or use iridescent elements on 3D bows. Seal everything with a high-quality topcoat for maximum shine and durability.
What seasonal Hello Kitty designs work best?
Halloween designs feature Hello Kitty in witch hats or pumpkin themes, while Christmas incorporates snowy wonderlands with red and green accents. Summer styles showcase tropical fruits and seaside adventures, adapting Hello Kitty’s classic look to seasonal elements.
How do I create 3D Hello Kitty nail art?
Use acrylic or gel medium to sculpt raised bows and facial features. Apply the medium in thin layers, allowing each to cure before adding details. Secure 3D charms with strong nail glue and seal with topcoat for durability and professional finish.


