The holiday season calls for nails that sparkle as bright as Christmas morning, and glitter nails deliver exactly that festive magic we’re all craving. Whether you’re attending holiday parties or simply want to add some seasonal sparkle to your everyday look, Christmas glitter nails transform your fingertips into dazzling accessories that capture the joy and wonder of the season.
We’ve all experienced that moment when the perfect manicure makes us feel unstoppable – and nothing says celebration quite like nails that catch the light with every gesture. From subtle shimmer to full-on glamorous sparkle, Christmas glitter nail designs offer endless possibilities to express your holiday spirit.
Ready to discover nail art that’ll have everyone asking where you got your manicure done? We’re diving into the most stunning Christmas glitter nail ideas that’ll keep your hands looking festively fabulous throughout the entire holiday season.
Classic Red and Gold Christmas Glitter Nails
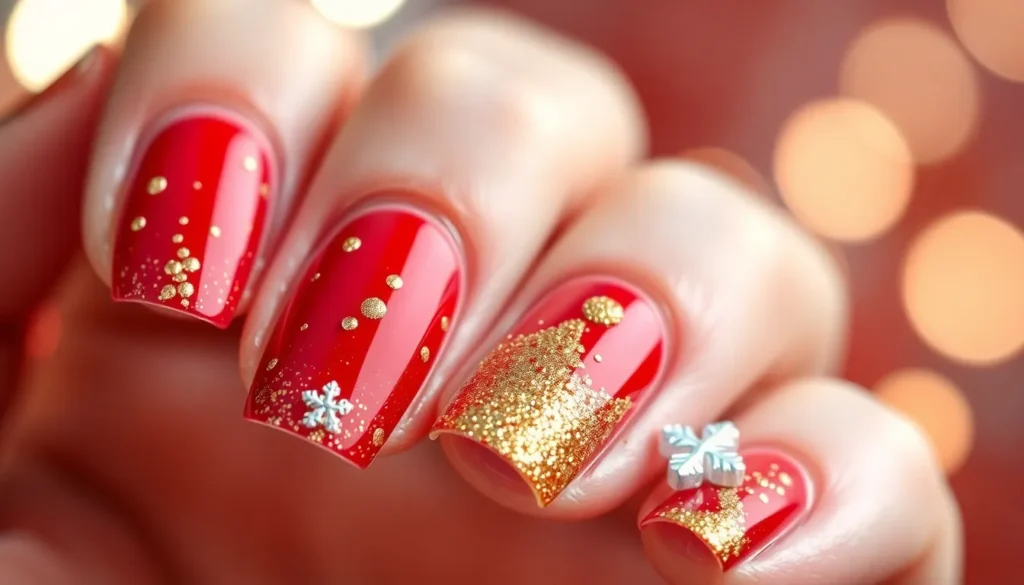
Red and gold combinations create the most iconic Christmas glitter nail designs that never go out of style. These timeless colors capture the essence of holiday tradition while delivering maximum festive impact.
Traditional Holiday Color Combinations
Deep crimson paired with champagne gold creates an elegant look that works for both casual gatherings and formal holiday parties. We recommend using a rich burgundy base coat with fine gold glitter applied over the entire nail for sophisticated coverage.
Bright cherry red with rose gold accents offers a modern twist on classic holiday colors. Apply the red base evenly, then concentrate rose gold glitter along the cuticle area and nail tips for a gradient effect that catches light beautifully.
Matte red finished with metallic gold details provides striking contrast that photographs wonderfully. Paint your nails with matte red polish, then use a thin brush to create gold glitter stripes or geometric patterns across each nail.
Alternating red and gold nails gives you maximum versatility throughout the holiday season. Choose solid red for your thumb and ring finger, then apply dense gold glitter to your remaining nails for balanced visual interest.
Application Techniques for Even Glitter Coverage
Base coat application forms the foundation for long lasting Christmas glitter nails. We always start with a clear base coat and let it dry completely before adding any colored polish or glitter elements.
Sponge dabbing method distributes glitter particles more evenly than brush application alone. Dip a makeup sponge into your glitter polish, then gently press it onto each nail surface while the base color remains slightly tacky.
Layering technique builds depth and richness in your red and gold design. Apply thin coats of glitter polish, allowing each layer to dry for 60 seconds before adding the next coat for optimal opacity.
Sealing with top coat protects your Christmas glitter nails from chipping and extends wear time. Use two thin coats of clear top coat, allowing the first coat to dry completely before applying the second layer for maximum durability.
Winter Wonderland White and Silver Glitter Designs

Transform your nails into a frosty masterpiece with white and silver glitter combinations that capture the magic of a snowy industry. These elegant designs offer versatility from subtle shimmer to dramatic sparkle, perfect for creating that coveted winter wonderland effect.
Snowflake Accent Nail Ideas
Snowflake accent nails add delicate artistry to your winter manicure with intricate patterns that catch the light beautifully. We recommend starting with a crisp white base coat to create the perfect canvas for your snowflake designs.
Freehand painting allows for complete creative control when crafting unique snowflake patterns. Use a small detail brush dipped in silver glitter polish to paint six pointed lines radiating from a central point. Add smaller branches and dots to create intricate crystal formations that mimic real snowflakes.
Nail stickers provide precision and consistency for those who prefer ready made designs. Apply snowflake shaped stickers over your base color, then seal with a clear top coat for longevity. Layer different sized stickers on accent nails to create depth and visual interest.
Mixed media techniques combine both methods for stunning results. Paint basic snowflake structures freehand, then add dimensional nail stickers as focal points. This approach creates texture variation while maintaining artistic flair throughout your manicure.
Ombre Glitter Fade Techniques
Ombre glitter fade creates a sophisticated gradient effect that transitions from intense sparkle to subtle shimmer across each nail. This technique works exceptionally well with white and silver glitter combinations for winter themed designs.
Sponge application delivers the smoothest gradient transitions when creating ombre effects. Dab a makeup sponge into silver glitter polish, then gently press it onto the nail tip. Gradually work the sponge toward the cuticle with lighter pressure to achieve a natural fade from dense to sparse glitter coverage.
Brush blending offers more control over glitter placement and intensity levels. Apply silver glitter polish heavily at the nail tip using a flat brush. Immediately blend upward with quick, light strokes while the polish remains wet to create seamless transitions.
Layering techniques build depth and dimension in your ombre fade. Start with a light dusting of white glitter across the entire nail. Add silver glitter concentrate at the tips, then blend the boundary line. This method creates complex light reflection patterns that enhance the winter wonderland aesthetic.
Green and Gold Festive Christmas Glitter Nails

Green and gold glitter nails represent the perfect fusion of natural elegance and luxurious celebration. This stunning color combination captures the essence of evergreen trees while adding that coveted golden sparkle that makes your manicure shine.
Christmas Tree Inspired Nail Art
Mini Christmas trees transform your nails into tiny holiday masterpieces that capture everyone’s attention. We recommend starting with a deep forest green base coat and using chrome or gel polish to create the tree silhouettes on accent nails.
Creating realistic tree patterns becomes effortless when you use nail stampers for precise shapes or try freehand techniques for a more artistic approach. Apply small gold glitter particles along the tree edges to mimic twinkling lights, or add tiny rhinestones as miniature ornaments.
Layering techniques elevate your Christmas tree design by building depth through multiple green shades. Start with darker greens at the base and gradually lighten toward the tree top, then seal everything with gold glitter accents that resemble fresh snow or sparkling decorations.
Holly and Mistletoe Glitter Accents
Holly leaf designs bring classic Christmas charm to your fingertips using rich green glitter for the distinctive serrated leaves. We suggest creating the traditional three leaf cluster pattern on accent nails while keeping other nails in solid gold or green glitter.
Berry accents add the perfect pop of color when you apply small red glitter dots or tiny rhinestones to represent holly berries. Position these carefully at the base of your holly leaves for authentic botanical accuracy that catches the light beautifully.
Mistletoe patterns offer a romantic twist on holiday nail art using pale green glitter for the delicate leaves and white or pearl accents for the berries. This whimsical design works exceptionally well when paired with gold glitter on alternating nails, creating a sophisticated pattern that’s perfect for holiday parties and intimate gatherings.
Multi-Colored Rainbow Christmas Glitter Nails

We’re bringing vibrant energy to Christmas nail art with spectacular rainbow glitter designs that sparkle with festive joy. These eye-catching manicures combine multiple colors in brilliant harmony, creating show-stopping looks that capture the celebratory spirit of the season.
Candy Cane Striped Glitter Patterns
Creating candy cane striped patterns adds playful charm to our Christmas manicure collection. We start with a clear base coat before applying alternating red and white stripes using thin nail art brushes or striping tape for precision. French tip techniques work beautifully for this design, allowing us to create clean diagonal stripes that mimic traditional candy cane patterns.
Metallic glitter accents transform basic stripes into dazzling focal points. We recommend applying fine silver or holographic glitter over the white stripes to create depth and sparkle. Red glitter can enhance the colored sections, but we suggest using it sparingly to maintain the classic candy cane aesthetic.
Finishing touches make all the difference in achieving professional results. We seal our candy cane designs with a high-gloss top coat to protect the stripes and enhance the glitter’s reflective properties. This technique ensures our festive patterns stay vibrant throughout holiday celebrations.
Christmas Light Inspired Color Schemes
Christmas light color schemes bring the magic of twinkling decorations directly to our fingertips. We incorporate bright primary colors like red, green, blue, and yellow to recreate the cheerful glow of holiday string lights. Each nail can feature a different color, or we can create gradient effects that blend multiple shades seamlessly.
Airbrushing techniques deliver smooth color transitions that mimic authentic light bulb appearances. We apply each color in small sections, allowing for natural blending between adjacent hues. Gradient brushwork offers an alternative method, using makeup sponges to dab colors together for softer transitions.
Glitter application amplifies the twinkling light effect we’re aiming to achieve. We layer fine multicolored glitter over our base colors to simulate the sparkling quality of illuminated Christmas lights. Holographic glitter particles catch light from different angles, creating that authentic twinkle that makes these designs truly special during holiday gatherings.
Elegant Nude Base with Christmas Glitter Accents

Nude base Christmas glitter nails offer the perfect balance between sophistication and festive charm. We love how this versatile approach allows the sparkle to take center stage while maintaining an polished appearance.
Minimalist Holiday Nail Designs
Minimalist Christmas glitter nails prove that less can definitely be more during the holiday season. We recommend starting with a subtle glitter accent approach, where you’ll apply just a light dusting of fine glitter over a neutral nude base for understated elegance.
Small candy cane stripes work beautifully when painted as thin red and white lines across one or two accent nails. We suggest using a fine brush to create these delicate patterns that evoke classic holiday imagery without overwhelming your overall look.
Delicate snowflakes become stunning focal points when painted on clear or white base coats using intricate detail work. We find that creating these small winter motifs on nude backgrounds allows the glitter elements to complement rather than compete with the design.
French Tip Glitter Variations
French tip designs get a festive upgrade when we incorporate Christmas glitter into the classic style. Red tips enhanced with gold glitter create a sophisticated look that’s perfect for holiday parties and formal events.
White tips paired with silver glitter offer a frosty winter effect that captures the essence of the season. We love how this combination mimics fresh snow while adding just enough sparkle to feel celebratory.
Glittered ombre tips provide the most dramatic variation using gradual color transitions in festive shades like red, green, or gold. We achieve this effect by blending glitter colors from the tip toward the nail bed, creating seamless gradient effects that catch light beautifully throughout your holiday celebrations.
DIY Christmas Glitter Nail Application Tips

Creating stunning Christmas glitter nails at home becomes effortless when you’ve got the right techniques and materials. We’ll guide you through everything needed to achieve salon-quality results in your own space.
Essential Tools and Materials Needed
Base and Color Products form the foundation of your Christmas glitter manicure. We recommend starting with OPI “Bare My Soul” as your sheer base coat, which provides excellent nail protection while maintaining transparency. Clear polish acts as the adhesive layer for your glitter application, ensuring better retention and smoother coverage.
Glitter Selection offers endless creative possibilities for your festive designs. Martha Stewart glitters come in perfect holiday shades including gold for luxury appeal, green for natural elegance, red for classic Christmas vibes, silver for winter wonder, and black for dramatic contrast. Different glitter particle sizes create varying texture effects, from fine shimmer to bold sparkle.
Application Tools ensure precise and professional results during your manicure process. Nail files shape your nails to perfection, while cuticle pushers prep the nail bed properly. Cotton balls and swabs handle cleanup duties around your cuticles, and folded paper pieces catch excess glitter for easy collection and reuse.
Finishing Products protect and enhance your completed design. OPI matte top coat provides a sophisticated finish option, while high-gloss alternatives deliver maximum shine and glitter reflection. Nail polish remover becomes essential for correcting mistakes and cleaning up application errors.
Step-by-Step Application Process
Nail Preparation creates the perfect canvas for your Christmas glitter design. Clean your nails thoroughly with nail polish remover to eliminate oils and residue. Shape each nail with gentle filing motions, working from outer edges toward the center to prevent splitting.
Base Coat Application protects your natural nails from staining while improving polish adhesion. Apply one thin, even layer of sheer base coat from cuticle to tip. Allow complete drying before proceeding to avoid bubbling or uneven texture in subsequent layers.
Clear Polish Layer serves as the adhesive foundation for your glitter particles. Paint a generous coat of clear polish over your prepared base, working quickly before it begins to set. This wet layer captures and holds glitter particles effectively during application.
Glitter Application requires swift and confident movements for optimal coverage. Sprinkle your chosen glitter colors over the wet clear polish immediately after application. Position folded paper beneath your hand to catch excess particles for collection and potential reuse.
Top Coat Sealing locks your glitter design in place while creating a smooth, professional finish. Apply a generous amount of top coat over the glittered surface, ensuring complete coverage of all particles. Multiple thin coats work better than one thick application for durability.
Final Cleanup perfects your manicure appearance and removes unwanted glitter residue. Use cotton swabs dipped in nail polish remover to clean glitter particles from your cuticle areas and skin. Work carefully around the nail edges to maintain clean, precise lines.
Professional Christmas Glitter Nail Salon Options

Professional salons offer expertly crafted Christmas glitter nails that’ll elevate your holiday look beyond what you can achieve at home. Choosing the right salon ensures your festive manicure will last throughout the season with stunning results.
What to Expect During Your Appointment
Service customization begins with a consultation where nail technicians assess your preferences and nail condition. Salons like Glitter & Polish, Nails & Spa at 248 E 44th St in New York offer comprehensive services including manicure, gel nails, nail art, and acrylic nails that can be enhanced with Christmas glitter designs.
Professional techniques include proper nail preparation, cuticle care, and expert glitter application using high-quality products. Technicians at established salons can create intricate designs like snowflakes, candy canes, or ombre effects that require specialized skills and tools.
Luxury amenities enhance your experience at upscale locations like Majesty’s Pleasure on 45 East 20th Street in Manhattan, where clients enjoy complimentary drinks during their appointment. Many salons provide relaxing environments with comfortable seating and professional lighting for optimal results.
Service duration typically ranges from 45 minutes to 2 hours depending on your chosen design complexity. Gel applications with intricate glitter work require additional curing time under UV or LED lamps for proper adhesion and longevity.
Cost Considerations and Booking Tips
Pricing structures vary significantly based on salon location, service type, and design complexity. Basic gel manicures with simple glitter accents start around $35-50, while elaborate nail art with multiple glitter colors and techniques can cost $75-150 at premium salons.
Seasonal demand peaks during November and December, making advance booking essential for securing your preferred appointment time. We recommend scheduling 2-3 weeks ahead, especially at popular locations like Sparkling Nail in Queens or Manhattan’s high-end establishments.
Package deals often provide better value during holiday seasons, with some salons offering discounts for multiple services or group bookings. Majesty’s Pleasure and similar luxury salons may include complimentary treatments like hand massages or paraffin dips with premium nail services.
Booking strategies include checking salon websites for online appointment systems, following social media accounts for flash sales, and calling directly to inquire about last-minute availability. Many salons maintain waitlists for cancellations during busy holiday periods.
Maintenance costs should factor into your budget, as professional Christmas glitter nails typically require touch-ups every 2-3 weeks to maintain their festive appearance throughout the holiday season.
Christmas Glitter Nail Maintenance and Longevity

Once you’ve achieved your perfect Christmas glitter manicure, proper maintenance becomes essential for keeping those festive nails looking fabulous throughout the entire holiday season.
Proper Care Techniques
Layering your glitter polish correctly forms the foundation of long-lasting Christmas nails. We recommend applying thin layers of glitter polish and allowing each layer to dry completely before adding the next one. This technique prevents excessive buildup while promoting better adhesion to your natural nails.
Moisturizing regularly keeps your nails and cuticles healthy during the dry winter months. We suggest applying hand creams and cuticle oils daily to maintain proper hydration levels around your festive nail art.
Protective measures shield your Christmas glitter nails from everyday damage. We advise wearing gloves during household chores to prevent exposure to harsh chemicals and excessive water that can weaken nail adhesive.
Avoiding excessive exposure to water or cleaning products extends your manicure’s lifespan significantly. We limit prolonged contact with these elements to maintain the integrity of our glitter polish application.
Touch-Up Methods for Extended Wear
Prompt repairs address chips or wear spots before they become major problems. We fix any damage in the glitter polish immediately to prevent further deterioration of our Christmas nail art.
Professional check-ins with nail technicians provide expert assessment during the holiday season. We schedule mid-season appointments to address any maintenance issues and keep our festive nails looking their best.
High-quality topcoat application protects intricate nail art designs from daily wear. We apply a superior topcoat to create a protective barrier that prevents chips and maintains the sparkle of our Christmas glitter nails.
Routine nail care maintains overall nail health throughout the holiday period. We keep our nails clean and properly moisturized to support the longevity of our festive manicure, with gel applications typically lasting two to three weeks when properly maintained.
Removal Process for Christmas Glitter Nails

Removing glitter nail polish requires patience and the right technique to protect your nail health. We’ll guide you through safe methods that effectively eliminate stubborn glitter without damaging your nails.
Safe Removal Techniques at Home
Top coat technique offers the most gentle approach for glitter removal. Apply a layer of clear polish over your existing glitter manicure and immediately use nail polish remover while the top coat remains wet. Both layers dissolve together, making removal significantly easier than traditional methods.
Buffing technique breaks the polish seal before chemical removal begins. Start by gently buffing the nail surface, then soak cotton balls in acetone based nail polish remover. Place the soaked cotton on each nail and wrap with aluminum foil for 3 to 5 minutes before removing.
100% acetone method provides the most effective chemical approach for stubborn glitter. Soak a cotton ball with pure acetone and press it onto the nail for 30 to 60 seconds. Gently wiggle the cotton ball to lift glitter particles, repeating as needed until all polish disappears.
Foil wrapping technique enhances acetone penetration for better results. After applying the acetone soaked cotton ball, wrap each nail with foil and wait 5 minutes. This method allows the acetone to work more effectively against tough glitter formulations.
Base coat protection prevents future removal challenges and nail damage. Always apply a quality base coat before your glitter polish to create a barrier between your natural nail and the glitter formula. Avoid excessive buffing during removal to maintain nail strength and prevent thinning.
When to Seek Professional Removal
Weak or brittle nails benefit from professional expertise during glitter removal. Nail technicians possess specialized tools and techniques that minimize damage while effectively removing stubborn polish. They can assess your nail condition and adjust removal methods accordingly.
Stubborn glitter formulations sometimes resist home removal attempts even though proper technique. Professional grade acetone and specialized removal tools at salons can handle even the most persistent glitter polish. Attempting to force removal at home may cause nail damage or injury.
Discomfort during removal signals the need for professional intervention immediately. Stop your removal process if you experience pain, burning, or excessive nail weakness. Professional nail technicians can safely complete the removal while protecting your nail health and preventing further complications.
Conclusion
Christmas glitter nails offer the perfect way to embrace the festive spirit while maintaining elegant style throughout the holiday season. Whether you’re drawn to classic red and gold combinations or prefer subtle nude bases with delicate sparkles we’ve covered options for every preference and skill level.
The key to stunning Christmas glitter nails lies in proper preparation application and maintenance. From DIY techniques using quality base coats to professional salon services that deliver intricate designs the possibilities are endless for creating your perfect holiday look.
Remember that removal requires patience and the right methods to protect your nail health. With proper care and touch-up techniques your Christmas glitter nails will keep sparkling through every holiday celebration making you feel confident and festive all season long.
Frequently Asked Questions
What are the most popular Christmas glitter nail colors?
The most popular Christmas glitter nail colors include classic red and gold combinations, winter-themed white and silver, and festive green and gold designs. Deep crimson with champagne gold offers elegance, while bright cherry red with rose gold provides a modern twist. White and silver create a winter wonderland effect perfect for the season.
How do I achieve even glitter coverage on my nails?
To achieve even glitter coverage, start with a base coat, then apply clear polish as a foundation. Use a makeup sponge to dab glitter evenly across the nail surface, layer gradually for depth, and seal with a top coat. This technique ensures smooth, professional-looking results with minimal fallout.
Can I create Christmas glitter nails at home?
Yes, you can create stunning Christmas glitter nails at home with the right tools and materials. Essential items include OPI “Bare My Soul” sheer base coat, quality glitter polish, application tools, and top coat. Follow proper nail preparation, layering techniques, and finishing steps for salon-quality results.
How long do Christmas glitter nails last?
Christmas glitter nails typically last 7-14 days with proper application and care. Professional salon applications may last longer due to expert techniques and high-quality products. Regular moisturizing, protective measures, and avoiding harsh activities help extend the lifespan of your festive manicure.
What’s the best way to remove glitter nail polish?
The safest removal method involves using 100% acetone with the foil wrapping technique. Soak cotton pads in acetone, place on nails, wrap with foil, and wait 10-15 minutes. Gently push off softened polish. Always apply base coat before application to prevent future removal challenges.
Are there minimalist Christmas glitter nail options?
Yes, minimalist Christmas glitter designs focus on subtle elegance. Try nude bases with light glitter accents, small candy cane stripes, or delicate snowflake motifs. French tip designs with red and gold or white and silver glitter offer sophisticated festive touches without overwhelming the overall look.
Should I get Christmas glitter nails done professionally?
Professional application offers benefits like expert techniques, intricate designs, and longer-lasting results. Salons provide proper nail preparation, customization options, and luxury amenities. However, DIY options work well for budget-conscious individuals with basic nail art skills and proper tools.
How do I maintain my Christmas glitter nails?
Maintain your glitter nails by moisturizing cuticles regularly, wearing gloves during cleaning, and avoiding harsh chemicals. Apply thin layers of top coat weekly for shine restoration. Schedule touch-ups as needed and consider professional check-ins to address any maintenance issues promptly.


