We’ve all been there – staring at our nails wondering how to make them look polished without very costly or spending hours at a salon. Basic nail ideas don’t have to be boring or complicated. In fact, some of the most stunning manicures come from simple techniques that anyone can master at home.
Whether you’re a complete beginner or just looking for quick everyday looks, we’re here to show you that beautiful nails are within reach. From classic solid colors to easy accent designs, these fundamental nail art techniques will transform your fingertips without requiring professional skills or expensive tools.
Ready to discover how a few simple strokes can elevate your entire look? We’ll walk you through foolproof methods that deliver salon-worthy results every single time. Let’s jump into these game-changing basic nail ideas that’ll become your go-to arsenal for effortlessly chic nails.
Simple Solid Color Manicures
Single color manicures form the foundation of elegant nail art and require minimal skill while delivering maximum impact.
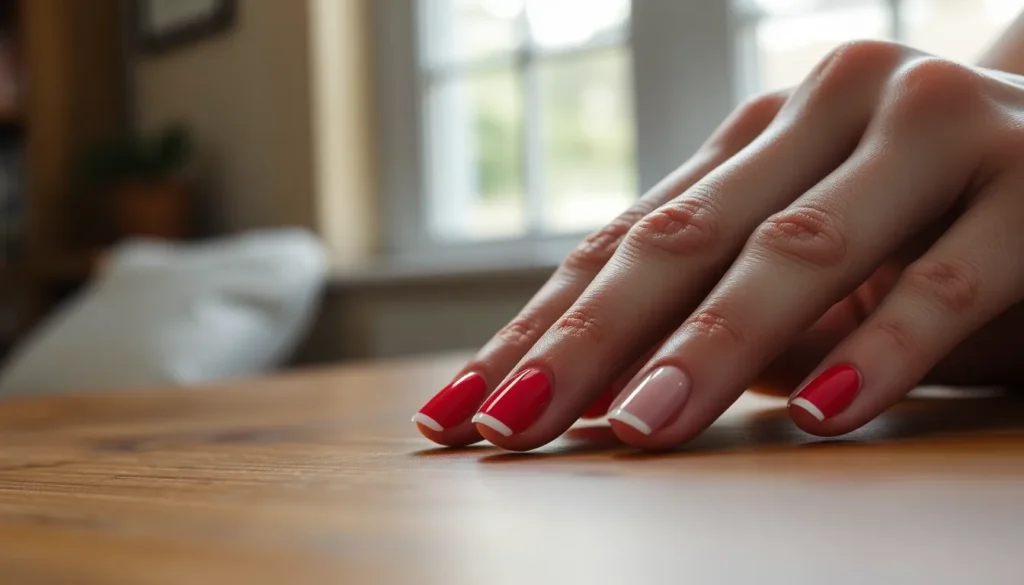
Classic Red Nails
Red polish creates timeless sophistication that complements every skin tone and outfit choice. We recommend applying a base coat first to prevent staining and ensure smooth coverage across all ten nails. Classic red shades like cherry, crimson, and burgundy work beautifully for both daytime meetings and evening events.
Choose cooler reds with blue undertones if you have fair skin, while warmer coral reds enhance medium to dark complexions perfectly. Apply thin coats rather than thick layers to avoid streaking and bubbling issues that can ruin your manicure. Two thin applications provide better coverage than one heavy coat and dry faster too.
Finish with a high quality top coat to seal the color and add glossy shine that lasts up to seven days. Red nails pair exceptionally well with white clothing, denim outfits, and little black dresses for versatile styling options.
Neutral Nude Shades
Nude polish offers understated elegance that works seamlessly with professional attire and casual weekend looks. We find that matching your nude shade to your skin’s undertones creates the most flattering and natural appearance possible.
Pink based nudes complement cool undertones beautifully, while peachy or beige nudes enhance warm skin tones perfectly. Popular nude shades include soft pink, champagne beige, and warm taupe that provide subtle sophistication without overwhelming your overall look.
Apply nude polish in two thin coats for even coverage since lighter shades tend to streak more easily than darker colors. The neutral base allows you to add simple accent designs later like gold striping tape or tiny rhinestones if desired.
Nude manicures photograph beautifully and won’t clash with patterned clothing or bold accessories in your wardrobe. These versatile shades work equally well for job interviews, weddings, and everyday activities where polished hands matter most.
Bold Black Polish
Black nail polish makes a striking statement that exudes confidence and modern edge in any setting. We love how black polish creates dramatic contrast against lighter skin tones and adds sophisticated depth to darker complexions as well.
Apply black polish carefully since dark colors show brush strokes and imperfections more readily than lighter shades do. Start with a quality base coat to prevent staining your natural nails and ensure smooth application throughout the process.
Two thin coats provide optimal coverage while preventing the thick, gloopy appearance that can occur with heavy application. Black polish dries slower than other colors, so allow extra time between coats to prevent smudging or denting.
Matte black creates an edgy, contemporary look while glossy black offers classic sophistication for formal occasions. Pair black nails with silver jewelry, monochrome outfits, or colorful clothing for striking visual contrast that draws attention to your hands.
French Manicure Variations
 1")
French manicures offer endless possibilities for creative expression while maintaining their signature elegance. We’ll explore three stunning variations that can transform your basic nail routine into something truly special.
Traditional White Tips
Classic white tips remain the gold standard for French manicures across all nail shapes and lengths. We recommend starting with a clear or neutral base coat to create the perfect foundation for your white tips. Application requires steady hands and thin coats to achieve that crisp, clean line that defines traditional French nails.
Professional results come from using quality white polish and taking your time with each stroke. We suggest practicing the curved motion on paper first to perfect your technique. This timeless look works beautifully for weddings, job interviews, and any occasion where understated elegance is key.
Colored French Tips
Colored French tips let you personalize the classic design with your favorite shades and seasonal trends. We love experimenting with pastels like soft pink and lavender for spring, bright corals and turquoise for summer adventures. Metallic finishes in gold, silver, and rose gold add instant glamour to any outfit.
Bold colors like deep burgundy or emerald green create striking contrast against neutral base coats. We recommend choosing colors that complement your skin tone and wardrobe for maximum versatility. This variation works especially well for special events where you want to make a statement while keeping the sophisticated French manicure structure.
Reverse French Manicure
Reverse French manicures flip the traditional design by placing accent colors at the nail base instead of the tips. We find this technique creates a modern, edgy look that’s perfect for fashion forward individuals. The cuticle area becomes your canvas for creative expression using metallics, glitter, or bold solid colors.
Negative space elements can be incorporated into reverse French designs for an ultra contemporary finish. We suggest starting with a thin line of color at the base and gradually building up the design as you become more comfortable with the technique. This style pairs beautifully with minimalist jewelry and creates an unexpected twist on the classic French manicure.
Easy Nail Art Techniques
 2")
Building on your solid color foundation, we’ll explore simple techniques that add personality to your manicure without requiring professional skills.
Polka Dot Designs
Dotting tools transform ordinary manicures into playful masterpieces with minimal effort. We create these charming designs by dipping a dotting tool into contrasting polish and gently pressing it onto dried base color. Bobby pins work perfectly as makeshift dotting tools when you don’t have professional equipment available.
Start with larger dots at the nail base and gradually decrease the size toward the tip for a sophisticated gradient effect. Metallic polishes like gold or silver create stunning polka dots over dark base colors. We recommend practicing dot spacing on paper before applying to your nails for consistent results.
Simple Stripes
Striping tape delivers professional looking lines without the steady hand required for freehand painting. We apply the tape over completely dry base polish, then paint over it with our chosen accent color. Remove the tape immediately after application while the polish remains wet for clean edges.
Vertical stripes elongate shorter nails and create an elegant appearance. Diagonal stripes add ever-changing movement to your design and work beautifully with contrasting colors. We achieve different stripe widths by using various tape sizes or painting multiple thin lines side by side.
Half-Moon Manicures
This classic technique involves covering the bottom quarter of each nail with accent color for a sophisticated vintage look. We use small round stickers or reinforcement hole punchers to create perfect curved lines at the nail base. Position the stickers just above your cuticle line for the most flattering effect.
Neutral bases with white half moons create timeless elegance that complements any outfit. Bold color combinations like navy blue half moons over nude base add modern flair to this vintage style. We apply thin coats to prevent polish from seeping under the stickers and always remove them while the polish is slightly tacky.
Minimalist Nail Designs
 3")
Sometimes less truly is more when creating stunning nail art. These understated designs prove that simplicity can be just as striking as complex patterns.
Single Accent Nail
Bold contrasting colors on a single nail create an instant focal point without overwhelming your entire manicure. We recommend choosing one finger per hand—typically the ring finger—to showcase a vibrant shade while keeping the remaining nails in a neutral base color.
Personalized designs like small hearts, stars, or initials transform your accent nail into a unique statement piece. Apply your base color to all nails first, then use a fine brush or nail art pen to add these delicate details to your chosen accent finger.
Color coordination makes your accent nail pop while maintaining overall harmony. Pair a soft pink base with a deep burgundy accent, or combine nude tones with a metallic gold finger for sophisticated contrast.
Thin Line Art
Delicate lines painted with a fine brush add elegant detail without complex techniques. We suggest practicing basic patterns like straight stripes or gentle chevrons on a nail wheel before applying them to your actual nails.
Minimalist accent lines work perfectly when you want subtle enhancement rather than bold statements. Place a single thin line along your nail bed or create parallel lines near the tip for modern geometric appeal.
Steady hand movements ensure clean, professional looking results. Rest your painting hand on a flat surface while working, and use short strokes rather than attempting to paint entire lines in one motion.
Geometric Shapes
Triangles and squares painted using nail polish and dotting tools create structured designs with minimal effort. We find that starting with basic shapes helps build confidence before attempting more complex geometric patterns.
Cohesive geometric patterns across all nails deliver maximum visual impact while remaining elegantly simple. Try alternating chevrons and hexagons on different fingers, or create a repeating triangle pattern that flows from thumb to pinky.
Strategic shape placement can elongate shorter nails or add width to narrow nail beds. Position triangles pointing toward your fingertips to create length, or use horizontal rectangles to make thin nails appear fuller.
Gradient and Ombre Effects
 4")
We’ll explore gradient and ombre techniques that create seamless color transitions on your nails with professional looking results.
Two-Color Gradient
Two color gradients offer endless possibilities for creating stunning nail art that blends complementary or contrasting shades. We recommend starting with a quality base coat to protect your natural nails and ensure smooth polish application. Paint your chosen lighter color at the cuticle area using thin, even strokes for the best coverage. Apply your darker shade at the nail tip, creating a distinct color separation before blending begins.
Use a makeup sponge or small brush to gently blend where the two colors meet. Dab the sponge repeatedly along the color line until you achieve a seamless transition between shades. Work quickly while the polish remains workable to prevent streaking or uneven blending. Clean your cuticles with a small brush dipped in acetone to remove any excess polish for a professional finish.
Glitter Fade Technique
Glitter fade creates an elegant sparkle effect that starts bold at the tips and gradually diminishes toward the cuticles. Begin with your chosen base coat and allow it to dry completely before applying any glitter polish. Paint the glitter polish heavily at the nail tip, covering approximately one third of the nail surface with full opacity.
Apply the second coat of glitter more sparingly, covering only half the area of your first application. Continue with a third coat that covers just the very tip of the nail for maximum sparkle concentration. Use a fan brush or makeup sponge to gently blend the glitter edges for a smooth fade effect. Seal your design with a high quality top coat to prevent glitter from chipping and add extra shine.
Sunset Ombre Nails
Sunset ombre nails capture the beautiful color progression of evening skies using warm orange, pink, and yellow tones. Start with a base coat and select three sunset inspired shades that blend harmoniously together. Apply the lightest color (typically yellow or pale orange) near the cuticle area as your foundation shade.
Paint the medium tone (usually pink or coral) in the center portion of your nail, overlapping slightly with the first color. Add the darkest shade (deep orange or red) at the nail tip, creating distinct color zones before blending begins. Use a damp makeup sponge to pat and blend the color boundaries until they flow seamlessly into each other.
Work in small dabbing motions rather than dragging the sponge to prevent streaking the colors. Apply a glossy top coat once the design is completely dry to enhance the sunset effect and provide lasting wear. Clean around your cuticles with a detail brush for the most polished appearance.
Quick Nail Sticker Applications
 5")
We’ll transform our nail game with stickers that deliver professional results in minutes. These easy application techniques work perfectly when we want stunning designs without the time commitment.
Floral Nail Stickers
Floral designs bring timeless elegance to our manicures with delicate petals and botanical patterns. We love how these stickers instantly create feminine looks that complement spring and summer wardrobes perfectly. Rose motifs work beautifully on nude base colors while daisy designs pop against pastel backgrounds like soft pink or mint green.
Application becomes effortless when we:
- Clean our nails thoroughly and apply a quality base coat for better adhesion
- Select stickers that fit our nail width properly to avoid awkward overhang
- Position each floral design near the nail tip or create accent patterns across multiple fingers
- Smooth from center outward to eliminate air bubbles that can ruin the delicate appearance
We can layer multiple small flower stickers for garden inspired looks or use single statement blooms on accent nails. The key lies in choosing colors that harmonize with our skin tone and outfit choices.
Metallic Accent Decals
Metallic accents add instant sophistication to any base color with their reflective shine and geometric precision. We find that gold decals complement warm skin tones while silver options enhance cooler undertones beautifully. These versatile additions work as thin strips along nail edges or bold geometric shapes across the entire surface.
Creating stunning metallic looks requires we:
- Start with completely dry base polish to prevent smudging during application
- Use tweezers for precise placement of small geometric shapes like triangles or lines
- Apply decals strategically on ring fingers or thumbs for balanced accent placement
- Seal everything with a high quality top coat to prevent edges from lifting
Copper and rose gold options bridge the gap between warm and cool tones perfectly. We can mix different metallic shades on the same hand for modern artistic effects that catch light from every angle.
Holiday Themed Stickers
Holiday stickers let us celebrate seasonal moments with festive nail art that matches special occasions perfectly. Christmas designs featuring snowflakes and holly leaves transform our nails into winter wonderlands while Halloween options like tiny pumpkins and bats add playful spookiness. Easter pastels with bunny silhouettes and egg patterns bring springtime joy to our fingertips.
Maximizing holiday impact means we should:
- Choose stickers that complement our planned outfits for each celebration
- Apply themed designs 2-3 days before events to ensure fresh appearance
- Mix holiday stickers with solid colors that match seasonal color palettes
- Remove designs promptly after holidays to avoid dated looks
Valentine’s Day hearts work beautifully on red or pink bases while Fourth of July stars shine against navy blue polish. We can create complete holiday looks by coordinating sticker themes across all ten nails or focus on accent fingers for subtle seasonal touches.
Natural and Barely-There Looks
 6")
Building on minimalist principles, natural nail looks offer the perfect balance between polished elegance and effortless beauty. These understated styles enhance your natural nails while maintaining a fresh, clean appearance that complements any outfit or occasion.
Clear Coat with Subtle Shimmer
Clear polish with a hint of shimmer creates the perfect barely-there sparkle that catches light beautifully without overwhelming your natural nail color. We recommend using products like Olive & June’s “COSMIC” polish, which adds just enough shimmer to elevate your look while maintaining that natural appearance. This versatile option works wonderfully on its own for a subtle glow or layered over another color to add depth and dimension.
Apply this type of polish in thin, even coats to avoid buildup and ensure the shimmer distributes evenly across each nail. The beauty of this technique lies in its versatility – you can wear it to professional meetings, casual outings, or special events without worrying about your nails appearing too bold or distracting.
Sheer Pink Tints
Soft pink shades enhance your natural nail color while providing just enough coverage to create a polished, put-together appearance. These delicate tints work beautifully for everyday wear because they complement all skin tones and never clash with your wardrobe choices. We find that sheer pink polishes are particularly flattering because they mimic the natural flush of healthy nails.
Choose a shade that’s only slightly deeper than your natural nail color for the most authentic look. Apply two thin coats rather than one thick coat to achieve that perfect sheer coverage that lets your natural nail show through. This technique creates a healthy, luminous finish that appears effortless yet intentional.
Matte Top Coat Finishes
Matte top coats transform any polish into a sleek, understated finish that adds texture and sophistication to your manicure. This technique works exceptionally well over natural or nude shades, creating a modern, contemporary look that feels fresh and current. We love how matte finishes eliminate shine while adding visual interest through their unique texture.
Apply your base color as usual, then finish with a matte top coat for an instantly elevated appearance. This approach works particularly well when you want to tone down a color that might otherwise appear too bright or glossy. The matte finish creates depth and visual interest while maintaining that barely-there aesthetic that makes natural looks so appealing.
Seasonal Basic Nail Ideas
 7")
Transform your manicure by embracing the natural beauty each season brings. We’ll guide you through color palettes that perfectly complement changing weather and seasonal moods.
Spring Pastel Colors
Pastel shades capture spring’s fresh energy with their soft and delicate appearance. Baby pink, lavender, peach, mint green, and sky blue create the perfect foundation for spring manicures that evoke blooming flowers and sunny skies. Cherry blossoms and Easter treats inspire these gentle hues that work beautifully as solid colors or in simple ombre blends.
Apply these colors in thin layers for even coverage and pair them with minimalist designs for an effortlessly elegant look. Soft pastels complement any outfit while maintaining a fresh, feminine aesthetic that’s perfect for the season’s renewal.
Summer Bright Hues
Bright and bold colors reflect summer’s vibrant energy and warmth. Coral, sunshine yellow, and turquoise bring the excitement of beach days and tropical vacations to your fingertips. These vivid shades work exceptionally well for beach inspired nail art or bright French tips that make a statement.
Layer these colors over a quality base coat to ensure the pigments pop against your natural nails. Bold summer hues pair perfectly with vacation outfits and add an instant mood boost to any sunny day look.
Fall Earth Tones
Earth tones mirror autumn’s rich foliage and harvest season beauty. Olive green, terracotta, cinnamon, and golden brown create sophisticated manicures that complement fall fashion perfectly. These warm neutrals work beautifully in natural ombre effects or as the base for earthy nail art designs.
Choose shades that echo the changing leaves outside your window for a cohesive seasonal look. Earthy colors provide versatility while maintaining the cozy warmth that defines autumn style.
Winter Jewel Tones
Jewel tones bring luxury and sophistication to winter manicures with their rich depth. Emerald green, sapphire blue, and ruby red create stunning focal points that complement holiday outfits and formal occasions. These deep colors work exceptionally well with metallic finishes or bold nail art that incorporates seasonal sparkle.
Apply jewel tones with precision since their intensity shows any imperfections clearly. Rich winter colors provide the perfect backdrop for holiday celebrations while maintaining elegance throughout the colder months.
Conclusion
Perfect nails don’t require years of training or expensive salon appointments. With these fundamental techniques in your toolkit you’ll create stunning manicures that rival professional results every time.
Remember that practice makes perfect and even the simplest designs can make a powerful statement. Whether you’re drawn to classic solids minimalist accents or seasonal colors these basic nail ideas will serve as your foundation for endless creativity.
Start with one technique that speaks to you and gradually expand your skills. Your nails are a canvas for self-expression and with these accessible methods you’ll always have gorgeous nails that complement your personal style and boost your confidence.
Frequently Asked Questions
Can I achieve salon-quality nails at home without expensive tools?
Yes! You can create stunning manicures at home using simple techniques and basic tools. Focus on proper preparation with a base coat, apply thin layers of polish, and finish with a top coat. Even beginner-friendly methods like solid colors and simple accent designs can deliver professional-looking results without costly salon visits.
What are the best nail polish colors for beginners?
Classic red is timeless and suits all skin tones, while neutral nude shades offer versatility for everyday wear. Bold black creates a sophisticated statement look. These foundational colors are forgiving for beginners and work well with various nail art techniques as you develop your skills.
How do I create a perfect French manicure at home?
Start with a clear or neutral base coat, then carefully apply white polish to the nail tips using steady strokes. For colored variations, try seasonal shades or metallics. The reverse French places color at the nail base instead. Use thin coats and allow proper drying time between applications.
What are some easy nail art techniques for beginners?
Try polka dots using dotting tools or bobby pins, simple stripes with striping tape, or half-moon designs. These techniques require minimal skill but add personality to your manicure. Start with contrasting colors and practice on one nail first to perfect your technique before applying to all nails.
How can I create gradient or ombre nails?
Use a makeup sponge to blend two colors seamlessly on your nail. Apply both colors to the sponge, then dab gently onto the nail surface. For glitter fades, concentrate sparkle at the nail tip and blend downward. Always use a base coat and seal with a glossy top coat for best results.
Are nail stickers a good alternative to hand-painted designs?
Absolutely! Nail stickers offer professional-looking designs in minutes. Choose from floral patterns, metallic accents, or seasonal themes. Apply to clean, dry nails and seal with a clear top coat. They’re perfect for special occasions or when you want intricate designs without artistic skills.
What’s the best approach for natural-looking nails?
Opt for clear coats with subtle shimmer, sheer pink tints that enhance your natural nail color, or matte top coats for sophisticated simplicity. These barely-there looks are perfect for professional settings and complement any outfit while maintaining a polished, elegant appearance.
How do I choose nail colors for different seasons?
Spring calls for soft pastels like baby pink and mint green. Summer embraces bright coral and sunshine yellow. Fall features earth tones such as olive green and terracotta. Winter showcases jewel tones like emerald and ruby red. Match colors to seasonal moods and your wardrobe preferences.


