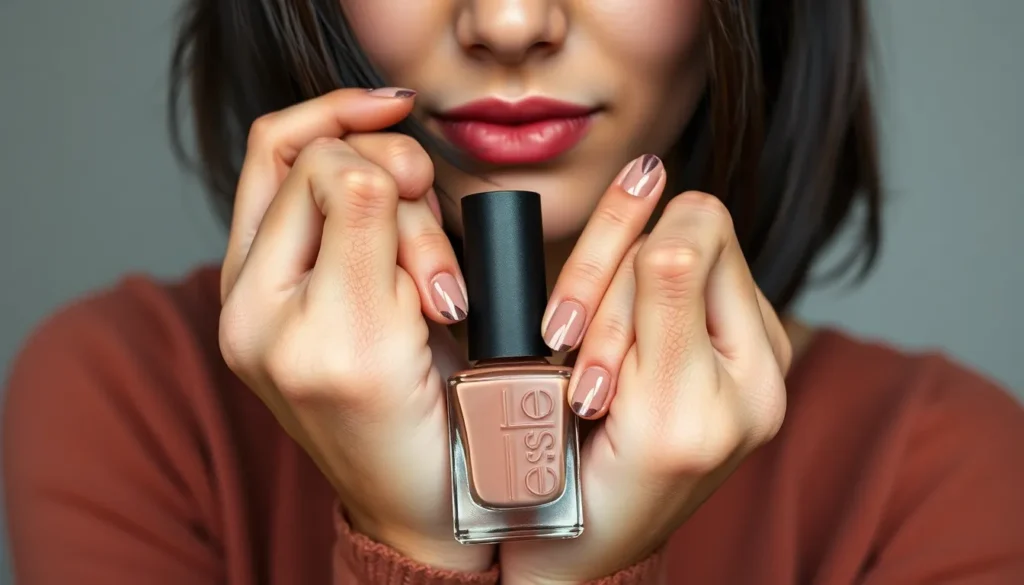
We’ve all seen those stunning nail designs that seem to magically balance polish with bare nail—those are negative space nail designs. This trendy technique creates eye-catching patterns by strategically leaving portions of your natural nail exposed while painting around them to form geometric shapes, stripes, or artistic cutouts.
What makes negative space designs so irresistible is their versatility and modern appeal. They’re perfect for anyone who wants to make a statement without overwhelming color while keeping their manicure fresh and contemporary. Whether you’re heading to the office or a night out these designs work seamlessly with any outfit or occasion.
The best part? You don’t need to be a nail art expert to master this technique. With the right tools and our step-by-step guidance you’ll discover how simple it can be to create professional-looking negative space designs at home. Let’s jump into everything you need to know to achieve these show-stopping manicures.
Understanding Negative Space Nail Designs: The Art of Strategic Bare Spots
Negative space nail art transforms your natural nail into a canvas where the unpainted areas become intentional design elements. This technique creates visual interest by leaving exact portions of your nail bare while applying polish to other areas.
What Makes Negative Space Different from Traditional Nail Art
Traditional nail art covers the entire nail surface with base colors, patterns, and decorative elements. Negative space designs deliberately expose portions of your natural nail as part of the overall aesthetic. This approach creates contrast between polished and unpolished areas that forms the core visual appeal.
Coverage patterns in traditional manicures aim to hide the natural nail completely. Negative space techniques celebrate your natural nail color and texture as essential design components. The exposed areas aren’t mistakes or gaps but carefully planned elements that contribute to the final look.
Color application in conventional nail art builds layers upon layers of polish and decorations. Negative space designs use minimal polish application to achieve maximum visual impact. This strategic restraint creates sophisticated patterns that appear complex while requiring fewer materials and less time.
Design complexity in traditional nail art often relies on adding more elements like rhinestones, decals, or multiple colors. Negative space designs achieve complexity through geometric shapes, strategic placement, and the interplay between painted and unpainted surfaces. The simplicity becomes the sophistication.
Why Negative Space Designs Are Trending in Modern Manicures
Social media platforms showcase negative space designs as Instagram-worthy nail art that photographs beautifully. The clean lines and geometric patterns create striking visual contrasts that stand out in photos and stories. Beauty influencers regularly feature these designs because they offer fresh alternatives to traditional solid colors.
Professional settings welcome negative space manicures because they maintain a polished appearance without being overwhelming. The exposed natural nail creates a more subtle look that complies with workplace dress codes while still expressing personal style. Many corporate professionals choose these designs for their understated elegance.
Time constraints make negative space designs appealing to busy individuals who want stylish nails without lengthy salon appointments. These designs require fewer coats of polish and less drying time than traditional nail art. The strategic bare spots mean less surface area to paint and maintain.
Seasonal versatility allows negative space designs to work year-round with simple color swaps. Spring and summer looks incorporate bright colors with natural nail showing through, while fall and winter designs use deeper tones. The adaptable nature means you can refresh your look without learning new techniques.
Geometric Negative Space Nail Designs for Clean, Modern Looks
 1")
Geometric patterns in negative space nail art create sophisticated designs that perfectly balance minimalism with visual impact. These angular designs transform your natural nails into modern art pieces that work beautifully for both everyday wear and special occasions.
Triangle and Diamond Cutout Patterns
Triangular cutouts deliver sharp, contemporary looks that emphasize clean lines and precise angles. We recommend using thin brushes or striping tape to create perfect triangular outlines at the base of your nail, leaving the center area completely unpainted for maximum contrast. Diagonal lines intersecting to form triangles showcase the negative space effect most dramatically, creating a bold geometric statement that catches light beautifully.
Diamond patterns offer versatility through their symmetrical shape and multiple placement options. Create these by outlining a diamond shape and filling the surrounding area with polish while leaving the center clear or filled with a contrasting color. Position diamonds at the nail’s center for a classic look, or place them near the cuticle for an unexpected twist that draws attention to your nail bed’s natural beauty.
Linear Stripes and Bold Geometric Shapes
Linear stripes create striking visual impact through their simplicity and graphic appeal. Paint parallel lines either vertically or horizontally while leaving unpainted space between them to achieve this timeless look. Use this technique across all nails for a cohesive design, or apply it to one or two accent nails for subtle sophistication that doesn’t overwhelm your overall style.
Bold geometric shapes like chevrons, arrows, and checkerboards emphasize the contrast between painted sections and your natural nail. These patterns work exceptionally well when you want to make a statement while maintaining the clean aesthetic that negative space designs are known for. Chevron patterns create ever-changing movement, while checkerboard designs offer playful sophistication that’s perfect for creative expression.
Minimalist Square and Rectangle Designs
Square cutouts provide understated elegance through their clean, architectural lines and precise edges. Place these geometric shapes on one or two accent nails using stencils or tape to ensure perfectly sharp borders that highlight your nail’s natural beauty. This technique works particularly well when you want a design that’s professional enough for work settings yet interesting enough for social occasions.
Rectangle designs offer endless possibilities for customization while maintaining the minimalist aesthetic that makes negative space nail art so appealing. Position rectangles vertically to elongate your nails, or place them horizontally to create width and visual interest. These shapes complement both casual and formal attire, making them incredibly versatile for any wardrobe or lifestyle.
Floral Negative Space Nail Designs That Embrace Natural Beauty
 2")
We’ve moved from geometric precision to organic elegance with floral negative space designs that celebrate nature’s inherent beauty. These delicate patterns transform your nails into miniature garden canvases where the natural nail becomes an integral part of the artistic composition.
Delicate Leaf and Vine Cutout Patterns
Delicate Leaf and Vine Cutout Patterns create intricate silhouettes that highlight nature’s graceful forms through strategic negative space placement. We love how these designs use minimal polish to outline botanical elements like fern fronds, ivy tendrils, and maple leaves.
Creating these patterns requires thin brushes for precise outlining work that captures each leaf’s unique shape and texture. You’ll paint only the edges of leaves and vine stems, allowing the natural nail to fill the interior spaces with organic beauty.
Nail tape becomes essential for achieving crisp leaf boundaries and perfectly curved vine pathways that flow naturally across the nail surface. Position tape strategically to create barriers that define each botanical element while preserving the negative space within.
Color choices typically favor earth tones like sage green, burnt orange, and deep burgundy that complement the natural nail’s undertones. These organic hues enhance the botanical theme while maintaining the minimalist aesthetic that makes negative space designs so appealing.
Rose and Petal Silhouette Designs
Rose and Petal Silhouette Designs feature elegant outlines of romantic florals that emphasize shape over fill for stunning visual impact. We create these designs by painting only the petal edges and rose contours, leaving the interior spaces beautifully bare.
Whole roses work beautifully as centerpiece elements on accent nails, with delicate petal outlines creating depth and dimension through negative space contrast. Single roses positioned at the nail’s base or tip provide focal points without overwhelming the overall design.
Individual petal patterns scattered across multiple nails create cohesive floral themes that feel organic and unstructured. Each petal’s curved outline captures the softness of real rose petals while the negative space interior adds lightness to the design.
Brushwork techniques focus on creating smooth, flowing lines that mimic natural petal curves and rose spiral formations. Start with the outer petals and work inward, building layers of outlined shapes that create dimensional rose silhouettes.
Color contrast plays a crucial role in these designs, with black outlines on natural nails creating dramatic impact, while soft pink or red lines offer romantic subtlety. The contrast between the outlined petals and bare nail space creates visual interest that draws attention to both elements equally.
Botanical Branch and Stem Negative Space Art
Botanical Branch and Stem Negative Space Art showcases nature’s structural beauty through minimalist line work that emphasizes organic growth patterns. We paint thin stems, delicate branches, and bare twigs that create elegant pathways across the nail surface.
Thin brush techniques become paramount for creating realistic branch textures and naturally irregular stem widths that mirror real botanical specimens. Paint main branches first, then add smaller offshoots and tiny twigs that create authentic tree-like structures.
Stem placement strategies involve positioning main branches diagonally across nails to create ever-changing movement and visual flow between fingers. Each nail can feature different branch angles and stem directions that work together as a cohesive forest-inspired design.
Seasonal adaptations allow these designs to reflect different times of year through branch styles and accompanying elements. Spring branches might include tiny bud outlines, while winter designs feature bare, stark stems that emphasize the negative space’s stark beauty.
Minimalist color palettes typically use single colors like deep brown, charcoal gray, or forest green to maintain focus on the branch structures themselves. The simplicity allows the natural nail color to dominate while the painted branches provide just enough detail to create botanical recognition.
French Manicure Negative Space Nail Designs with a Twist
 3")
French manicures get a modern makeover when we incorporate negative space techniques. These sophisticated designs maintain the classic elegance of traditional French tips while adding contemporary appeal through strategic bare nail placement.
Reverse French Tips Using Negative Space
Flipping the traditional French tip look creates instant visual impact by applying polish to the nail bed while leaving the tip completely bare. We can achieve this stunning reversal by painting the lower two-thirds of the nail in our chosen color and allowing the natural nail tip to shine through. This technique works beautifully with bold colors like deep burgundy or navy blue, where the contrast between polished and bare areas becomes more dramatic.
Creating the perfect reverse French requires steady application from the cuticle area toward the middle of the nail. We recommend using striping tape to mark the boundary between polished and bare sections for crisp, clean lines. The exposed tip area should showcase your natural nail’s healthy appearance, making proper nail care essential for this design.
Color combinations enhance the reverse French effect when we pair unexpected shades with the natural nail tone. Metallic polishes like rose gold or champagne create luxurious looks, while matte finishes offer modern sophistication that’s perfect for professional settings.
Half-Moon French with Clear Base Designs
Half-moon shapes at the cuticle area transform the classic French manicure into a vintage-inspired masterpiece with contemporary negative space appeal. We create this design by leaving a crescent-shaped area near the cuticle bare while applying color to the rest of the nail. The exposed half-moon showcases the natural nail color as an intentional design element.
Achieving precise half-moon curves becomes manageable when we use hole reinforcement stickers as guides. These circular stickers, typically used for paper, create perfect crescent shapes when positioned correctly at the base of each nail. We apply our chosen polish over the sticker, then carefully remove it while the polish remains wet for clean edges.
Clear base applications work exceptionally well with this design since they enhance the natural nail’s appearance without adding unwanted color. We can experiment with different crescent sizes, from subtle thin curves to bold wide crescents that cover nearly half the nail bed.
Double French with Negative Space Accents
Combining two French tip styles elevates the traditional manicure through layered negative space elements that create depth and visual interest. We achieve this sophisticated look by incorporating both tip and base accent areas, often using contrasting colors or finishes. The design typically features colored tips, bare middle sections, and accent areas near the cuticle.
Strategic color placement makes double French designs particularly striking when we use complementary or contrasting shades. Popular combinations include nude bases with white tips and gold accents, or clear bases with black tips and silver details. The negative space between these elements prevents the design from becoming overwhelming.
Precision techniques become crucial for double French success since we’re working with multiple design elements on limited nail space. We recommend completing one section at a time, allowing each area to dry completely before moving to the next. Using thin striping brushes helps maintain clean lines between the different sections while preserving the negative space integrity.
Abstract Negative Space Nail Designs for Creative Expression
 4")
Beyond structured geometric patterns lies the captivating industry of abstract negative space nail art. We’ll explore how fluid shapes and unconventional designs transform your nails into miniature works of art.
Organic Curved Lines and Flowing Patterns
Fluid designs incorporate smooth, flowing lines that often resemble organic shapes, creating a natural and fluid look that mimics water droplets or wind patterns. We achieve these artistic expressions by allowing the natural shape of the nail to become part of the overall composition.
Creating organic curves requires using nail polish in a way that celebrates the nail’s natural contours rather than fighting against them. Techniques involve applying different colors on either side of the nail for striking contrast, letting the polish flow naturally to form gentle waves or rippling effects.
Popular flowing patterns include:
- Wave formations that cascade from cuticle to tip
- Spiral designs that wrap around the nail’s natural curve
- Droplet patterns that appear to drip down the nail surface
- Cloud formations that blend seamlessly with the natural nail
Asymmetrical Cutout Designs
Asymmetrical styles involve intentionally placing nail art in an offset manner, creating visual interest that breaks traditional symmetry rules. We embrace the beauty of imbalance by positioning cutouts and negative spaces in unexpected locations.
Application techniques focus on precision to achieve clean asymmetrical lines without appearing accidental or messy. Using nail tape to create barriers helps achieve precise cutouts and intentionally uneven designs that still maintain visual harmony.
Effective asymmetrical approaches include:
- Off center triangles positioned toward one side of the nail
- Diagonal splits that divide the nail unevenly
- Scattered cutouts placed randomly across the nail surface
- Tilted shapes that lean dramatically to create ever-changing movement
Mixed Media Abstract Art with Clear Sections
Mixed media approaches combine different materials or techniques, such as nail polish, stickers, or glitter, to create layered abstract art on the nail canvas. We layer various textures and finishes while maintaining strategic clear sections for visual breathing room.
Clear sections or negative space within these complex designs allow for a clean and minimalist appearance that prevents the art from becoming overwhelming. Incorporating transparent areas emphasizes the artistic elements themselves rather than creating visual chaos.
| Design Element | Application Method | Visual Impact |
|---|---|---|
| Checkerboard French Tips | Combining classic French with geometric patterns | Modern twist on traditional style |
| Floral Frames | Framing botanical patterns with negative space | Minimalist elegance |
| Contrast Colors | Using black and white for dimension | Bold visual separation |
Strategic placement of clear sections creates focal points that guide the eye through the abstract composition, making each nail a unique piece of wearable art.
Color-Blocked Negative Space Nail Designs for Bold Statements
 5")
Bold colors meet strategic clear sections to create some of the most striking negative space nail art we’ve seen. These designs transform ordinary manicures into conversation starters that command attention.
Two-Tone Negative Space Combinations
Contrast colors like black and white create the most visually striking effects when placed on different parts of the nail. Opposition enhances the design’s dimensionality and makes each section pop against the natural nail base. Strategic placement of these contrasting hues ensures maximum visual impact while maintaining the integrity of the negative space elements.
Classic combinations work exceptionally well for professional settings where we want sophistication without overwhelming color. Black and nude create timeless elegance, while navy and cream offer subtle contrast that’s perfect for conservative environments. White and burgundy deliver dramatic results that work beautifully for evening events or special occasions.
Coco Chanel inspired minimalistic dots add elegance and sophistication to two tone designs without overwhelming the overall aesthetic. Simple dot placement in contrasting colors creates focal points that draw the eye while allowing the natural nail to remain the star. These dots work particularly well when clustered near the cuticle or scattered asymmetrically across the nail surface.
Gradient Effects with Strategic Clear Areas
Gradient nail art incorporating clear areas adds depth and visual interest that transforms simple color transitions into complex design statements. Controlled application techniques using nail tape help section off exact areas while allowing smooth color blending in designated zones. This approach creates stunning ombre effects that fade beautifully into the natural nail.
Vertical gradients work particularly well for elongating shorter nails while maintaining clear sections near the cuticle or tips. Horizontal gradients create width and can make narrow nail beds appear fuller when combined with strategic negative space placement. Diagonal gradients offer ever-changing movement that draws attention while keeping portions of the natural nail visible.
Temperature based color gradients from cool to warm tones create sophisticated transitions that complement various skin tones. Blues fading to purples with clear sections create oceanic effects, while oranges transitioning to reds with negative space evoke sunset themes. These gradient combinations work especially well during seasonal transitions when we want manicures that bridge different weather patterns.
Metallic Accents Against Natural Nail Base
Gilded honeycombs create luxurious looks when metallic accents like gold contrast against natural nail bases. These geometric patterns use minimal metallic polish to maximum effect, allowing the natural nail’s warmth to enhance the precious metal tones. Strategic placement of these honeycomb patterns typically works best when concentrated on accent nails or positioned asymmetrically across the nail set.
Sleek chrome French tips enhance negative space effects by providing mirror like finishes that create stunning contrast with natural nails. Chrome applications require exact techniques to achieve the signature reflective quality that makes these designs so captivating. Base preparation becomes crucial for chrome success, as any imperfections will show dramatically in the final mirror finish.
Rose gold accents offer versatility that complements both warm and cool skin tones while maintaining sophisticated appeal. These metallic elements work particularly well when combined with geometric negative space patterns, creating modern luxury that feels both trendy and timeless. Application techniques focus on achieving smooth, even coverage that doesn’t overwhelm the natural nail’s beauty.
Silver foil details create contemporary edge when applied strategically against clear nail sections. These accents work exceptionally well for special events where we want maximum glamour without full coverage color. Placement typically focuses on tips, accent walls, or geometric shapes that frame the natural nail rather than compete with it.
Essential Tools and Techniques for Creating Negative Space Nail Designs
 6")
Creating stunning negative space nail designs requires the right tools and a solid understanding of proper techniques. We’ll walk you through everything you need to achieve professional-looking results at home.
Must-Have Supplies for DIY Negative Space Manicures
Base coat forms the foundation of every successful negative space manicure by protecting your nails and ensuring polish adhesion. Quality matters here since this protective layer prevents staining and extends your design’s longevity.
Nail art tape or scotch tape serves as your precision tool for creating sharp lines and geometric shapes that define negative space designs. We recommend investing in high-quality tape to ensure crisp, clean edges that won’t bleed.
Nail polish remover becomes essential for creating precise negative space areas and cleaning up any mistakes during application. Choose a formula with a brush applicator for targeted cleanup work.
Various nail polish colors allow you to experiment with different design combinations, from bold contrasts to subtle earth tones that complement your natural nail. Building a versatile color collection gives you endless creative possibilities.
Top coat seals your design while adding protective shine that prevents chipping and extends wear time. This final step transforms your negative space art into a professional-looking manicure.
Flat synthetic brush proves useful for applying both polish and remover with precision, giving you better control over detailed work. These brushes maintain their shape longer than natural bristles.
Step-by-Step Application Methods
Preparation starts with trimming and filing your nails to your desired shape, followed by applying a base coat and allowing it to dry completely. Clean nail beds create the perfect canvas for negative space designs.
Taping involves strategically placing nail art tape to create your desired shapes or patterns while protecting areas meant to remain natural. Press tape edges firmly to prevent polish seepage underneath.
Polishing requires filling in the taped areas with your chosen polish color, applying thin layers and allowing each to dry slightly before proceeding. Avoid thick applications that can cause drips or uneven coverage.
Cleanup demands careful tape removal before the polish dries completely to avoid smudging or pulling up dried polish. Timing this step correctly ensures crisp, clean lines.
Sealing concludes the process with a top coat application that protects your design and adds professional-level shine. Allow everything to cure properly for maximum durability.
Professional Tips for Clean Lines and Smooth Finishes
Thin layers prevent drips and ensure even coverage while building up color intensity gradually. Multiple light coats always look better than one thick application.
Quick tape removal before polish completely dries creates the cleanest lines without pulling up dried polish or creating jagged edges. Practice timing this step for best results.
Sharp lines depend on using high-quality tape that adheres well without leaving residue when removed. Invest in proper nail art tape rather than substituting with household alternatives.
Polish remover with a brush attachment allows for precise cleanup of excess polish around your negative space areas. Keep this tool handy throughout the application process for immediate corrections.
Maintenance Tips for Long-Lasting Negative Space Nail Designs
 7")
Proper maintenance keeps your negative space nail designs looking fresh and professional for extended periods. We’ll share essential care techniques that protect both the polished and clear areas while maximizing wear time.
Protecting Clear Areas from Staining
Clear areas in negative space designs require special attention to prevent discoloration. We recommend applying a high-quality base coat to create a protective barrier between your natural nail and potential staining agents. This foundation layer prevents common culprits like coffee, tea, and colored foods from penetrating the nail surface.
Selecting the right polish formula makes a important difference in maintaining pristine clear sections. We suggest choosing polishes specifically designed to minimize color transfer, particularly when working with darker shades adjacent to exposed nail areas. Quality formulations reduce bleeding and maintain sharp contrast lines between polished and natural sections.
Regular cleaning with lint-free wipes helps remove accumulated oils and debris that can dull the appearance of clear areas. We find that gentle soap and water work effectively for daily maintenance without compromising the integrity of your design.
Touch-Up Techniques for Extended Wear
Minor imperfections don’t require complete design removal when addressed promptly. We use a small detail brush to carefully touch up small chips or scratches on polished sections, blending the repair seamlessly with the existing color. This targeted approach extends wear time significantly.
Reapplying top coat every few days maintains the glossy finish and provides additional protection to both clear and polished areas. We recommend using a fast-drying formula to prevent smudging during the refresh process. This simple step can double the lifespan of your negative space design.
Strategic placement of touch-ups helps maintain the overall design integrity. We focus on high-wear areas like fingertips and nail edges, where damage typically occurs first, allowing the rest of the design to remain untouched.
Proper Removal Methods to Prevent Damage
Gentle removal techniques preserve nail health while preparing for your next negative space creation. We always use acetone-free polish removers specifically formulated for nail art, as these products are less harsh on the nail surface while effectively dissolving polish.
Patience during the removal process prevents unnecessary nail damage. We recommend soaking cotton pads with remover and holding them against each nail for 10-15 seconds before gently wiping away the polish. This method avoids forceful scrubbing that can weaken the nail plate.
Moisturizing immediately after removal restores natural oils to both the nail and surrounding cuticle area. We apply cuticle serum and hand cream to maintain healthy nails, creating an optimal foundation for future negative space designs.
Conclusion
Negative space nail designs offer endless creative possibilities while maintaining elegance and sophistication. We’ve explored everything from geometric patterns to floral motifs and modern French manicure twists that showcase your natural nail’s beauty.
With the right tools and techniques you can achieve salon-quality results at home. Remember that practice makes perfect and even small imperfections add character to your unique nail art.
Whether you’re drawn to minimalist dots or bold color-blocked designs negative space manicures adapt to any style or occasion. Start with simple patterns and gradually experiment with more complex techniques as your confidence grows.
Your nails are now ready to become a canvas for artistic expression that celebrates both color and natural beauty.
Frequently Asked Questions
What are negative space nail designs?
Negative space nail designs are a trendy nail art technique that combines polished areas with exposed natural nail to create striking patterns. Unlike traditional nail art that covers the entire nail, these designs use unpainted areas as intentional design elements, celebrating the natural nail’s color and texture while using minimal polish for maximum visual impact.
Do I need professional skills to create negative space nail art?
No, you don’t need to be a nail art expert to achieve these looks. With the right tools and step-by-step guidance, you can create professional-quality negative space manicures at home. The key is having essential supplies like nail art tape, quality brushes, and following proper application techniques for clean, precise results.
What tools do I need for negative space nail designs?
Essential tools include a high-quality base coat, nail art tape or striping tape, nail polish remover, various nail polish colors, a top coat, and flat synthetic brushes. These basic supplies will help you achieve clean lines and professional-looking results when creating geometric patterns, floral designs, or abstract negative space art.
How long do negative space nail designs last?
With proper application and maintenance, negative space nail designs can last 7-10 days. To maximize longevity, apply a quality base coat to prevent staining, use the right polish formula, regularly clean with lint-free wipes, and reapply top coat as needed to maintain gloss and protection.
What are the most popular negative space nail design styles?
Popular styles include geometric patterns (triangles, diamonds, stripes), floral designs (leaves, roses, botanical branches), modern French manicure variations (reverse tips, half-moon designs), abstract art with fluid shapes, and color-blocked combinations with metallic accents. Each style offers unique visual appeal and versatility for different occasions.
Can negative space designs work for professional settings?
Yes, negative space designs are perfect for professional environments. Their minimalist aesthetic and subtle use of color make them sophisticated and appropriate for workplace settings. Geometric patterns, understated florals, and modern French variations particularly complement professional attire while maintaining elegance.
How do I maintain negative space nail designs?
Maintain your designs by applying a quality base coat initially, avoiding harsh chemicals, using lint-free wipes for cleaning, and performing gentle touch-ups when needed. Reapply top coat every 2-3 days to maintain shine and protection. When removing, use gentle techniques and moisturize afterward to maintain nail health.
What’s the difference between negative space and traditional nail art?
Traditional nail art typically covers the entire nail surface with color and designs, while negative space art strategically leaves portions of the natural nail exposed as part of the design. This creates visual contrast and celebrates the natural nail’s appearance, requiring less polish while achieving maximum artistic impact.


