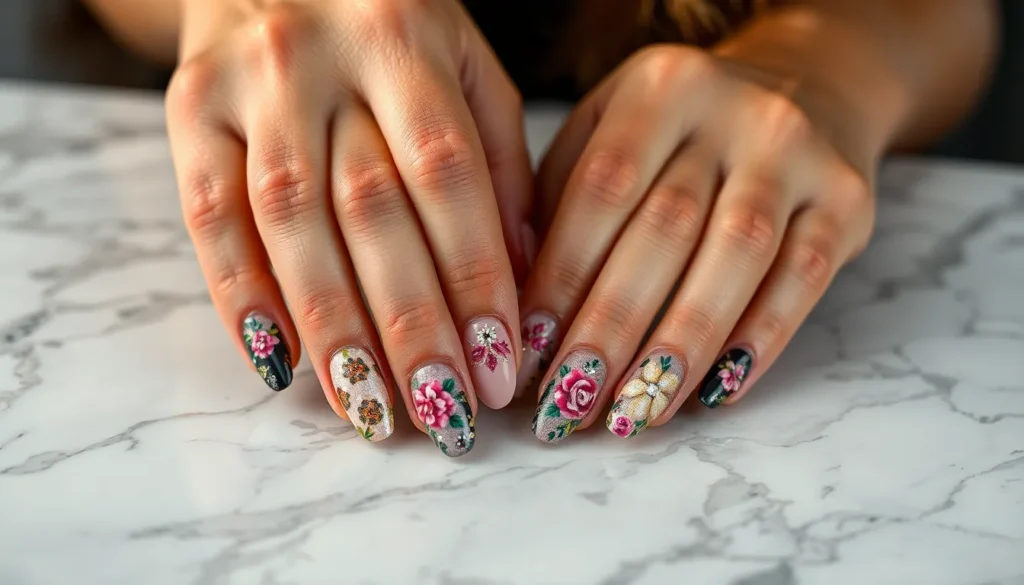
We’ve all been there – staring at our nails and craving something extraordinary that goes beyond basic polish. Overlay nails have revolutionized the nail art industry by transforming thin, weak nails into stunning canvases that showcase intricate designs and bold creativity.
These innovative nail enhancements don’t just strengthen your natural nails; they open up endless possibilities for artistic expression. From delicate floral patterns to geometric masterpieces, overlay techniques let us experiment with textures, colors, and dimensional elements that simply aren’t possible with traditional manicures.
Whether you’re preparing for a special event or want to elevate your everyday look, we’re here to guide you through the most captivating overlay nail ideas that’ll have everyone asking where you got your nails done. Let’s jump into these game-changing designs that perfectly blend durability with jaw-dropping aesthetics.
Classic French Overlay Ideas That Never Go Out of Style
French overlay techniques continue to dominate the nail industry with their timeless elegance and sophisticated appeal. We’ve mastered these enduring styles that complement every occasion and personal aesthetic.
Traditional White Tips With Clear Base
White tip overlays create the quintessential French manicure look while strengthening your natural nails underneath. We apply a crystal clear base coat that allows your natural nail to show through, then carefully paint crisp white tips using gel or acrylic overlay materials. This technique extends 2-3mm beyond your natural nail edge, creating that perfect curved smile line.
Professional nail technicians recommend using a quality white gel polish like OPI GelColor or Essie Gel Couture for the cleanest finish. We’ve found that applying thin coats prevents bubbling and ensures even coverage across all ten nails. The overlay base provides structure that prevents chipping for up to 3 weeks, making this style both beautiful and practical.
Consider varying the white tip thickness from 2mm for subtle elegance to 4mm for a more dramatic statement look. We often add a thin silver or gold accent line right above the white tip to elevate this classic design.
Colored French Tips for Modern Twist
Colored French overlays breathe new life into traditional techniques while maintaining that sophisticated French aesthetic. We’re seeing incredible results with soft pastels like lavender, mint green, and dusty rose that complement the clear base perfectly. Bold choices like deep burgundy, navy blue, or emerald green create striking contrasts for evening looks.
Seasonal color combinations work exceptionally well with overlay applications. We recommend coral and peach tones for summer, rich oranges and deep reds for fall, and jewel tones like sapphire or amethyst for winter occasions. Spring calls for soft yellows, baby blues, and fresh greens that capture the season’s renewal.
Two tone French overlays involve using different colors on alternating nails or creating gradient effects within the tip itself. We achieve stunning ombre French tips by blending two complementary colors, starting with the lighter shade at the nail bed and transitioning to the darker hue at the tip.
Reverse French Overlay Techniques
Reverse French overlays flip the traditional design by placing color at the cuticle area instead of the tip. We create this look by applying colored gel or acrylic near the nail base, leaving the majority of the nail clear or in a complementary neutral tone. This technique works especially well with metallic shades like rose gold, champagne, or silver.
The application process requires precise brush control to achieve clean lines near the cuticle without flooding the surrounding skin. We use thin detail brushes and high quality gel polishes to create perfect half moon shapes that mirror your natural cuticle line. Popular color choices include soft nudes, classic reds, and trendy holographic finishes.
Reverse French overlays with negative space designs create modern artistic effects by leaving portions of the natural nail exposed. We incorporate geometric patterns, diagonal lines, or abstract shapes within the reverse French framework to add contemporary flair while maintaining overlay durability.
Glitter Overlay Nail Designs for Maximum Sparkle

Adding sparkle to your overlay nails creates stunning effects that catch light beautifully throughout the day. These glittery techniques transform basic overlays into eye-catching statements that work for both special occasions and everyday glamour.
Full Glitter Coverage Overlays
Solid glitter nails deliver maximum impact by covering the entire nail surface with dense glitter polish. We recommend applying these bold designs using a single color base or mixing different glitter sizes to create interesting texture variations. Dense coverage techniques work best when you build up the sparkle gradually with multiple thin coats rather than one thick application.
Nude glitter bases offer a more subtle approach that complements any skin tone perfectly. These sophisticated overlays start with a nude polish foundation and receive a top layer of fine glitter that enhances rather than overwhelms. Fine glitter particles distribute more evenly over nude bases and create an elegant shimmer that’s appropriate for professional settings.
Mica flakes overlays provide unique shimmering effects that differ from traditional glitter polishes. These specialized flakes require a layer of builder gel applied over them and must be cured under UV/LED lamps to seal properly. Mica creates depth and dimension that regular glitter simply can’t match.
Holographic glitter applications incorporate futuristic elements that reflect light in multiple directions. These specialized glitters create 3D effects that shift and change as you move your hands. Holographic particles work exceptionally well over dark base colors where their rainbow properties can shine through clearly.
Gradient Glitter Fade Techniques
Glitter gradient applications start with concentrated sparkle at the nail tips and gradually reduce intensity toward the nail bed. We achieve these seamless transitions by using makeup sponges to blend the glitter polish while it’s still wet. Sponge techniques allow for precise control over where the sparkle begins and ends.
Fade out glitter methods create soft ombre effects by blending sparkle down the nail length naturally. These techniques work best when you apply glitter in small sections and immediately blend each area before moving to the next. Natural fading requires patience but produces professional looking results that rival salon work.
Eco friendly glitter options use biodegradable materials that reduce environmental impact without sacrificing sparkle. These sustainable alternatives perform just as well as traditional glitters while supporting environmentally conscious beauty practices. Biodegradable particles break down naturally over time instead of contributing to microplastic pollution.
Accent Nail Glitter Overlays
Glitter accent nails feature one nail per hand with a completely different design or color scheme from the others. We typically choose the ring finger for accent placement since it naturally draws attention without being overwhelming. Accent techniques create striking contrasts that make the entire manicure more interesting and ever-changing.
Glitter French tips transform the classic French manicure by replacing white polish with sparkling alternatives. These modern interpretations maintain the sophisticated French silhouette while adding contemporary flair. Sparkly French tips work particularly well for evening events or celebrations where extra glamour is desired.
Ombre Overlay Techniques for Seamless Color Transitions

Building on the glamorous foundation we’ve established, ombre overlay techniques create stunning gradient effects that seamlessly blend colors across your nails. These sophisticated methods allow you to achieve professional-looking transitions using various application approaches.
Two-Color Ombre Overlays
Double ombre designs transform your nails using two distinct colors at the tip, creating eye-catching contrasts through careful blending. Purple and yellow combinations exemplify how contrasting hues can work together to produce vibrant gradient effects. Traditional sponge techniques enable you to overlap colors smoothly, achieving professional-quality transitions without salon visits.
Subtle gradient approaches work best when you select colors close in hue but with slight variations in tone or saturation. These sophisticated combinations create elegant effects perfect for professional settings or understated elegance. Pigment powder methods offer another approach, requiring you to apply powders over cured top coats and feather them upward from nail tips for seamless blending.
Multi-Color Rainbow Ombres
Rainbow ombre designs feature multiple vibrant colors blended together to create spectacular spectrum effects across your nails. These bold looks combine various polishes or pigments in different colors, allowing you to express creativity through dramatic color transitions. Careful layering techniques ensure each color maintains its vibrancy while blending smoothly into adjacent hues.
Application methods for rainbow ombres require patience and precision, as you’ll need to work with multiple colors simultaneously. Sponge blending techniques work exceptionally well for these complex designs, enabling you to achieve smooth transitions between three or more colors. Professional results depend on proper color placement and blending timing.
Neutral Tone Gradient Overlays
Soft gradient effects using neutral tones like beige, gray, and soft pink create sophisticated looks ideal for those preferring understated elegance. These subtle designs add depth and dimension without overwhelming your overall appearance, making them perfect for professional environments or minimalist aesthetics.
Monochromatic ombre approaches focus on different shades of a single color family, creating depth through tonal variations rather than bold color changes. These refined techniques allow you to experiment with gradient effects while maintaining a cohesive, polished appearance that complements any outfit or occasion.
Seasonal Overlay Nail Ideas for Year-Round Style

Seasonal overlay nail designs let us express creativity while adapting to the changing beauty trends throughout the year. We’ll explore stunning seasonal patterns that complement each season’s unique aesthetic.
Spring Floral Overlay Patterns
Floral mani designs transform our nails into artistic canvases using mauve bases with oversized white petals and gold chrome swirls for an editorial look. Creating soft florals involves combining peach tones with white flower accents and delicate gold swirls on feature nails for a romantic spring vibe. Botanical impressions work beautifully year round, using fine brushes to paint intricate patterns that capture nature’s delicate beauty.
Gel and acrylic overlays featuring pastel colors provide the perfect foundation for delicate spring patterns. Pastel pink, lavender, and mint green bases create fresh canvases for floral artwork. Mixed media techniques allow us to layer different textures and create dimensional flower designs that pop against subtle backgrounds.
Summer Beach-Inspired Overlays
Bold colors dominate summer overlay designs, incorporating vibrant hues and playful patterns that evoke endless summer fun. Ocean inspired motifs like seashells, waves, and coral patterns work beautifully with gel or acrylic overlays. Tropical themes featuring palm trees, flamingos, and sunset gradients capture the carefree summer spirit.
Beachy keen designs use aqua blues, coral pinks, and sandy beiges to create coastal vibes. Glitter accents mimicking sand sparkles add texture and dimension to beach themed overlays. Chrome finishes in gold and silver create metallic effects that catch summer sunlight perfectly.
Fall Autumn Leaf Designs
Autumn leaves come to life through mixed media techniques creating intricate leaf patterns on warm toned overlays. Rich burgundies, burnt oranges, and golden yellows provide the perfect autumn palette for seasonal nail art. Negative space artistry incorporating autumnal colors adds depth and sophistication to fall designs.
Marble elegance works exceptionally well for autumn, adding luxury touches to any seasonal design. Warm marble patterns using amber, rust, and deep brown tones create sophisticated fall looks. Textured overlays mimicking tree bark or fallen leaves bring natural autumn elements to our fingertips.
Winter Holiday Overlay Themes
Holiday cheer designs feature festive elements like snowflakes, holly, and Christmas trees using gel or acrylic overlays. Icy blues and silvers create winter wonderland effects, with chrome or glitter adding extra sparkle for holiday celebrations. Traditional red and green combinations work beautifully with overlay techniques for classic Christmas nail art.
Winter wonderland themes incorporate frosty effects using white, silver, and pale blue overlays. Snowflake patterns created with fine detail brushes add delicate winter magic to our nails. Glitter gradients mimicking falling snow create ethereal winter effects that capture the season’s beauty.
Textured Overlay Designs That Add Dimension

Textured overlay designs transform ordinary manicures into tactile works of art that captivate both sight and touch. These dimensional techniques create visual depth while offering unique sensory experiences that elevate your nail game beyond traditional flat finishes.
Sand Texture Overlay Effects
Sand texture overlay effects create stunning dimensional looks by applying acrylic powder or fine sand to wet gel polish. We achieve this textured sandy appearance through careful application of materials while the base coat remains tacky, allowing for perfect adhesion and long-lasting results.
Beach inspired themes work exceptionally well with sand texture overlays, bringing coastal vibes to your fingertips through natural grain patterns. Winter motifs also benefit from this technique, creating frosty landscapes that mimic snow covered surfaces with remarkable realism.
Fine sand particles can be combined with glitter elements to enhance visual appeal and create multi-dimensional effects. Acrylic powder offers more control over texture density, allowing you to customize the grain size from subtle texture to dramatic sandy beaches.
Application requires working quickly while the gel polish remains workable, ensuring even distribution across the nail surface. Different sand colors create varied moods, from warm beige tones for summer designs to silvery whites for winter wonderlands.
Velvet Finish Overlay Applications
Velvet finish overlay applications deliver luxurious tactile experiences through fine velvety sand that creates soft textured surfaces. We recommend this technique for special occasions where you want nails that feel as impressive as they look, offering both visual and tactile sophistication.
Velvety sand comes in various colors and grain sizes, providing versatility for different nail art styles and personal preferences. Fine grain options create subtle texture perfect for elegant everyday wear, while coarser varieties deliver dramatic effects ideal for statement looks.
Daily glamour becomes achievable with velvet overlays that maintain their luxurious feel throughout regular activities. Color options range from classic neutrals to bold jewel tones, ensuring compatibility with any wardrobe or occasion.
Professional application involves gentle pressing of velvet particles into the nail surface while maintaining consistent coverage. Different grain sizes allow for customized texture intensity, from barely there sophistication to bold tactile statements.
Matte and Glossy Combination Overlays
Matte and glossy combination overlays create striking visual contrasts that add sophisticated depth to nail designs. We layer different topcoat finishes strategically to highlight exact design elements while creating ever-changing interplay between textures.
Sophisticated looks emerge when glossy elements draw attention to focal points while matte areas provide elegant balance. Highlighting exact nail art sections becomes effortless through strategic placement of contrasting finishes that guide the eye naturally.
Visual effects multiply when combining finishes within single nail designs, creating complexity without overwhelming the overall aesthetic. Depth perception increases dramatically as light reflects differently off glossy sections while matte areas absorb illumination.
Strategic layering techniques involve applying matte topcoat to desired areas while leaving others glossy, or vice versa depending on your design goals. Design versatility expands infinitely as this combination works with geometric patterns, floral motifs, and abstract art equally well.
Professional results require careful masking techniques to achieve clean lines between matte and glossy sections. Timing becomes crucial as you must work efficiently to maintain crisp boundaries while both finishes cure properly.
Minimalist Overlay Ideas for Subtle Elegance

Minimalist overlay designs offer the perfect balance between elegance and simplicity. These understated techniques create sophisticated nail art that enhances your natural beauty without overwhelming your overall look.
Single Stripe Overlay Accents
Single stripe overlay accents transform ordinary manicures into sophisticated statements with minimal effort. We love how this design involves applying just one stripe of color or pattern over the nail to create clean, refined looks that work perfectly for professional settings.
Vertical stripes elongate shorter nails and create the illusion of length, making them ideal for those with naturally compact nail beds. Horizontal stripes add width to narrow nails while maintaining the minimalist aesthetic that’s perfect for everyday wear.
Diagonal stripes offer the most ever-changing approach to single stripe overlays, creating movement and visual interest without sacrificing elegance. We recommend using complementary colors that are two to three shades apart for the most striking yet subtle effect.
Geometric Line Overlay Patterns
Geometric line overlay patterns introduce structured beauty through simple shapes and clean lines. Chevron patterns create sophisticated zigzag effects that add visual interest while maintaining the minimalist principle of less is more.
Straight line combinations work exceptionally well for creating modern grid patterns or intersecting designs that feel contemporary and fresh. We’ve found that using thin nail art brushes or striping tape ensures the crispest lines and most professional looking results.
Triangle formations and diamond shapes offer angular sophistication that complements both short and long nail lengths. These patterns work best when executed in neutral tones or subtle metallics that enhance rather than dominate the overall design.
Negative Space Overlay Designs
Negative space overlay designs celebrate the natural nail by strategically incorporating bare areas into artistic patterns. This technique creates elegant designs where the natural nail becomes an integral part of the overall aesthetic rather than just a canvas.
Partial coverage overlays leave exact sections of the natural nail exposed, creating beautiful contrast between polished and unpolished areas. We particularly love how this approach works with nude or clear base coats that enhance the natural nail’s appearance.
Cutout patterns use negative space to create windows or geometric shapes within the overlay design, resulting in sophisticated nail art that feels both modern and timeless. These designs require precise application but deliver stunning results that photograph beautifully and complement any outfit.
Bold Statement Overlay Nail Art for Special Occasions

Special occasions call for nail art that commands attention and creates unforgettable impressions. We’ve curated show stopping overlay techniques that transform your nails into conversation pieces perfect for weddings, galas, and milestone celebrations.
Metallic Foil Overlay Applications
Metallic foil overlays deliver luxurious sophistication that catches light from every angle. Gold foil applications create warm, elegant statements perfect for formal events, while silver foils offer cool, modern aesthetics ideal for contemporary celebrations. Rose gold overlays provide romantic warmth that complements both vintage and modern styling preferences.
Stamping techniques allow us to create intricate metallic patterns with professional precision. We layer metallic foils over base colors to achieve depth and dimension that standard polishes cannot match. Advanced foil transfer methods enable complex geometric patterns and delicate lace effects that elevate any special occasion look.
Layering multiple metallic tones creates custom color combinations that perfectly match your outfit or event theme. Chrome foil overlays produce mirror like finishes that reflect light dramatically, making them perfect for evening events and photography sessions.
3D Embellishment Overlay Ideas
Gemstones and rhinestones transform overlay nails into wearable jewelry that sparkles with every gesture. Swarovski crystals provide premium brilliance for once in a lifetime events like weddings and anniversaries. Strategic placement of rhinestones creates focal points that draw attention without overwhelming the overall design.
Acrylic flowers add romantic dimension to overlay nails through hand sculpted petals and leaves. These 3D elements work beautifully for garden parties, brunch events, and spring celebrations where natural beauty takes center stage. Mixed media applications combine rhinestones with acrylic flowers for maximum visual impact.
Pearl embellishments offer timeless elegance that complements classic formal wear and vintage inspired occasions. We position these elements strategically to create balance and flow across the nail surface. Textured overlays incorporating beads and micro pearls add tactile interest that engages multiple senses.
Neon Color Block Overlays
Neon stripe overlays create electrifying statements perfect for music festivals, art galleries, and contemporary celebrations. Vibrant pink, electric blue, and lime green combinations produce eye catching contrasts that photograph beautifully under various lighting conditions. These bold designs work exceptionally well for younger demographics and creative industry events.
Neon ombre techniques gradually transition from one intense color to another, creating ever-changing visual movement across the nail surface. Electric purple to hot pink gradients offer dramatic flair for nightclub events and dance performances. We achieve smooth color transitions through careful blending techniques that eliminate harsh lines.
Color blocking with neon overlays features sharp geometric divisions that create modern art inspired nail designs. Combining electric yellow with magenta creates striking visual tension perfect for fashion forward events. These techniques work best when we limit the palette to two or three complementary neon shades for maximum impact without visual chaos.
Essential Tools and Products for Perfect Overlay Application

Creating stunning overlay nail designs requires the right arsenal of professional-grade tools and products. We’ve compiled the most essential items that’ll transform your nail art from amateur to salon-quality results.
Professional Overlay Brushes and Equipment
Poly gel brushes serve as the foundation for precise overlay application, with Kiki London poly gel brushes leading the industry for their exceptional control and durability. These specialized brushes allow us to sculpt and shape gel overlays with incredible accuracy.
LED and UV lamps provide the crucial curing power needed to set each gel layer properly. Modern LED lamps cure faster than traditional UV options, reducing application time while ensuring complete polymerization.
Nail files and buffers prepare the nail surface for optimal adhesion and create the perfect canvas for overlay application. Professional-grade files remove ridges and smooth imperfections that could compromise the overlay’s longevity.
Cuticle pushers and trimmers complete the preparation process by creating clean nail beds free from excess cuticle tissue. Proper cuticle care prevents lifting and ensures seamless overlay application from base to tip.
Nail tips and forms extend or reshape nails when natural length isn’t sufficient for desired overlay designs. These tools provide the structural foundation for dramatic length extensions and unique nail shapes.
Top-Rated Overlay Polish Brands
OPI GelColor dominates the professional market with its extensive color range and long-lasting formula that resists chipping for up to three weeks. Professional nail technicians consistently choose OPI for its reliable performance and vibrant pigmentation.
Essie Gel Couture offers a unique two-step system that eliminates the need for base coats while delivering exceptional shine and durability. This brand excels in creating sophisticated neutral tones perfect for minimalist overlay designs.
Gelish provides superior coverage and smooth application, making it ideal for both beginner and advanced nail artists. Their formula cures evenly under LED lights and maintains flexibility to prevent cracking.
Base Coat and Top Coat Recommendations
American Creator Transparent Base Gel ensures superior adhesion between natural nails and overlay products, preventing premature lifting and extending wear time. This base coat creates the essential bonding layer that determines overlay longevity.
U-Shine Non-Wipe Top Gel delivers maximum shine and protection without requiring alcohol wiping after curing. This innovative formula eliminates the sticky inhibition layer while providing a glass-like finish that enhances any overlay design.
Builder gel applications require soft or medium-viscosity gels that self-level for smooth, professional results. These specialized gels create the structural foundation that strengthens natural nails while supporting decorative overlay elements.
Step-by-Step Application Tips for Flawless Overlay Results

Creating professional overlay nails requires precise technique and attention to detail. We’ll guide you through essential application methods that ensure stunning, long-lasting results.
Nail Preparation Techniques
Sanitization forms the foundation of successful overlay application. We always clean and sanitize hands thoroughly before beginning any nail work to prevent bacteria buildup and ensure strong adhesion between the overlay and natural nail.
Cuticle care requires gentle precision for optimal results. Push back cuticles carefully using a cuticle pusher, but avoid over-trimming or cutting the delicate skin. Excessive cutting can cause irritation and create entry points for bacteria.
Buffing creates the perfect surface for overlay adhesion. Gently buff the nail plate to remove natural shine and create a slightly rough texture. This step enhances the bond between your natural nail and the overlay material.
Nail shaping establishes your desired look before overlay application. File and shape nails to your preferred length and style, ensuring all nails match for a cohesive appearance.
Layering Methods for Even Coverage
Thin layers prevent common application problems like bubbles, pooling, and uneven curing. Apply builder gel or soft gel in thin, even coats rather than attempting to build thickness in one application.
Strategic building techniques differ between overlay materials. For acrylic overlays, start at the cuticle area and move toward the free edge while shaping the overlay as you work. Gel overlays require even brush distribution across the entire nail surface.
Structural shaping creates natural-looking results through proper C-curve formation. File the overlay to achieve a slightly raised center that tapers thinner toward the edges, mimicking the natural nail’s curvature.
Coverage consistency ensures professional results across all nails. Apply each layer with the same pressure and technique, maintaining uniform thickness from nail to nail.
Curing and Finishing Best Practices
Proper curing times follow manufacturer guidelines for UV or LED lamp exposure. Each overlay material requires exact curing durations to achieve full polymerization and maximum strength.
Surface smoothing eliminates imperfections after initial curing. Gently file away any bumps or uneven areas to create a smooth, professional surface before applying topcoat.
Base coat application provides essential adhesion enhancement. Use a thin base coat layer and cure under your UV or LED lamp according to product directions before applying the overlay material.
Topcoat sealing protects your overlay and adds brilliant shine. Apply a quality topcoat after overlay curing, then cure again according to product specifications. Remove any tacky residue with nail cleanser for a glossy, long-lasting finish.
Maintenance and Care for Long-Lasting Overlay Nails

Proper maintenance ensures your stunning overlay designs stay beautiful for weeks while protecting your natural nails underneath. We’ll guide you through essential care practices that preserve both the artistic integrity and structural durability of your overlays.
Daily Care Routines
Keep your nails clean and dry to prevent bacterial growth and moisture-related lifting that can compromise your overlay’s longevity. Moisture trapped beneath the gel creates the perfect environment for bacteria, which weakens adhesion and causes premature peeling.
Apply cuticle oil daily to maintain hydration and prevent the painful peeling that occurs when cuticles become too dry. We recommend massaging a few drops into each cuticle area every evening before bed for optimal absorption.
Use non-acetone remover for cleaning up any polish mistakes or removing temporary nail art, as acetone-based products can weaken the gel structure and affect its natural shine. Traditional acetone removers strip away essential oils that keep your overlays flexible.
Invest in quality hand cream and apply it multiple times throughout the day, focusing on the skin around your nails while avoiding direct contact with the overlay surface. Hydrated skin prevents cracking that can catch on clothing and cause overlay damage.
Wear gloves during household chores to shield your overlays from harsh cleaning chemicals that can cause discoloration and structural weakening. Rubber gloves provide an effective barrier against bleach, ammonia, and other common household products.
Touch-Up Techniques
Inspect your overlays regularly for small chips or breaks that can spread into larger damage if left untreated. We suggest checking your nails each morning as part of your routine, looking for any signs of lifting at the edges or small cracks in the surface.
Address minor issues promptly by visiting your nail technician for professional repairs before damage spreads to surrounding areas. Small chips can often be buffed smooth and resealed with topcoat, extending your overlay’s lifespan significantly.
Use nail repair kits for emergency fixes when you can’t immediately visit a salon, but remember these are temporary answers. Emergency kits typically include clear polish and small brushes that can seal minor chips until professional repair is possible.
File gently in one direction if you notice any rough edges, avoiding back-and-forth motions that can cause additional cracking. Always use a fine-grit file specifically designed for gel overlays to prevent unnecessary damage.
Removal Process Without Damage
Schedule professional removal whenever possible to avoid damaging your natural nails during the process. Professional technicians have specialized tools and techniques that safely dissolve the gel without scraping or filing your natural nail plate.
Limit soaking time to prevent your natural nails from becoming overly soft and prone to damage during removal. Extended water exposure can cause lifting that makes removal more difficult and potentially harmful.
Use gentle scraping techniques if removing overlays at home, working slowly with a wooden cuticle pusher rather than metal tools that can gouge your natural nails. Metal implements can create permanent ridges and thin spots that take months to grow out.
Apply nourishing treatments immediately after removal to restore moisture and strength to your natural nails. We recommend using strengthening base coats and cuticle oils for at least a week before applying new overlays.
Allow recovery time between overlay applications to let your natural nails breathe and regain their strength. Most nail professionals recommend waiting at least 48 hours between removal and reapplication for optimal nail health.
Conclusion
We’ve explored the incredible versatility of overlay nails and their power to transform your natural nails into stunning works of art. From timeless French tips to bold statement designs these techniques offer endless possibilities for creative expression while strengthening your nails.
Whether you’re drawn to subtle minimalist accents or eye-catching 3D embellishments there’s an overlay style that perfectly matches your personality and occasion. The key lies in mastering proper application techniques and maintaining your overlays with consistent care.
With the right tools quality products and our step-by-step guidance you’re ready to create salon-worthy overlay nails at home. Remember that practice makes perfect and each design you try brings you closer to nail art mastery.
Frequently Asked Questions
What are overlay nails and how do they work?
Overlay nails are nail enhancements that strengthen thin, weak natural nails while creating a durable canvas for nail art. They involve applying gel or acrylic products over your natural nails to provide extra strength and length. This technique transforms fragile nails into a sturdy base perfect for intricate designs, lasting up to three weeks with proper application and care.
How long do overlay nails typically last?
Overlay nails typically last 2-3 weeks with proper application and care. The longevity depends on factors like nail growth rate, daily activities, and maintenance routine. High-quality gel polishes and proper curing techniques can extend wear time. Regular touch-ups and following proper care guidelines help maintain the overlay’s appearance and durability throughout the wear period.
Can I do overlay nails at home or should I visit a salon?
You can do overlay nails at home with the right tools and techniques. Essential equipment includes professional-grade brushes, LED or UV lamps for curing, quality base and top coats, and proper nail files. However, achieving salon-quality results requires practice and patience. Beginners may benefit from starting with simple designs before attempting complex techniques like ombre or 3D embellishments.
What’s the difference between French overlay and regular overlay nails?
French overlay nails specifically feature the classic French manicure design with white tips and nude or pink bases, while regular overlays can incorporate any design or color scheme. French overlays maintain the timeless elegance of traditional French manicures but with added strength and durability. Modern variations include colored tips, reverse French designs, and seasonal combinations while preserving the classic aesthetic.
Are there eco-friendly options for glitter overlay nails?
Yes, eco-friendly glitter options are available for overlay nails. These biodegradable alternatives reduce environmental impact while maintaining the same sparkling aesthetic appeal. Eco-friendly glitters are made from sustainable materials that break down naturally over time. Many professional nail brands now offer environmentally conscious glitter products that deliver stunning shimmer effects without compromising on quality or appearance.
How do I maintain overlay nails for maximum longevity?
Maintain overlay nails by keeping them clean and dry, applying cuticle oil daily, and using non-acetone nail polish removers. Avoid using nails as tools and wear gloves during cleaning. Touch up minor chips immediately with matching polish. Schedule professional maintenance every 2-3 weeks and allow recovery time between applications to maintain natural nail health and strength.
What tools do I need for professional-quality overlay application?
Essential tools include professional-grade brushes for smooth application, LED or UV lamps for proper curing, various grits of nail files for surface preparation, and cuticle pushers. Quality products like top-rated overlay polishes (OPI GelColor, Essie Gel Couture), base coats for adhesion, and protective top coats are crucial. Proper sanitization tools and buffing blocks complete the professional setup.
Can overlay nails accommodate seasonal designs?
Absolutely! Overlay nails are perfect for seasonal designs throughout the year. Spring features floral patterns with pastels, summer showcases beach-inspired themes with bold colors, fall incorporates autumn leaves with warm tones, and winter highlights holiday motifs like snowflakes. Each season offers unique color palettes and artistic techniques that reflect seasonal beauty while maintaining overlay durability.


