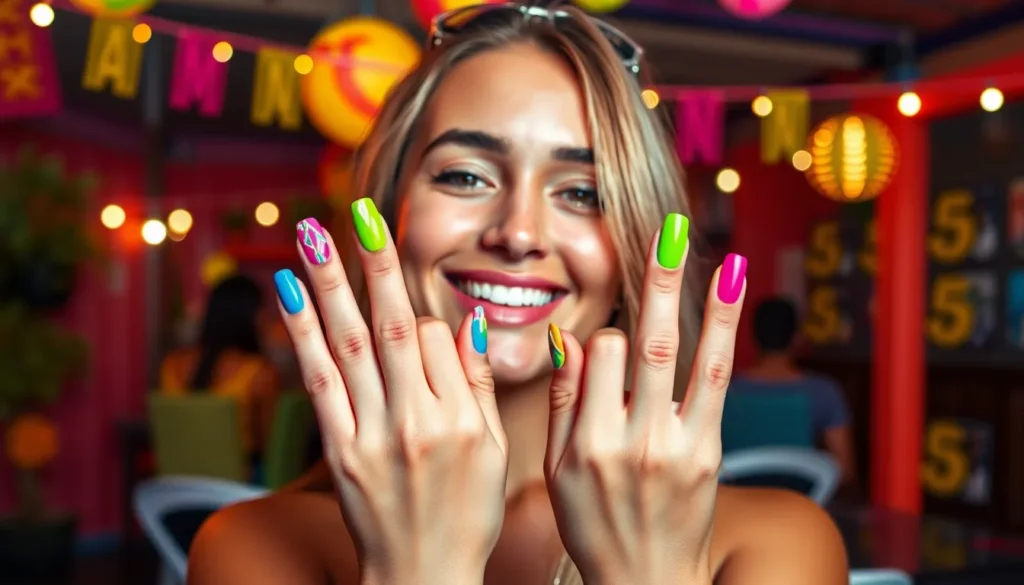
Neon nails aren’t just a trend – they’re a bold statement that screams confidence and creativity. We’ve all seen those electric brights that make fingers look like they’re glowing under blacklight, and there’s something undeniably magnetic about their vibrant energy.
Whether you’re heading to a music festival, summer party, or simply want to brighten up your everyday look, neon nail art offers endless possibilities. From electric pink and lime green to blazing orange and cyber yellow, these attention-grabbing shades transform your fingertips into miniature works of art.
We’re diving into the most stunning neon nail designs that’ll make your manicure the talk of any room. These aren’t your subtle, understated looks – we’re talking about colors so bright they practically pulse with life. Get ready to discover how to rock these electrifying shades with style and make your nails the ultimate accessory.
Bright Electric Blue Neon Nail Ideas
Electric blue neon nails deliver an electrifying pop of color that commands attention wherever you go. We’ve curated the most stunning blue neon nail ideas that’ll transform your fingertips into mesmerizing focal points.
Classic Solid Electric Blue Manicure
Solid electric blue nails create the ultimate statement look with their intense, vibrant finish. We recommend applying two thin coats of electric blue neon polish over a white base coat to achieve maximum color payoff. Professional nail artists suggest using brands like OPI Electric Eel or Essie DJ Play That Song for the most striking results.
Preparation steps make all the difference in achieving that flawless neon blue finish. We always start with properly shaped nails, push back cuticles, and apply a quality base coat before the color application. Adding a glossy top coat seals the deal and creates that mirror like shine that makes electric blue nails absolutely irresistible.
Maintenance tips help preserve your electric blue neon nails for up to two weeks. We suggest wearing gloves during household chores and applying cuticle oil daily to prevent chipping. Touch up small chips with a matching polish and reapply top coat every few days to maintain that brilliant electric blue glow.
Blue Neon French Tips
Electric blue French tips modernize the classic French manicure with a bold neon twist that’s perfect for special occasions. We create this look by painting traditional white tips with electric blue neon polish, leaving the nail bed in its natural state or with a clear base. This design works beautifully on both short and long nails.
Application techniques require steady hands and quality striping brushes for clean, precise lines. We recommend using nail guides or tape to achieve perfectly straight edges along the tip line. Start with thin coats and build up the intensity gradually to prevent streaking or uneven coverage in your blue neon French tips.
Design variations expand the possibilities beyond traditional French tip shapes. We love experimenting with diagonal tips, curved smile lines, or even double French tips with electric blue as the accent color. Adding small rhinestones or metallic accents along the tip line creates extra glamour for evening events.
Electric Blue Gradient Fade
Gradient fade techniques blend electric blue neon seamlessly from intense color to transparency for a stunning ombre effect. We achieve this look using makeup sponges to dab and blend the polish from the tip toward the cuticle area. The key is working quickly while the polish remains workable.
Color combinations enhance the electric blue gradient with complementary shades like white, silver, or even purple neon. We often pair electric blue with lighter blue shades to create depth and dimension. Starting with the darkest shade at the tips and fading to lighter tones creates the most dramatic gradient effect.
Professional finishing involves careful cleanup around the cuticles and adding a high quality top coat for smoothness. We use small cleanup brushes dipped in acetone to remove excess polish from the skin. Multiple thin layers of top coat help blend the gradient seamlessly while adding that essential neon nail shine.
Vibrant Hot Pink Neon Nail Designs

Hot pink neon designs create the perfect electric statement that transforms ordinary manicures into stunning focal points. These vibrant shades offer endless possibilities for creative expression and bold style choices.
Hot Pink Chrome Finish
Hot pink chrome nails deliver an incredible mirror-like reflection that catches light from every angle. We recommend applying a black base coat first to enhance the chrome pigment’s intensity and create deeper color saturation. Chrome powder application requires gentle buffing motions with an eyeshadow brush to achieve that perfect metallic sheen.
Sealing chrome finishes demands careful attention since traditional top coats can dull the reflective properties. Professional nail artists suggest using specialized chrome-compatible sealers that preserve the mirror effect while providing long-lasting protection. Temperature changes and daily activities can affect chrome longevity, so proper maintenance becomes essential for keeping that stunning reflective finish intact.
Neon Pink Marble Effect
Neon pink marble designs combine vibrant electric hues with sophisticated artistic patterns that create visual depth and dimension. Water marble techniques work exceptionally well with hot pink neon polishes, allowing colors to blend naturally while maintaining distinct pattern lines. We’ve found that contrasting the neon pink with white or black creates the most striking marble effects.
Freehand marble application using a thin brush gives artists complete control over pattern placement and intensity. Alcohol-based nail art paints blend seamlessly with neon pink bases to create realistic marble veining that appears naturally occurring. Professional marble effects often incorporate multiple pink tones, from bright magenta to electric coral, creating complex color variations within each nail.
Pink Neon Accent Nails
Pink neon accent designs offer the perfect introduction to bold color without overwhelming your entire manicure. We typically recommend featuring neon pink on ring fingers or thumbs while keeping remaining nails in complementary neutral shades. This approach creates balanced visual interest that works beautifully for both casual and professional settings.
Geometric accent patterns using neon pink create modern, edgy looks that photograph beautifully under various lighting conditions. Stripe designs, triangular sections, and half-moon applications all showcase neon pink effectively while maintaining sophisticated appeal. Accent nail placement can follow traditional rules or break them entirely, depending on your personal style preferences and the overall look you want to achieve.
Eye-Catching Lime Green Neon Styles

Lime green neon nails bring fresh energy to your manicure with their electric vibrancy and versatility. These designs work perfectly for both casual outings and formal events where you want to make a statement.
Lime Green Geometric Patterns
Lime Green Geometric Patterns transform your nails into modern art pieces by combining triangles, squares, and complex shapes with complementary neon colors. We recommend starting with a white base coat to maximize the lime green’s intensity and create clean lines using nail tape or stencils. Bold geometric designs work exceptionally well when you pair lime green with electric blue or hot pink accents for striking contrast.
Creating these patterns becomes easier when you use a fine detail brush for precise edges and allow each color section to dry completely before applying the next. Professional nail artists suggest practicing basic shapes like chevrons or color blocking before attempting more intricate patterns like hexagons or diamond layouts.
Neon Green Ombré Design
Neon green ombré designs create stunning gradient effects by gradually blending lime green with other vibrant neon shades or neutral tones. We achieve the smoothest transitions using makeup sponges to dab and blend colors while they’re still wet, working from the cuticle toward the nail tip. Popular color combinations include lime green fading into lemon yellow for a citrus burst or transitioning into electric blue for a tropical vibe.
Perfecting the ombré technique requires applying thin layers and building up color intensity gradually rather than attempting to achieve the full effect in one application. Sealing your gradient with a high quality top coat ensures the colors maintain their vibrancy and prevents chipping at the transition points.
Green Neon Negative Space Art
Green Neon Negative Space Art creates clean, modern looks by strategically leaving portions of your natural nail visible while using lime green as the primary design element. We love how this technique showcases the nail’s natural shape while adding geometric cutouts, stripes, or abstract patterns in brilliant lime green. The contrast between your natural nail and the electric green creates visual depth that’s both sophisticated and eye catching.
Achieving crisp negative space designs requires careful planning and precise application using nail tape to mask areas you want to keep natural. Clean removal of the tape while the polish is slightly tacky prevents bleeding and ensures sharp, professional looking edges that elevate the entire manicure.
Bold Orange Neon Nail Art

Orange neon nails deliver an energetic punch that captures attention instantly. These vibrant designs showcase the bold nature of neon colors while adding warmth and excitement to your manicure.
Tangerine Solid Color Base
Tangerine solid color provides a bright and vibrant foundation that makes every nail pop with electric energy. We recommend applying a white base coat first to amplify the neon orange intensity and ensure maximum color payoff. Premium nail polish brands like OPI and Essie offer exceptional tangerine formulas that deliver rich, saturated coverage in just two coats.
Application requires steady hands and thin, even layers to prevent streaking or bubbling. Start with clean, properly prepped nails and apply the base coat, followed by two thin coats of tangerine polish. Each layer should dry completely before applying the next to achieve that perfect solid color finish.
Professional finishing involves sealing with a high-quality top coat to enhance shine and extend wear time. This solid base works beautifully on its own or serves as the perfect canvas for additional nail art elements.
Orange Neon Tribal Designs
Tribal designs gain dramatic impact when enhanced with neon orange accents that create bold and edgy looks. We suggest using fine nail art brushes or dotting tools to create geometric patterns, zigzag lines, and angular shapes that define classic tribal aesthetics. Black or white base colors provide striking contrast that makes the orange elements truly pop.
Popular tribal patterns include chevron designs, diamond shapes, and intricate line work that flows across the nail surface. Orange neon polish works exceptionally well for outlining these patterns or filling in exact geometric sections. The key lies in planning your design beforehand and using nail tape to achieve clean, precise lines.
Layering techniques allow you to build complex tribal designs by adding orange accents over dried base patterns. This approach creates depth and visual interest while maintaining the bold, statement-making quality that tribal nail art demands.
Sunset Orange Gradient
Sunset orange gradients create beautiful and ever-changing nail designs by gradually transitioning from orange to complementary sunset colors. We achieve this stunning effect using makeup sponges to blend neon orange with colors like coral pink, golden yellow, and deep red. The technique involves applying each color to different sections of a damp sponge, then gently pressing and rolling it across the nail surface.
Color combinations that work exceptionally well include orange to yellow for a classic sunset look, orange to pink for romantic vibes, and orange to red for intense drama. Multiple light applications create smoother gradients than trying to achieve the effect in one heavy coat.
Blending requires patience and practice to master the seamless transitions that define professional-quality gradient nails. Clean up around the cuticles with a small brush dipped in acetone, then seal the entire design with a glossy top coat to unify the colors and add dimension to your sunset masterpiece.
Electric Yellow Neon Manicure Ideas

Electric yellow neon nails deliver an instant energy boost that radiates positivity and confidence. These brilliant yellow shades create stunning manicures that capture attention and showcase your vibrant personality.
Sunshine Yellow Full Coverage
Sunshine yellow transforms your entire nail surface into a brilliant canvas of warmth and joy. We recommend applying a white base coat to maximize the color intensity and achieve that perfect sunny glow. Premium polish brands deliver the most vibrant sunshine yellow pigmentation with fewer coats required.
Application technique matters significantly for achieving flawless full coverage results. Start with thin layers and allow each coat to dry completely before adding the next. Two to three coats typically provide optimal opacity and color saturation for sunshine yellow nails.
Creating an ombre effect within sunshine yellow adds dimensional beauty to your manicure. Gradate from light sunshine yellow at the tips to deeper yellow tones near the cuticles using a makeup sponge for seamless blending.
Yellow Neon Lightning Bolt Art
Lightning bolt designs transform ordinary yellow nails into ever-changing electric statements. We suggest using nail art brushes or striping tape to create precise lightning bolt shapes across each nail surface. Black or white contrasting colors make the yellow lightning bolts pop dramatically.
Placement strategies enhance the visual impact of your lightning bolt nail art. Position bolts diagonally across nails for maximum drama or create smaller bolts on accent nails for subtle electric touches. Multiple lightning bolts on single nails create storm cloud effects that captivate viewers.
Template options simplify the lightning bolt creation process for beginners. Nail stencils ensure consistent shapes across all nails while freehand techniques allow for unique artistic expression and personalized designs.
Lemon Yellow Matte Finish
Matte lemon yellow creates sophisticated elegance that differs beautifully from glossy neon finishes. We apply a high quality matte top coat over fully dried lemon yellow polish to achieve that smooth, velvety texture. The matte finish transforms bright lemon yellow into a subtle yet striking statement.
Accent nail combinations work exceptionally well with matte lemon yellow polish. Use lemon yellow on one or two featured nails while keeping other nails in clear or nude tones for balanced visual appeal. This approach provides color impact without overwhelming your overall look.
Maintenance requirements for matte finishes differ from traditional glossy manicures. Avoid touching matte nails frequently as oils from your skin can create unwanted shine spots that compromise the uniform matte appearance.
Purple Neon Nail Design Concepts

Purple neon nails combine royal elegance with electric vibrancy, creating a sophisticated yet bold statement. These designs offer versatility for both daytime events and nighttime occasions.
Electric Purple Holographic Effect
Electric purple holographic polishes create an otherworldly shimmer that captures and reflects light beautifully. Purple Plasma delivers the most saturated electric purple holographic finish, producing intense metallic effects that dazzle under any lighting condition. We recommend applying this over a black base coat to maximize the holographic intensity and depth.
Holo Effect Violet features specialized shimmering particles that enhance the prismatic effect throughout all seasons. This formula works exceptionally well for special occasions when you want maximum impact. Apply two thin coats over your base for optimal coverage, then seal with a high gloss topcoat to amplify the holographic properties.
Violet Neon Swirl Patterns
Violet swirl designs transform your nails into mesmerizing works of art using fluid motion techniques. Create these vibrant patterns by combining different violet shades or mixing neon colors for radiant contrast effects. We suggest using a dotting tool or thin brush to create flowing swirl movements across each nail.
Neon violet accents work perfectly when applied over darker backgrounds like deep purple or black bases. These ever-changing swirl patterns catch light beautifully and create visual movement that draws attention. Practice the swirling motion on paper first to perfect your technique before applying to your nails.
Purple Neon Glitter Accent
Purple neon glitter accents add sparkle without overwhelming your entire manicure design. Apply a clear topcoat mixed with purple neon glitter over your base color for subtle yet eye catching effects. We recommend using fine glitter particles for elegant shimmer or chunky glitter for bold statement looks.
Glitter gradient techniques create stunning visual transitions by gradually increasing glitter concentration from cuticle to nail tip. Start with light glitter application near the cuticle, then build density toward the free edge for dramatic results. This method works beautifully over solid purple bases or combined with other neon shades for maximum impact.
Multi-Color Neon Nail Combinations

Mixing multiple neon colors creates stunning visual impact that elevates any manicure to artistic heights. These vibrant combinations showcase creativity while maintaining balanced aesthetics across all ten nails.
Rainbow Neon Each Finger
Assigning each finger a different neon color from the rainbow spectrum creates a fun and colorful look that’s perfect for summer parties. We recommend starting with a white base coat to make the neon rainbow ombre effect truly pop with colors like pink, orange, yellow, green, blue, and purple. Individual finger colors work best when you follow the natural rainbow progression across your hands.
Creating this whimsical effect requires careful color placement and proper blending techniques. Start with your thumb in neon pink and progress through the spectrum to your pinky in electric purple. The key is maintaining consistent saturation levels across all colors so no single nail overpowers the others.
Neon Color Block Design
Using different shades of one neon color creates a cohesive monochromatic look that appears sleek and sophisticated. This design technique allows you to experiment with various intensities while maintaining visual harmony across your manicure. Multi-color blocks offer bolder results when you alternate between different neon shades to create geometric patterns.
Executing color block designs requires precise application and clean lines between each section. We suggest using nail tape to create sharp boundaries and prevent color bleeding. The geometric nature of this design makes it perfect for those who prefer structured nail art over fluid patterns.
Electric Tie-Dye Effect
Swirling multiple neon colors together creates a mesmerizing tie-dye effect that transforms each nail into a unique piece of art. This technique uses a toothpick or dotting tool to blend colors while they’re still wet, creating organic patterns that flow naturally across the nail surface. The swirling motion produces different results on each nail, making every manicure completely one of a kind.
Achieving the perfect tie-dye effect requires working quickly before the polish sets. Drop different neon colors onto the nail and immediately swirl them together using circular motions. The key is maintaining wet polish throughout the process to ensure smooth color transitions and avoid harsh lines between shades.
Neon Nail Art Techniques and Tips

Mastering the perfect neon manicure requires exact techniques that enhance color vibrancy and ensure lasting results. We’ll share professional methods that transform your nail art from basic to brilliant.
Proper Base Coat Application
Base coat application serves as the foundation for achieving stunning neon nail art that resists staining and lasts longer. We recommend using a base coat specifically designed for neon or bright colors to enhance the vibrancy of electric shades like hot pink, lime green, and electric blue.
Application begins with clean, dry nails that have been properly prepped with cuticle care and light buffing. We suggest applying the base coat in thin, even strokes from cuticle to tip, ensuring complete coverage without pooling around the nail edges.
White base coats work exceptionally well under neon colors because they create maximum color payoff and prevent the natural nail tone from dulling the electric effect. We’ve found that allowing the base coat to dry completely before applying neon polish prevents streaking and ensures smooth application.
Professional nail artists recommend using a base coat that contains strengthening ingredients to protect natural nails from the intense pigments found in neon polishes. We always check that our base coat is completely dry by testing with a gentle touch before proceeding to color application.
Layering Techniques for Intensity
Layering techniques create the intense vibrancy that makes neon nail art truly electric and eye-catching. We achieve maximum color impact by building up neon shades gradually rather than applying thick coats that can appear streaky or uneven.
Starting with thin layers allows each coat to dry properly while building up the desired opacity and intensity. We typically apply 2-3 thin coats of neon polish, allowing each layer to dry completely before adding the next one.
Dark base coats under certain neon colors can enhance the electric effect by creating dramatic contrast. We’ve discovered that black base coats work particularly well under electric blue and lime green neons, making the colors appear more vibrant and glow-like.
Building intensity requires patience because rushing the process often results in smudging or uneven coverage. We recommend waiting at least 2 minutes between coats to ensure proper adhesion and prevent the layers from mixing together.
Color saturation improves significantly when we use high-quality neon polishes that contain concentrated pigments designed for maximum impact. We’ve tested various brands and found that investing in premium neon formulas produces noticeably better results than budget alternatives.
Top Coat Selection for Longevity
Top coat selection determines how long your neon nail art maintains its electric vibrancy and protects against chipping and fading. We choose non-yellowing formulas that won’t dull the bright colors over time, particularly important for maintaining the integrity of electric yellows and hot pinks.
Glossy top coats enhance the neon effect by reflecting light and making colors appear more intense and mirror-like. We apply glossy finishes when we want maximum impact and attention-grabbing shine that complements the electric nature of neon shades.
Matte top coats create sophisticated looks that tone down the intensity while maintaining the bold color impact. We use matte finishes for electric purple or lime green designs when we want a more subtle but still striking appearance.
Multiple thin layers of top coat provide superior protection against wear and environmental factors that cause neon colors to fade quickly. We typically apply 2 coats of top coat, allowing each layer to dry completely before adding the next one.
Sealing techniques involve wrapping the top coat around the nail tips to prevent chipping and extend the manicure’s lifespan. We always finish our neon nail art by carefully painting the free edge of each nail to create a protective barrier that keeps the design intact longer.
Conclusion
We’ve explored an incredible spectrum of neon nail possibilities that’ll transform your fingertips into stunning works of art. From electric blues and vibrant hot pinks to eye-catching lime greens and bold oranges these designs offer endless opportunities to express your unique style.
The key to mastering neon nails lies in proper preparation and technique. Remember to use white base coats for maximum vibrancy apply thin layers for optimal coverage and choose the right top coat to maintain that electric intensity we all love.
Whether you’re drawn to solid colors geometric patterns or mesmerizing gradients there’s a neon design that perfectly matches your personality. Don’t be afraid to experiment with multi-color combinations or accent nails – these vibrant shades are meant to be bold and expressive.
Ready to make your next manicure absolutely unforgettable? It’s time to embrace the neon trend and let your creativity shine as bright as these electric colors.
Frequently Asked Questions
What makes neon nails so popular?
Neon nails are popular because they make bold statements and showcase confidence and creativity. The electric colors like pink, green, orange, and yellow are perfect for enhancing various occasions such as music festivals and summer parties. They transform ordinary manicures into eye-catching art pieces that stand out and reflect a vibrant personality.
How do I achieve the best color payoff with neon nail polish?
To achieve maximum color payoff with neon nail polish, always start with a white base coat. This creates the perfect canvas for electric colors to pop and appear more vibrant. Apply thin layers of neon polish, allowing each coat to dry completely before applying the next one for optimal opacity and intensity.
What are some popular neon nail design techniques?
Popular neon nail design techniques include electric blue gradients, hot pink chrome finishes, lime green geometric patterns, orange sunset ombré effects, and yellow lightning bolt designs. You can also try negative space art, tribal patterns, marble effects, and multi-color combinations using different neon shades for stunning visual impact.
How can I make my neon manicure last longer?
To extend your neon manicure’s longevity, use a quality base coat designed for neon colors, apply thin polish layers, and seal with an appropriate top coat. For chrome effects, use careful application and sealing techniques. Regular maintenance and avoiding harsh chemicals will help preserve the vibrant color and finish.
Can I mix different neon colors together?
Yes! Mixing multiple neon colors creates stunning visual effects. Try assigning each finger a different neon color for a rainbow look, create color block designs using different shades of one neon color, or experiment with electric tie-dye effects that swirl multiple colors together for unique, artistic patterns.
What’s the difference between glossy and matte neon finishes?
Glossy neon finishes enhance the electric vibrancy and create a bold, attention-grabbing look perfect for parties and events. Matte neon finishes, like matte lemon yellow, offer sophisticated elegance with a more subdued appearance while maintaining the vibrant color. Choose based on your desired aesthetic and occasion.
Are there professional tips for better neon nail art results?
Professional tips include using nail tape for clean geometric lines, applying makeup sponges for smooth gradient effects, and careful planning for negative space designs. Always use thin layers, allow proper drying time between coats, and finish with precise cleanup around the cuticles for a polished, salon-quality appearance.


