We’ve all experienced that moment when we want our nails to reflect the beauty of nature – and what better way to achieve this than with stunning flower nail designs? From delicate cherry blossoms to bold sunflower patterns, floral nail art transforms your fingertips into miniature gardens that capture attention wherever you go.
Whether you’re preparing for spring celebrations, summer weddings, or simply want to add a touch of botanical elegance to your everyday look, flower nail ideas offer endless creative possibilities. We’ll explore techniques that work for both beginners picking up their first nail brush and seasoned artists ready to master intricate petal details.
The best part? You don’t need professional salon skills to create gorgeous floral masterpieces. With the right tools, colors, and step-by-step guidance, you’ll discover how easy it is to bring nature’s most beautiful blooms to life on your nails.
Delicate Daisy Nail Designs for Everyday Elegance
Daisy nail designs offer the perfect balance between feminine charm and understated sophistication. We’ll explore three stunning approaches that bring these cheerful blooms to your fingertips with effortless grace.
Hand-Painted White Daisy Accents
Hand painted white daisies create timeless elegance on any base color. Start with a neutral nude or soft pink foundation, then use a thin nail art brush to paint small white petals in circular formations. Add tiny yellow dots at the center using a dotting tool or toothpick for authentic daisy centers.
Position these delicate flowers strategically across 2-3 nails per hand. We recommend placing one larger daisy on your ring finger and smaller blooms on your thumb and middle finger. This creates visual balance without overwhelming your overall look.
Layer thin white polish for smooth, opaque petals that won’t chip easily. Apply two thin coats rather than one thick application to achieve professional looking results. Seal everything with a quality top coat to protect your hand painted artwork for up to 10 days.
Minimalist Daisy Chain Patterns
Minimalist daisy chains work beautifully along the nail bed’s natural curve. Create connected small daisies using simple dots and lines, flowing from cuticle to tip in gentle arcs. This technique requires only white polish and a yellow accent color for maximum impact.
Space each tiny daisy approximately 2-3mm apart for optimal visual flow. We suggest practicing the chain pattern on paper first to perfect your spacing and petal consistency. Each daisy should measure roughly 3-4mm in diameter for proportion.
Apply this design to just your accent nails for sophisticated restraint. Choose your ring fingers or create an alternating pattern across all ten nails. The key lies in maintaining consistent daisy sizes and uniform spacing throughout the chain.
Pastel Daisy Field Inspirations
Pastel daisy fields capture spring meadow beauty with soft color combinations. Mix pale pink, lavender, and mint green bases with white daisy overlays for dreamy, romantic effects. Each nail can feature a different pastel shade while maintaining design cohesion.
Create depth by varying daisy sizes from 2mm to 6mm across your nail canvas. Larger flowers work best near the cuticle area, while smaller blooms fill empty spaces naturally. This mimics how real wildflower fields grow in organic, scattered patterns.
Blend multiple pastel shades using a makeup sponge for gradient backgrounds. Apply your chosen colors to a cosmetic sponge, then dab gently across each nail before the daisy application. This technique creates soft, watercolor effects that enhance the overall field inspired aesthetic.
Bold Rose Nail Art for Romantic Occasions
 1")
Rose nail designs bring timeless elegance to your fingertips, making them perfect for date nights and special celebrations. We’ll explore three stunning approaches that transform your nails into romantic masterpieces.
Classic Red Rose Statement Nails
Create dramatic focal points with prominent red roses against neutral backgrounds for maximum impact. We recommend starting with a nude or pale pink base coat, then carefully painting detailed red roses on one or two accent nails per hand. Gold accents and tiny rhinestones elevate the design further, adding glamorous touches that catch the light beautifully.
Perfect these nails for anniversary dinners, Valentine’s Day celebrations, or any romantic evening where you want to make a statement. The contrast between the subtle base and bold roses creates visual interest while maintaining sophistication. Small gold lines connecting the rose elements or delicate rhinestone placement around the petals enhance the overall elegance.
Ombre Rose Petal Gradients
Blend colors seamlessly from light to dark tones to mimic the natural layering of rose petals. Start with the lightest shade at your cuticle area and gradually deepen the color toward your nail tips, creating that soft gradient effect roses are known for. We suggest using pink, coral, or burgundy color families for the most authentic rose petal appearance.
Apply this technique by using a makeup sponge to dab and blend the colors while they’re still wet. The ethereal quality of ombre rose gradients makes them ideal for romantic occasions where you want something subtle yet captivating. This design works exceptionally well on longer nails where you have more space to showcase the gradient transition.
Vintage Rose Garden Themes
Transport your nails to an enchanted garden setting with intricate floral patterns and muted color palettes. We love incorporating multiple rose sizes and complementary florals like leaves and tiny buds to create that lush garden atmosphere. Dusty roses, sage greens, and cream tones work together to achieve that vintage aesthetic.
Layer different elements by painting larger roses as focal points, then adding smaller blooms and delicate foliage around them. This whimsical design approach captures the romantic essence of old fashioned rose gardens, making it perfect for garden parties, brunch dates, or any occasion where you want to showcase your artistic flair. The muted color scheme ensures the design remains elegant rather than overwhelming.
Cherry Blossom Nail Ideas for Spring Vibes
 2")
Cherry blossom nail designs bring the gentle beauty of spring to your fingertips with their soft, feminine aesthetics. These sakura-inspired looks perfectly capture seasonal renewal while offering versatile options for both everyday wear and special occasions.
Soft Pink Sakura Branches
Creating soft pink sakura branches starts with a light beige or soft pink base that provides a clean, airy foundation. We paint delicate branches using fine brushes and dark brown or black polish to form elegant stems across the nail bed. Miniature cherry blossoms bloom along these branches using pale pink shades, often enhanced with white highlights for dimension.
This romantic design works beautifully for daily wear, offering subtle sophistication that complements any outfit. The branches can curve naturally across short or long nails, making this style incredibly adaptable. We recommend applying a quality top coat to preserve the intricate artwork and maintain the glossy finish.
Watercolor Cherry Blossom Effects
Watercolor cherry blossom effects create a dreamy, artistic appearance by blending light pink, white, and occasionally lavender polish. We achieve this ethereal look by working with polish while it’s still slightly wet, allowing colors to diffuse naturally. The blossoms appear soft and blended, mimicking the fleeting beauty of real cherry blossoms caught in spring light.
This technique produces a diffused, painterly effect that transforms nails into miniature works of art. The watercolor method works especially well when we vary the intensity of colors across different nails. Each nail becomes unique while maintaining overall harmony in the design.
Traditional Japanese-Inspired Designs
Traditional Japanese-inspired designs incorporate authentic sakura motifs with scattered cherry blossoms along graceful branches. We often include subtle details like falling petals or delicate calligraphy-inspired elements that honor the cultural significance of cherry blossoms. The color palette stays true to tradition, featuring soft pinks, whites, and black for branches.
These designs maintain elegance through their authentic approach to Japanese aesthetics. We can adapt the complexity from minimalist single branches to more elaborate compositions featuring multiple flowering stems. The versatility of traditional motifs allows us to create everything from understated daily looks to sophisticated statement nails perfect for special events.
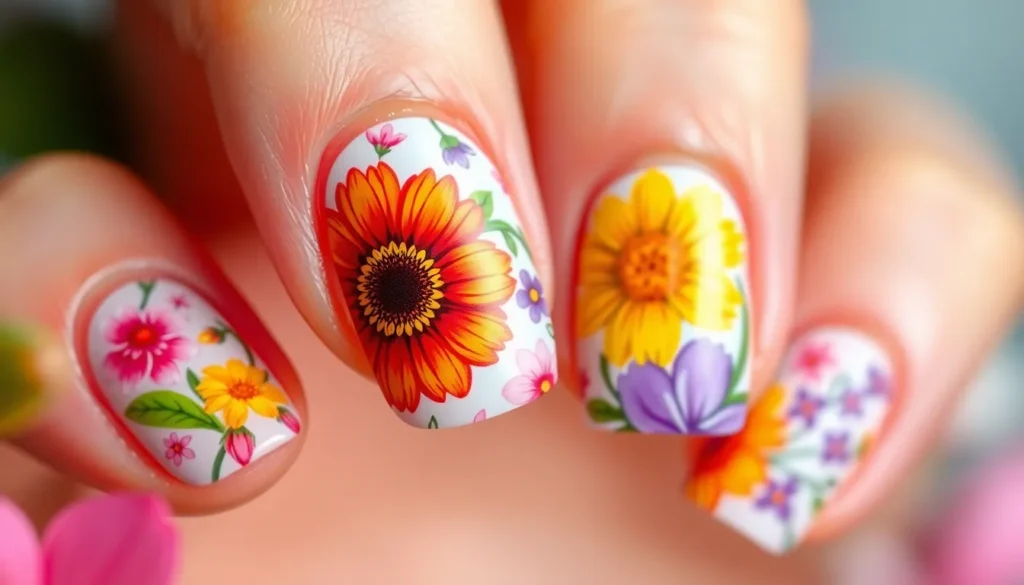
Sunflower Nail Art for Bright Summer Days
 3")
Sunflower nail art captures the essence of summer with its vibrant colors and cheerful aesthetic. These designs evoke warmth and optimism, making them perfect for the sunny season ahead.
Yellow Sunflower Field Motifs
Bright yellow gradients create stunning sunflower field effects that transform your nails into miniature landscapes. We love how these trending designs use expansive sunflower patterns with bold yellows and oranges to mimic endless summer fields. Patchwork techniques allow you to apply different sections of sunflower motifs across each nail, creating a ever-changing and lively appearance.
Gradient applications work beautifully when blending from deep orange at the base to bright yellow at the tips. This technique captures the natural variation found in real sunflower fields. Multiple sunflower placement across all ten nails creates a cohesive field effect that’s both eye-catching and seasonally appropriate.
Color combinations featuring warm yellows, burnt oranges, and golden tones complement summer wardrobes perfectly. These vibrant hues pair exceptionally well with casual summer activities and outdoor events where you want your nails to make a statement.
Rustic Sunflower and Burlap Textures
Matte brown base colors provide the perfect foundation for rustic sunflower designs that channel countryside charm. We achieve this farmhouse aesthetic by combining textured elements with traditional sunflower motifs for a unique layered look. Burlap texture techniques use specialized stamping methods or gel applications to create raised fabric-like surfaces on your nails.
Gel application methods allow us to build up texture that genuinely mimics burlap material. This technique requires patience but delivers authentic-looking results that stand out from typical smooth nail art. Stamping techniques offer a quicker alternative for achieving burlap textures while maintaining professional-looking results.
Contrasting elements work best when pairing the rough burlap texture with delicate sunflower details. Hand-painted sunflower accents or carefully applied decals create beautiful contrast against the textured background, making each element pop.
Sunflower Center Detail Techniques
Traditional brown centers surrounded by bright yellow petals form the classic sunflower look that never goes out of style. We enhance these centers using dots, rhinestones, or textured beads to replicate the natural seed head pattern found in real sunflowers. Dimensional applications using 3D embellishments create depth and visual interest that makes your sunflower centers truly stand out.
Hand-painted techniques require fine brushes and steady hands but produce the most authentic-looking sunflower centers. Professional nail challenges in 2025 showcase these detailed approaches, proving that intricate work pays off in the final result. Stamping methods offer consistent results for those who prefer uniform designs across multiple nails.
Strategic placement determines the overall impact of your sunflower design. Single statement sunflowers work beautifully as centerpieces on accent nails, while scattered mini sunflowers create playful, whimsical effects across all nails. Size variations keep the design interesting and prevent monotony in your sunflower nail art.
Tropical Hibiscus Flower Nail Designs
 4")
We’re bringing the vibrant energy of paradise to your fingertips with stunning hibiscus flower nail designs. These bold tropical blooms transform ordinary manicures into eye-catching works of art that capture the essence of summer.
Vibrant Hawaiian Hibiscus Patterns
Bright hibiscus flowers in pink, orange, and yellow create stunning focal points that embody the spirit of Hawaiian islands. We recommend starting with a neutral base and adding hand-painted hibiscus blooms using gel polish for long-lasting vibrancy. Traditional Hawaiian motifs like palm fronds and ocean waves complement these floral designs perfectly.
Large hibiscus flowers work best as accent nails, while smaller blooms can be scattered across all fingers for a cohesive tropical look. We suggest incorporating authentic Hawaiian patterns like tribal designs or traditional lei motifs to enhance the cultural authenticity of your nail art.
Professional nail artists on Etsy offer hand-painted 3D red hibiscus designs with leafy green details that create dimensional summer looks. These custom pieces feature intricate petal work and realistic color gradients that make each hibiscus bloom appear three-dimensional.
Sunset-Colored Hibiscus Gradients
Warm orange to soft pink transitions create breathtaking sunset effects that perfectly complement hibiscus flower designs. We achieve these stunning gradients using gel polish and specialized nail art tools to ensure smooth color blending. Each gradient mimics the natural hues of tropical sunsets, creating a romantic backdrop for floral elements.
Gradation techniques involve applying multiple thin layers of polish, starting with the lightest shade at the cuticle and deepening toward the nail tip. We recommend using a makeup sponge to blend colors seamlessly, creating that perfect sunset ombre effect.
These sunset gradients work beautifully as standalone designs or as backgrounds for delicate hibiscus silhouettes. We often pair warm gradient bases with white or coral hibiscus outlines for maximum visual impact.
Beach-Themed Floral Combinations
Hibiscus flowers paired with plumeria and orchids create diverse tropical nail art that captures the full beauty of beach destinations. We combine these floral elements with ocean-inspired details like seashells, starfish, and wave patterns for comprehensive beach themes.
Seashell accents enhance the coastal vibe while maintaining focus on the floral elements. We strategically place small shell details near the cuticle or nail tips to frame the hibiscus blooms without overwhelming the design.
Palm tree silhouettes and ocean wave details provide perfect companions to hibiscus patterns, creating cohesive beach-inspired nail art. We use these elements to tell a complete tropical story across all ten nails, with each finger contributing to the overall beach paradise theme.
Lavender Nail Art for Calming Aesthetics
 5")
We’ll transition from bold tropical designs to the soothing industry of lavender nail art, where pastel purple shades create peaceful manicures perfect for relaxation and mindfulness.
Purple Lavender Sprig Designs
Purple lavender sprig designs incorporate delicate botanical elements that bring natural beauty to your fingertips. We paint small lavender flowers or sprigs on each nail using fine brushes, creating whimsical patterns that capture the essence of Mediterranean gardens. Artists combine pastel purple shades for the blooms with soft green tones for stems and leaves, ensuring each sprig looks realistic and dimensional.
These designs work exceptionally well on shorter nails where single sprigs can make elegant statements without overwhelming the nail bed. We recommend starting with a clear or nude base coat, then adding 2-3 small lavender sprigs per nail for balanced coverage. Professional nail artists often suggest practicing the sprig shapes on paper first, mastering the delicate petal formations before applying them to nails.
French Lavender Field Scenes
French lavender field scenes transform your nails into miniature Provence landscapes that evoke memories of summer travels. We create these designs using light purple bases topped with white flowers or small lavender blooms arranged in gentle rows. Artists include slight wavy lines or simple cloud designs for playful touches that suggest rolling hills and open skies.
The technique involves layering different purple tones from light lavender to deeper violet, mimicking the natural color variations found in actual lavender fields. We add tiny white or cream colored dots to represent distant flowers, creating depth and perspective on each nail. These scenes work particularly well on longer nails where there’s more canvas space for detailed industry elements.
Dried Lavender Pressed Flower Effects
Dried lavender pressed flower effects incorporate actual dried lavender petals sealed onto nails for authentic botanical textures. We use clear top coats to secure pressed lavender flowers directly onto the nail surface, creating unique three dimensional effects that can’t be replicated with paint alone. Artists combine these elements with spring inspired colors like milky pink or creamy whites for cohesive seasonal palettes.
The application process requires careful placement of dried petals while the base coat remains slightly tacky, followed by multiple thin layers of clear topcoat for durability. We recommend sourcing high quality dried lavender from create stores or herb suppliers, ensuring the petals maintain their color and shape when sealed. These designs offer longevity since the actual flowers preserve their natural beauty under protective coatings, making them perfect for special occasions or extended wear periods.
Wildflower Mix Nail Ideas for Boho Style
 6")
We’re bringing the free spirited essence of bohemian style to your fingertips with wildflower nail designs that capture nature’s untamed beauty. These mixed floral patterns celebrate the carefree charm of meadow blooms.
Mixed Wildflower Bouquet Nails
Layered flowers create stunning dimension when we combine different wildflower species on each nail. Using nail polish in varying opacity levels, we can build depth by painting background blooms first, then adding foreground flowers with bolder colors.
3D flower accents transform ordinary wildflower designs into captivating dimensional art that catches light beautifully. We recommend placing one dimensional flower per hand as a focal point, typically on the ring finger, while keeping other nails painted with flat wildflower motifs.
Sticker applications work wonderfully for creating complex bouquet arrangements without advanced painting skills. Combining hand painted elements with quality floral stickers lets us achieve professional looking results while maintaining the organic, mixed feeling of a gathered wildflower bunch.
Prairie Wildflower Meadow Designs
Gradient backgrounds using sunset colors provide the perfect canvas for delicate wildflower silhouettes. We start with warm orange at the nail base, blending upward through coral and pink to soft yellow at the tips, mimicking golden hour lighting across prairie landscapes.
Delicate wildflowers painted in small clusters across each nail recreate the scattered beauty of meadow scenes. Using fine detail brushes, we paint tiny daisies, buttercups, and prairie grass stems in varying heights to simulate natural wildflower growth patterns.
Scale variation keeps meadow designs realistic since wildflowers naturally grow in different sizes throughout prairie environments. We paint some blooms larger in the foreground with others smaller toward the nail base, creating natural depth perception.
Pressed Flower Preservation Techniques
Resin encapsulation offers inspiration for creating realistic wildflower nail designs that mimic preserved botanical specimens. While we can’t use actual resin on nails, we recreate this effect using multiple clear coat layers over detailed wildflower paintings, building translucent depth.
Pressing flower motifs onto paper first helps us plan nail compositions before painting begins. We sketch or trace pressed flower arrangements, then use these templates to guide our nail art placement for balanced, natural looking designs.
Scanning techniques let us capture pressed flower details for reference when painting intricate wildflower patterns. Digital references help us achieve accurate petal shapes, vein details, and color variations that make our nail art look authentically botanical.
Advanced Flower Nail Art Techniques
 7")
Ready to elevate your floral nail designs beyond basic painting techniques? These professional methods will transform your flower nail art into stunning three-dimensional masterpieces.
3D Flower Sculpting Methods
3D acrylic sculpting creates breathtaking dimensional flowers that appear to bloom directly from your nails. We start by building flower petals layer by layer with acrylic gel, shaping each element while the material remains workable. Professional artists use specialized 3D acrylic brushes to create realistic roses, peonies, and cherry blossoms with incredible detail.
Gel sculpting techniques offer another approach for dimensional floral designs. Apply colored gel in thin layers to build petal depth, curing each section under UV light for durability. This method works exceptionally well for delicate flowers like daisies and baby’s breath.
Clay flower applications involve creating tiny flowers separately before adhering them to cured base coats. Polymer clay flowers can be pre-made and stored, allowing for quick application during manicure appointments.
Stamping and Stencil Applications
Stamping plates deliver precise floral patterns without requiring freehand painting skills. We recommend using high-quality steel plates with deep etching for crisp flower details. Apply stamping polish to the plate, scrape excess product, then transfer the design using a silicone stamper.
Nail stencils create clean geometric flower arrangements and consistent petal shapes. Adhesive stencils work best for gradient effects, while reusable vinyl stencils suit multiple design applications. Position stencils carefully before applying color to ensure uniform flower placement.
Water decal transfers provide intricate floral artwork that rivals hand-painted designs. Soak decals in warm water for 10-15 seconds, then slide onto prepared nail surfaces for professional results.
Professional Tool Recommendations
| Tool Category | Essential Items | Purpose |
|---|---|---|
| Brushes | 3D acrylic brushes, liner brushes | Sculpting details, painting stems |
| Stamping | Steel plates, silicone stampers | Creating precise patterns |
| Stencils | Vinyl stencils, adhesive guides | Uniform flower shapes |
| Materials | Gel paints, acrylic powders | Vibrant, long-lasting colors |
High-quality gel paints ensure vibrant flower colors that won’t fade or chip. Professional formulations offer better pigmentation than standard polishes, making flower petals appear more realistic.
Precision dotting tools create perfect flower centers and small decorative elements. We use various tip sizes to achieve different petal textures and dimensional effects.
UV/LED lamps with consistent wattage cure gel materials evenly, preventing flower sculptures from collapsing or losing shape during the hardening process.
Seasonal Flower Nail Ideas Throughout the Year
 8")
We’ll explore how different seasons inspire unique floral nail designs that perfectly capture each time of year’s distinctive beauty and charm.
Spring Tulip and Daffodil Designs
Bright yellow daffodil designs celebrate spring’s renewal with vibrant sunny hues that instantly lift your mood. We recommend creating hand-painted daffodils using gel polish on a soft white base, incorporating varying sizes to add visual depth and dimension. The iconic trumpet shape of daffodils translates beautifully to nail art when painted with detail brushes, creating realistic botanical elements that capture spring’s fresh energy.
Colorful tulip patterns offer endless creative possibilities with their simple yet elegant silhouettes. We love combining pink, white, and yellow tulips in monochromatic designs that showcase different flower sizes and arrangements. Free-hand painting techniques work exceptionally well for tulip nail art, allowing you to create organic shapes that feel natural and flowing.
Mixed spring garden scenes bring together both tulips and daffodils for comprehensive seasonal nail art. We suggest alternating between tulip and daffodil motifs across different nails, creating a cohesive garden-inspired manicure that celebrates spring’s abundant blooms.
Summer Peony and Lily Patterns
Vibrant peony blooms capture summer’s bold energy with their full, ruffled petals in bright colors. We recommend using special gel polishes that create blooming effects over time, allowing your peony designs to appear as if they’re continuously flowering. These dramatic flowers work beautifully in soft pastels or bold brights, depending on your summer style preferences.
Elegant lily designs bring sophistication to summer nail art with their graceful, elongated petals. We love incorporating white lilies with subtle green accents to create fresh, clean designs perfect for summer weddings and garden parties. The clean lines of lily petals make them ideal for both minimalist and detailed nail art approaches.
Fruity floral combinations add playful summer touches by pairing peonies and lilies with citrus elements. We suggest incorporating small orange and lemon accents alongside your floral designs, creating nail art that captures summer’s fresh, vibrant spirit while maintaining elegant botanical beauty.
Fall Chrysanthemum and Marigold Themes
Warm chrysanthemum patterns embrace autumn’s cozy atmosphere with their intricate, layered petals in rich seasonal colors. We recommend using warm brown, burgundy, and deep orange tones to create chrysanthemum designs that perfectly complement fall fashion and changing leaves. The complex petal structure of chrysanthemums allows for detailed nail art that showcases advanced painting techniques.
Golden marigold accents bring autumn’s sunny warmth to your fingertips with their bright orange and yellow blooms. We love creating marigold designs using warm color palettes that include deep golds and burnt oranges, capturing the essence of harvest season celebrations and autumn festivities.
Sunflower and chrysanthemum combinations create popular fall nail art that celebrates the season’s most beloved blooms. We suggest using red-orange and burgundy base colors with detailed flower work in coordinating warm tones, creating nail designs that feel perfectly suited for autumn’s crisp, colorful days.
Winter Poinsettia and Holly Accents
Classic poinsettia designs bring festive winter charm to your nails with their bold red petals and dramatic silhouettes. We recommend creating poinsettia nail art using crisp lines and bold color contrasts that capture these winter flowers’ striking appearance. The geometric nature of poinsettia petals makes them perfect for clean, precise nail art designs.
Holly and berry motifs add traditional winter elegance with their deep green leaves and bright red berries. We love incorporating holly designs with gold accents for luxurious winter nail art that feels both festive and sophisticated. The contrast between holly’s sharp leaves and round berries creates visually interesting nail designs.
Gold and white winter florals elevate winter nail art with elegant metallic touches and crisp color combinations. We suggest combining poinsettias and holly with gold leaf accents and white details, creating winter nail designs that feel both festive and refined for holiday celebrations and winter events.
Conclusion
We’ve explored an incredible variety of flower nail designs that showcase nature’s beauty right at our fingertips. From delicate daisies to vibrant hibiscus these floral patterns offer endless possibilities for self-expression and creativity.
Whether you’re drawn to romantic roses or cheerful sunflowers there’s a perfect flower design waiting for you. The techniques we’ve shared make it possible for everyone to create stunning nail art regardless of skill level.
Remember that flower nails aren’t just about following trends – they’re about celebrating the natural industry and bringing joy to your everyday style. With the right tools and a bit of practice you’ll be creating breathtaking floral masterpieces that turn your nails into tiny works of art.
Frequently Asked Questions
What flower nail designs are best for beginners?
Daisy nail designs are perfect for beginners due to their simple structure. Start with hand-painted white daisy accents on a neutral base using dotting tools for the center and thin brushes for petals. Minimalist daisy chain patterns are also beginner-friendly, requiring only basic brush strokes to create connected flowers along the nail bed.
How can I create realistic rose nail art at home?
Begin with classic red rose statement nails using a neutral base color. Paint roses using layering techniques – start with darker shades for depth, then add lighter tones for highlights. Enhance with gold accents and small rhinestones. Practice the ombre rose petal gradient technique by blending colors from light to dark for a natural petal effect.
What tools do I need for professional-looking flower nail art?
Essential tools include detail brushes in various sizes, dotting tools, stamping plates with floral patterns, and high-quality gel paints for vibrant colors. For advanced techniques, consider acrylic sculpting tools and clear coats for resin-like effects. Quality tools ensure precise application and long-lasting results for all floral designs.
How do I make seasonal flower nail designs?
Match flowers to seasons: spring tulips and daffodils with bright, renewal colors; summer peonies and lilies with bold, vibrant shades; fall chrysanthemums and marigolds with warm autumn tones; winter poinsettias and holly with festive reds and greens. Use seasonal color palettes and appropriate techniques for each flower type.
Can I use real pressed flowers in my nail art?
Yes, pressed flowers create stunning 3D effects in nail art. Carefully place dried petals on wet polish or gel, then seal with clear topcoat for preservation. Plan your composition using pressed flower templates for best results. This technique works particularly well with wildflower and lavender designs for authentic botanical looks.
What’s the difference between hand-painted and stamped flower designs?
Hand-painted flowers offer complete creative control and unique, personalized designs but require more skill and time. Stamped flowers provide consistent, precise patterns perfect for intricate designs and are beginner-friendly. Stamping plates make complex floral arrangements accessible without advanced painting skills, while hand-painting allows for custom color combinations and artistic expression.
How long do flower nail designs typically last?
With proper application and quality products, flower nail designs can last 7-14 days. Use base coats, cure gel polishes properly, and apply protective topcoats for durability. 3D elements like sculpted flowers or pressed petals may have shorter lifespans. Regular touch-ups and avoiding harsh chemicals help maintain vibrant floral designs longer.
Which flower designs work best for special occasions?
Bold rose nail art with rhinestone accents suits romantic dates and weddings. Cherry blossom designs are perfect for spring celebrations and cultural events. Tropical hibiscus patterns work well for summer parties and beach vacations. Elegant lavender designs complement formal events, while wildflower patterns suit bohemian-themed occasions and festivals.


