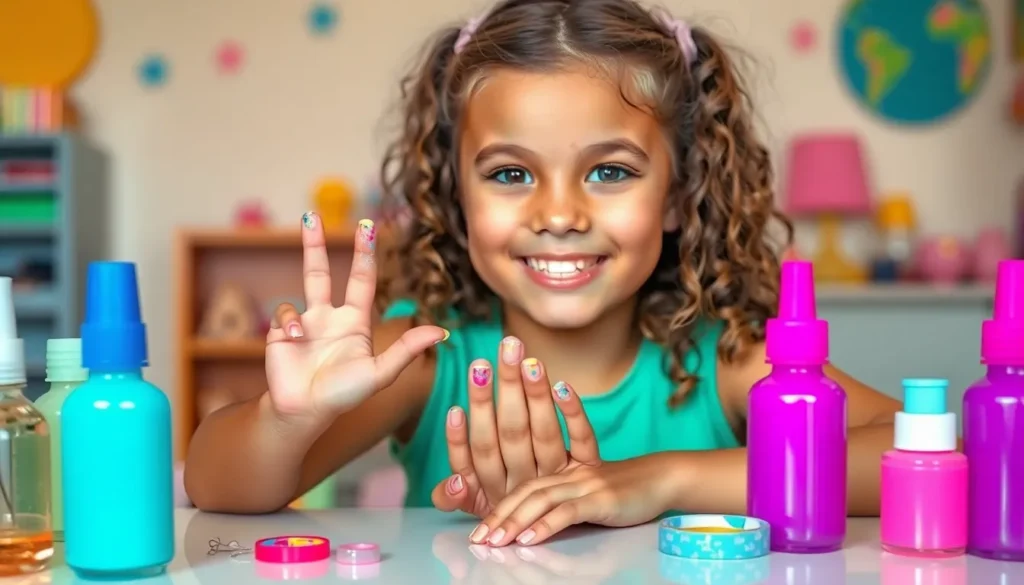
We know how exciting it can be when you’re 12 and finally getting to experiment with nail art! At this age you’re developing your personal style and want nails that reflect your fun personality while still being appropriate for school and activities.
Finding the perfect balance between trendy and age-appropriate nail designs doesn’t have to be challenging. We’ve discovered that simple techniques and vibrant colors create stunning looks that’ll make you feel confident and stylish. From glitter accents to cute patterns you can easily recreate these designs at home with basic nail tools.
Whether you’re heading to a sleepover birthday party or just want to add some sparkle to your everyday look we’ve got nail ideas that’ll have your friends asking “Where did you get your nails done?” The best part? These designs are budget-friendly and perfect for beginners who are just starting their nail art journey.
Fun and Age-Appropriate Nail Polish Colors for 12 Year Olds
Choosing the right nail polish colors can make all the difference in creating looks that feel both trendy and appropriate. We’ve curated a selection of shades that perfectly balance youthful fun with sophisticated style.
Pastel Pink and Purple Shades
Soft pink tones create the perfect foundation for any young nail artist’s collection. Baby pink shades like cotton candy and rose quartz offer a gentle pop of color that complements any outfit. Light lavender and periwinkle blue provide beautiful alternatives that feel fresh and modern.
Metallic pastels add extra dimension without being too bold. Pearl pink finishes catch the light beautifully while maintaining that sweet, age appropriate vibe. Shimmer purple polishes create an enchanting effect that’s perfect for special occasions or weekend fun.
Gradient combinations work wonderfully with these softer shades. Blending light pink into white creates an ombre effect that looks professionally done. Mixing purple and pink pastels results in a dreamy sunset inspired manicure that’s both creative and wearable.
Bright Summer Colors
Coral and peach shades bring warmth and energy to any nail look. These vibrant hues work particularly well during warmer months and pair beautifully with casual summer outfits. Tangerine orange adds a playful twist that’s bold yet tasteful.
Turquoise and aqua blues capture that fun beach vacation feeling. These refreshing colors remind us of tropical waters and complement both light and dark skin tones beautifully. Mint green offers a similarly fresh alternative that feels modern and youthful.
Sunshine yellows brighten up any day with their cheerful appearance. Lemon yellow and buttercup shades create an instant mood boost while remaining perfectly appropriate for school and social activities. These colors work especially well as accent nails or in simple nail art designs.
Classic Clear and Nude Tones
Clear polish with glitter provides the perfect compromise between natural and fun. This combination allows nail beds to show through while adding subtle sparkle that catches the light. Silver and gold glitter options offer versatility for different occasions and outfits.
Sheer pink formulas enhance natural nail color without looking too grown up. These barely there shades create a polished appearance that’s suitable for any setting. Rose tinted clear polishes add just enough color to feel special while maintaining that natural look.
Light beige and champagne tones offer sophistication that feels age appropriate. These neutral shades complement every skin tone and work well for both casual and more formal occasions. Nude polishes with subtle shimmer provide extra elegance without being overwhelming.
Simple DIY Nail Art Designs Perfect for Beginners

Creating beautiful nail art doesn’t require professional skills or expensive tools. We’ve discovered three foolproof techniques that’ll help young artists master their first designs with household items.
Polka Dot Patterns Using Bobby Pins
Bobby pins transform into perfect nail art tools for creating uniform polka dots. We recommend dipping the rounded end of a bobby pin directly into your chosen nail polish color. Gently press the polish covered tip onto your base color to create clean, round dots.
Practice spacing helps achieve balanced patterns across each nail. Start with three dots in a triangle formation before adding more complex arrangements. Different sized bobby pins create varied dot sizes, giving your design visual interest and depth.
Striped Designs with Tape
Clear tape creates professional looking stripes without steady hand requirements. We suggest applying strips of tape across painted base coats once they’re completely dry. Position tape pieces diagonally, vertically, or horizontally depending on your desired stripe direction.
Paint over the tape with your contrasting color using smooth, even strokes. Remove tape immediately while the polish remains wet to reveal crisp, clean lines. Multiple tape applications allow for complex geometric patterns and color blocking effects.
Gradient Ombre Effects
Ombre nails blend two complementary colors seamlessly from cuticle to tip. We’ve found that makeup sponges work perfectly for this blending technique. Apply your lighter shade as the base coat and let it dry completely.
Dab both colors onto a makeup sponge side by side, then gently press and roll the sponge across your nail. Build up the gradient effect with multiple light applications rather than one heavy coat. Finish with a top coat to smooth any texture created by the sponge application.
School-Safe Nail Ideas That Follow Dress Codes

We know how important it’s to express your style while following school rules. These sophisticated nail designs let you showcase your personality without breaking dress code guidelines.
Subtle French Manicure Variations
Pastel tips transform the classic French manicure into something perfect for school. We love using soft pink, lavender, or peach instead of traditional white tips to create a gentle and age appropriate look. Glitter tips offer another stunning variation that adds just the right amount of sparkle. Apply a thin layer of clear glitter polish to your nail tips for subtle shine that catches light beautifully without being distracting in class.
Light Glitter Accents
Glitter topcoat creates the perfect balance between fun and appropriate for school settings. We recommend applying clear polish with fine glitter particles over your favorite solid color to add dimension without going overboard. Glitter dots provide another creative way to incorporate sparkle into your nail design. Using glitter polish to create small dots on a solid colored background gives you that special touch while maintaining a clean and polished appearance that teachers will appreciate.
Natural Looking Finishes
Clear polish remains the ultimate school safe choice that adds shine while looking completely natural. We’ve found that clear formulas work perfectly for daily activities and won’t chip as noticeably as colored polishes during sports or art class. Nude shades in light tones give your nails a sophisticated appearance that complements any outfit. These natural looking colors provide coverage while staying subtle enough to meet even the strictest dress code requirements at school.
Creative Themed Nail Designs for Special Occasions

Special occasions call for nail designs that capture the excitement and joy of memorable moments. These themed nail ideas help young artists express their creativity while celebrating life’s special events.
Holiday-Inspired Patterns
Christmas designs bring festive cheer with red and green stripes that create candy cane effects on each nail. Snowflakes painted in white polish over blue or silver bases transform nails into winter wonderlands. Christmas trees drawn with green polish and topped with yellow star dots make adorable holiday statements.
Halloween celebrations come alive with ghost designs using white polish and tiny black dots for spooky faces. Bats created with black polish against orange backgrounds capture the Halloween spirit perfectly. Jack o’ lantern faces painted in orange with black features add playful pumpkin charm to any costume.
Easter festivities shine with pastel colors like soft pink, mint green, and lavender as base coats. Bunny silhouettes drawn in white polish with pink inner ears create adorable springtime looks. Egg designs featuring colorful dots and simple patterns celebrate the season’s renewal and joy.
Birthday Party Nail Art
Colorful balloon designs featuring bright reds, blues, and yellows with thin black lines for strings create party ready nails. Multiple balloons on each nail using different colors add festive excitement to birthday celebrations. Balloon clusters painted across all ten nails make a coordinated and cheerful statement.
Cake and candle designs transform nails into miniature birthday celebrations with brown bases for cake and yellow flames. Layered cake designs featuring pink, white, and chocolate brown stripes mimic real birthday treats. Candle flames painted in yellow and orange add realistic touches to these sweet nail art creations.
Party hat illustrations using triangular shapes in various bright colors bring celebration vibes to fingertips. Polka dot patterns on party hats using contrasting colors create playful and fun designs. Multiple party hats across different nails in rainbow colors make every day feel like a celebration.
Sports Team Color Combinations
Team colors create powerful nail statements using official color combinations from favorite sports teams. Simple stripes alternating between team colors like red and white or blue and gold show school or professional team pride. Color blocking techniques using team colors on alternating nails create bold and spirited looks.
Logo designs featuring simple team symbols like stars, letters, or mascot silhouettes add personal touches to team themed nails. Basic shapes representing team logos using steady hands and thin brushes create recognizable team connections. Number designs featuring favorite player numbers in team colors make personalized sports nail art.
Championship colors celebrating recent wins or favorite seasons using gold accents with team colors create winning combinations. Playoff inspired designs incorporating multiple team colors in geometric patterns show serious fan dedication. Victory themed nails using glitter overlays in team colors celebrate sports achievements and team loyalty.
Essential Nail Care Tips for Healthy Young Nails

Beautiful nail art starts with healthy nails. We’ll explore the fundamental care practices that keep young nails strong and ready for creative expression.
Proper Nail Hygiene Habits
Daily cleaning forms the foundation of healthy nail care for tweens. We recommend using a soft-bristled brush during bath time to gently clean under the nails and remove any buildup of dirt or bacteria.
Regular handwashing becomes especially important after applying or removing nail products. Young nail artists should wash their hands thoroughly with soap and warm water to maintain proper hygiene throughout their nail art sessions.
Weekly trimming prevents breakage and reduces bacterial collection under the nails. We suggest trimming fingernails straight across with slightly rounded corners, while toenails should be cut straight across to prevent painful ingrown nails.
Nail biting prevention improves through consistent trimming schedules. Keeping nails at an appropriate length naturally reduces the urge to bite or pick at them, promoting healthier habits overall.
Safe Nail Polish Removal Techniques
Acetone-free removers protect young nails from harsh chemical damage. We always recommend choosing gentler formulations specifically designed for frequent use, as they maintain nail flexibility while effectively removing polish.
Limited removal frequency preserves nail health over time. Using nail polish remover too often can dry out the natural oils in nails, so we suggest spacing removal sessions appropriately between manicures.
Gentle application methods prevent nail damage during the removal process. Soaking a cotton pad with remover and gently pressing it against each nail for 10-15 seconds makes polish removal easier without excessive rubbing or scraping.
Complete drying periods ensure nails are ready for new applications. We recommend waiting at least 30 minutes after removal before applying new polish, allowing nails to rehydrate naturally.
Moisturizing and Strengthening Routines
Daily moisturizing keeps young nails flexible and strong throughout growth phases. We suggest applying a specialized nail moisturizer each evening to maintain optimal nail health and prevent brittleness.
Chemical exposure limits protect developing nails from unnecessary damage. Avoiding harsh household cleaners and using gloves during cleaning activities helps preserve the natural strength of young nails.
Strengthening treatments can benefit nails that show signs of weakness or peeling. We recommend consulting with parents before using nail hardeners, as some formulations may be too strong for developing nails.
Natural strengthening methods offer safe alternatives for nail improvement. Gentle buffing once weekly and maintaining a balanced diet rich in vitamins supports healthy nail growth without harsh chemical interventions.
Budget-Friendly Nail Art Supplies and Tools

Creating stunning nail designs doesn’t require expensive professional supplies. We’ve discovered that amazing nail art can be achieved with affordable brands and clever household items.
Affordable Nail Polish Brands
Revlon offers an extensive color range that’s perfect for young nail artists experimenting with different shades. Their polishes provide excellent coverage and last longer than many budget alternatives.
Wet n Wild delivers vibrant colors at incredibly low prices, making it easy to build a rainbow collection without very costly. Their electric blue and hot pink shades are particularly popular among 12-year-olds who love bold, eye-catching colors.
Sally Hansen combines quality with affordability, offering everything from classic nudes to trendy neon greens. Their wide brush applicators make it easier for beginners to achieve smooth, even coats.
DIY Tools from Around the House
Tape becomes your best friend for creating perfect striped patterns and geometric designs. Simply apply strips where you want clean lines, paint over them, and peel away for professional-looking results.
Stickers from your create drawer can create instant nail art patterns when placed strategically on painted nails. Remove them while the polish is still slightly wet for crisp edges.
Toothpicks work wonderfully as dotting tools for creating polka dots and small details. Dip the pointed end in polish and gently dot onto your nails for perfectly round shapes.
Bobby pins create varying dot sizes depending on which end you use. The rounded tip makes larger dots while the wavy end can create interesting textured patterns.
Basic Nail Art Kit Essentials
Nail polish remover should be acetone-free to protect young nails from harsh chemicals. This gentler formula effectively removes polish without causing dryness or damage.
Base coat creates a smooth foundation and helps your nail art last longer. It also protects natural nails from staining, especially important when using darker colors.
Top coat seals in your designs and adds glossy shine that makes any nail art look professional. It also prevents chipping, extending the life of your creative work.
Nail art brushes in various sizes allow for detailed work and precise application. A thin liner brush, flat brush, and dotting tool cover most basic nail art needs.
Quick 15-Minute Nail Designs for Busy Schedules

We understand that busy schedules shouldn’t prevent you from expressing your creativity. These time-saving designs let you achieve beautiful nails without spending hours perfecting each detail.
One-Color Applications with Sparkle
Monochromatic sparkle designs transform ordinary polish into glamorous looks using just one base color and a sparkly topcoat. Apply your favorite shade as usual, then add a glitter topcoat while the base is still slightly tacky for better adhesion. Holographic topcoats create rainbow effects that catch light beautifully, while chunky glitter adds texture and dimension.
Single accent sparkles focus attention on one or two nails for maximum impact with minimal effort. Choose your ring finger or thumb for the sparkle treatment, keeping other nails in a complementary solid color. Fine glitter polishes blend seamlessly, while larger hexagonal glitters create bold statement looks.
Ombre sparkle effects blend solid color into glitter for a gradient appearance that’s surprisingly easy to achieve. Start with your base color, then dab glitter polish onto a makeup sponge and press it onto the nail tip. Blend downward for a smooth transition that looks professionally done.
Simple Accent Nail Ideas
Striped accent nails add visual interest using tape or thin nail art brushes to create clean lines. Place strips of tape across wet polish, paint over with a contrasting color, then remove tape immediately for crisp edges. Diagonal stripes create ever-changing movement, while horizontal lines offer classic elegance.
Dot accent patterns use simple dotting tools or bobby pins to create playful designs in minutes. Create flower patterns with five dots arranged in a circle, or make polka dot accents using different sized tools. Rainbow dots across all nails create cheerful patterns that work with any outfit.
Heart accent designs bring romance to your look using a simple two-dot technique that forms perfect heart shapes. Place two dots side by side, then use a toothpick to drag downward from the center to create the heart’s point. Multiple tiny hearts scattered across accent nails create whimsical patterns.
Easy Geometric Patterns
Chevron patterns create trendy zigzag designs using strips of tape as guides for perfectly straight lines. Apply base color, place tape in V-shaped patterns, then paint over with accent colors before removing tape. Metallic chevrons over pastel bases create sophisticated looks that aren’t too bold for everyday wear.
Diagonal stripe combinations offer endless possibilities using different widths and colors to create unique patterns. Wide stripes create bold statements, while thin pinstripes add subtle detail. Alternate between two complementary colors for classic appeal, or use rainbow stripes for playful summer vibes.
Triangle accent shapes bring modern geometric flair using small pieces of tape cut into triangular stencils. Position triangles at nail tips for negative space designs, or scatter them across nails for contemporary patterns. Gradient triangles using similar shades create depth and dimension that looks professionally crafted.
Nail Safety Guidelines Every 12 Year Old Should Know

Understanding proper nail safety becomes essential as we explore creative nail designs. We want to protect our nails while expressing our unique style through beautiful art.
Avoiding Harmful Chemicals
Non-toxic products should always be our first choice when selecting nail polishes and treatments. We need to check labels carefully and avoid products containing formaldehyde, which can cause serious health issues over time.
Chemical-free alternatives offer safer options for young nail enthusiasts. We can find excellent polishes specifically designed for children that provide vibrant colors without harsh ingredients.
Water-based formulas work exceptionally well for beginners since they’re easier to apply and remove. We should look for brands that clearly label their products as “3-free” or “5-free” to ensure we’re avoiding the most dangerous chemicals.
Reading ingredient lists helps us make informed decisions about what we put on our nails. We must remember that our nail beds can absorb chemicals, making safe product selection crucial for our health.
Preventing Nail Damage
Proper application techniques protect our natural nails from unnecessary stress and breakage. We should always start with clean, dry nails and apply thin, even coats rather than thick layers.
Gentle removal methods prevent peeling and weakening of our nail surface. We need to use acetone-free removers and avoid picking or peeling off polish, which can remove layers of our natural nail.
Base coat protection creates a barrier between our nails and colored polish. We should never skip this step since it prevents staining and helps polish adhere better.
Avoiding excessive filing keeps our nails strong and healthy. We must file in one direction only and avoid aggressive back-and-forth motions that can cause splits and breaks.
When to Take Breaks from Polish
Regular polish-free periods allow our nails to breathe and recover from constant product use. We should plan at least one week each month without any nail polish to maintain optimal nail health.
Short duration wear works better for artificial nails and gel products. We need to limit fake nail applications to special occasions and remove them after just a few days to prevent long-term damage.
Healthy nail indicators tell us when it’s time for a break from polish. We should watch for yellowing, brittleness, or unusual texture changes that signal our nails need recovery time.
Moisturizing during breaks helps restore our nails’ natural strength and flexibility. We can use cuticle oil and hand cream daily during polish-free periods to keep our nails in excellent condition.
Conclusion
We’ve shown you that creating beautiful nail art doesn’t have to be complicated or expensive. With just a few basic supplies and simple techniques you can achieve stunning looks that reflect your personality while staying age-appropriate.
Remember that healthy nails are the foundation of any great manicure. Take care of your nails with proper hygiene and moisturizing and don’t forget to give them breaks between polish applications.
Whether you’re getting ready for school or a special celebration there’s always a perfect nail design waiting to be discovered. Start with the basics and gradually build your skills – before you know it you’ll be creating nail art that’ll make your friends ask for tutorials!
Frequently Asked Questions
What nail polish colors are best for 12-year-olds?
Soft pastels like baby pink and lavender work great as foundation colors, while bright summer shades like coral and turquoise add a playful touch. Metallic pastels provide extra dimension, and classic clear or nude tones offer a sophisticated yet youthful look that’s perfect for school and various occasions.
How can I create simple nail art designs at home?
You can create stunning designs using household items! Try polka dots with bobby pins, stripes with clear tape, or gradient ombre effects with makeup sponges. These beginner-friendly techniques require no special tools and allow you to experiment with different patterns and colors easily.
Are there school-appropriate nail designs for tweens?
Yes! Subtle French manicures with pastel tips, light glitter accents, and natural finishes using clear or nude polishes are perfect for school. These designs allow personal expression while adhering to most dress codes and maintaining a sophisticated yet age-appropriate appearance.
What supplies do I need for budget-friendly nail art?
Start with affordable nail polish brands like Revlon or Wet n Wild, acetone-free remover, base and top coats, and basic nail art brushes. Use household items like tape, stickers, and toothpicks as DIY tools. This basic kit lets you create professional-looking designs without expensive products.
How can I keep my nails healthy while doing nail art?
Practice proper nail hygiene with daily cleaning and regular handwashing. Trim nails weekly, use acetone-free polish removers, and take regular breaks from polish. Moisturize daily and use gentle application techniques with thin coats to prevent damage and maintain strong, healthy nails.
What are some quick nail designs for busy schedules?
Try 15-minute designs like one-color applications with sparkly topcoats, simple accent nails with dots or stripes, or easy geometric patterns like chevrons and triangles. These time-saving techniques let you achieve trendy looks even with a packed schedule.
How do I create themed nail art for special occasions?
For holidays, try candy cane stripes for Christmas, ghost motifs for Halloween, or bunny designs for Easter. Birthday celebrations can feature colorful balloons and cake patterns, while sports fans can showcase team colors and logos to express their loyalty.
What safety guidelines should I follow for nail art?
Choose non-toxic, age-appropriate products and read ingredient labels carefully. Use proper application techniques with thin coats, gentle removal methods, and take regular breaks from polish. Always prioritize nail health over trendy looks and moisturize regularly during polish-free periods.


