We’ve all been there – staring at our nails wondering how to make them truly special and uniquely ours. Initial nail art has become one of the hottest trends in nail design, offering a perfect way to personalize your manicure while making a bold statement. Whether you’re looking to showcase your own initials or honor someone special, these designs transform ordinary nails into conversation starters.
The beauty of initial nail ideas lies in their versatility and endless creative possibilities. From elegant script letters adorned with crystals to bold block letters in vibrant colors, there’s an initial design that matches every personality and style preference. We can incorporate initials into French tips, ombre backgrounds, or even geometric patterns for a modern twist.
Ready to discover initial nail designs that’ll have everyone asking about your stunning manicure? We’ve gathered the most inspiring and achievable initial nail art ideas that you can recreate at home or request at your next salon visit.
Classic Monogram Initial Nail Designs
Classic monogram initial nail designs offer timeless elegance that never goes out of style. These sophisticated looks bring a personal touch to your manicure while maintaining an air of refined beauty.
Single Letter Accent Nails
Single letter accent nails create a subtle yet personalized statement that’s perfect for everyday wear. We recommend placing your initial on the ring finger of each hand using a contrasting color to make it pop against your base shade. Gold foil letters on nude or blush pink bases work beautifully for professional settings while white initials on black backgrounds create striking contrast for evening events.
Placement matters when designing single letter accents. Consider positioning the initial slightly off center toward the cuticle area to create visual interest and prevent the letter from appearing too centered or static. Size your letters to fill approximately 60% of the nail width for optimal proportion and readability.
Full Set Monogram Patterns
Full set monogram patterns allow you to showcase your initials across all ten nails in coordinated designs. We suggest alternating between your first and last initial on different fingers or creating a pattern where each nail features the same initial in varying fonts or colors. Navy blue backgrounds with white serif initials provide a classic preppy aesthetic while burgundy bases with gold script letters offer luxurious appeal.
Pattern consistency creates visual harmony across your full set design. Try using the same initial size and placement on corresponding fingers (thumb to thumb, index to index) while varying the background colors in complementary shades. This approach maintains cohesion while adding visual depth to your overall manicure.
Vintage Script Style Initials
Vintage script style initials bring old industry charm to modern nail art with their ornate flourishes and decorative elements. We love recreating Victorian era lettering with delicate serifs and swirling tails that extend beyond the letter’s main body. These designs work exceptionally well on almond or coffin shaped nails where the extended canvas allows for proper letter proportion.
Execution of vintage script requires careful attention to line weight and spacing. Start with thin strokes for the main letter body then add thicker elements for downstrokes and decorative flourishes. Metallic gold or silver polish enhances the vintage aesthetic while deep jewel tones like emerald or sapphire provide rich backgrounds that make script letters shine.
Modern Minimalist Initial Nail Art

Modern minimalist initial nail art embraces simplicity while maintaining sophisticated personal touches. We focus on soft neutral shades, clean lines, and subtle embellishments to create elegant designs that highlight initials without overwhelming the overall look.
Clean Line Letter Designs
Clean line techniques deliver crisp, precise letters using fine brushes or specialized nail art pens. We recommend painting a single initial directly onto each nail, emphasizing neatness and visual balance to ensure letters remain legible. The placement typically centers on the nail or positions near the tip, sometimes paired with minimalist accents like single dots or thin stripes.
Application Tips:
- Use fine brushes for sharp, controlled strokes
- Position letters at nail center or tip for optimal balance
- Add single dots or thin stripes as complementary accents
- Maintain consistent letter sizing across all nails
Negative Space Initial Techniques
Negative space designs incorporate the natural nail as part of the artwork, creating breathable and light manicures. We outline or partially fill letters while allowing portions to fade into the exposed nail surface. This approach works exceptionally well for both short and long nails, maintaining an airy aesthetic that feels modern and fresh.
Design Benefits:
- Creates breathable, lightweight manicures
- Suits both short and long nail lengths
- Maintains airy, contemporary aesthetic
- Reduces overall design complexity
Geometric Initial Shapes
Geometric initial designs combine lettering with structured shapes like triangles, squares, and fine lines for modern edge. We enclose initials within geometric frames or interweave them with angular patterns to create sophisticated contrast. Accent nails feature single, bold geometric shapes with centrally placed initials for visual emphasis.
Popular Geometric Elements:
- Triangular frames surrounding initials
- Square borders with centered letters
- Angular pattern integration
- Bold geometric accent nail placement
These techniques maintain sophisticated aesthetics through minimal color palettes in nude, pale pink, or gentle greys, with gold, silver, or small pearl accents for elegant finishing touches.
Glitter and Glam Initial Nail Ideas

Transform your initial nail art into dazzling statement pieces with sparkles, shine and luxurious embellishments. These glamorous techniques elevate simple lettering into eye-catching masterpieces perfect for special occasions or when you’re ready to make your nails the center of attention.
Sparkly Letter Overlays
Create dimensional letters by layering glitter polish over your base initial design for maximum impact. We recommend painting your chosen letter with regular polish first, then adding a sparkly overlay with glitter polish to create depth and brilliant shine that catches light from every angle.
Apply glitter strategically using various techniques like full coverage for bold statements, gradient fading for subtle elegance, or concentrated sparkle just around the letter edges. Clear polish works beautifully as a base for this technique, allowing the glitter to take center stage while maintaining the letter’s crisp definition.
Experiment with glitter sizes from fine micro-glitter for sophisticated shimmer to chunky hexagonal pieces for dramatic texture. Different glitter types create unique effects when layered over initials, giving you endless creative possibilities to match your personal style.
Holographic Initial Effects
Holographic polish transforms simple initial designs into mesmerizing 3D effects that shift colors as you move your hands. This rainbow-reflecting finish creates an almost magical quality that makes your initials appear to dance with light and movement.
Choose complementary colors when selecting holographic polish to enhance your initial design rather than compete with it. We suggest applying holographic polish in thin, even coats to maintain the letter’s readability while maximizing the prismatic effect.
Layer holographic elements over painted initials or use holographic polish as the primary medium for creating the letters themselves. Both approaches deliver stunning results, with layered applications offering more dramatic color shifts and direct application providing cleaner letter definition.
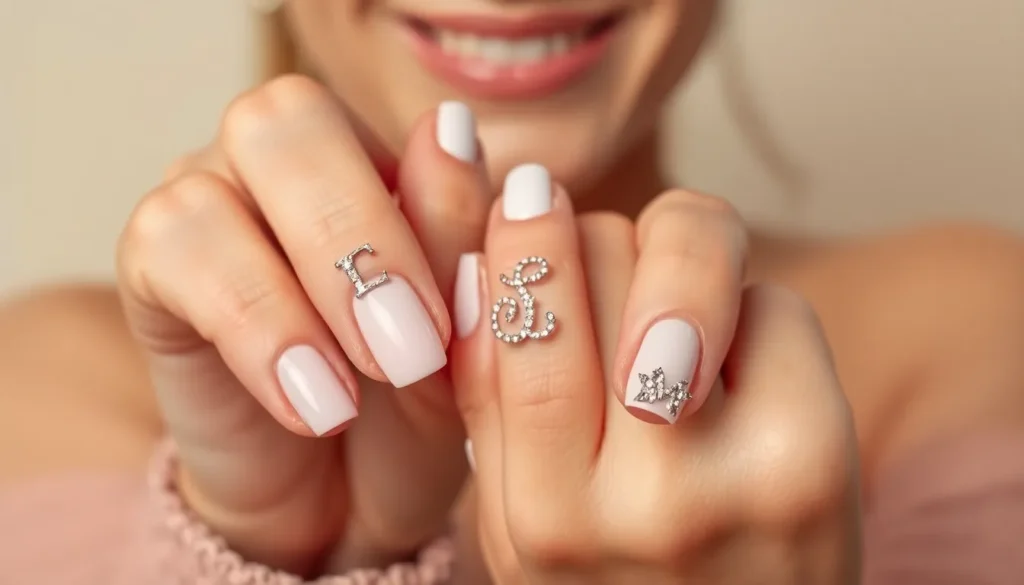
Crystal Embellished Monograms
Rhinestones and crystals add luxurious sophistication to initial nail designs, creating jewelry-like effects that elevate your manicure to formal elegance. Small crystals placed strategically around painted initials create beautiful frames that enhance the letter without overwhelming the design.
Position embellishments carefully by placing them either directly on top of painted letters for dimensional texture or around the perimeter for elegant borders. We find that using nail glue or thick topcoat ensures crystals stay securely attached throughout wear.
Select crystal sizes that complement your nail length and initial size, with smaller stones working best for delicate script letters and larger crystals improving bold block initials. Mix different crystal sizes within the same design to create visual interest and professional-looking sophistication.
French Manicure Initial Nail Variations

French manicures get a personalized upgrade when we add initials to these timeless designs. This elegant combination creates sophisticated nail art that’s perfect for special occasions or everyday wear.
Classic French with Initial Tips
Classic French manicures with initial tips transform the traditional white tip into a canvas for personal expression. We recommend placing initials directly on the white tip area using contrasting colors like gold, silver, or black for maximum visibility. Bold lettering works best on longer nails, while delicate script suits shorter lengths perfectly.
The sophisticated look emerges when we use metallic shades for the initials against crisp white tips. Gold initials create warmth and luxury, while silver offers a modern, sleek appearance. Black lettering provides striking contrast that commands attention without overwhelming the classic French aesthetic.
Reverse French Initial Designs
Reverse French manicures flip the traditional design by placing color at the cuticle area instead of the tip. We position initials either on the colored base section or at the natural nail tip for creative flexibility. This modern twist allows for bolder color choices while maintaining elegance through strategic initial placement.
Bright colors like coral, navy, or emerald green work exceptionally well for the reverse French base. We suggest using complementary or contrasting colors for the initials to create visual interest. Placement at the tip area creates a balanced look, while positioning initials on the colored base makes a stronger statement.
Colored French with Monogram Accents
Colored French tips with monogram accents combine vibrant hues with personalized lettering for a playful yet refined appearance. We recommend selecting tip colors that complement your skin tone while choosing monogram colors that create sufficient contrast for readability. Pink glitter French tips paired with white or gold initials deliver a fun, eye-catching combination.
Monogrammed designs work beautifully when we coordinate the initial color with other nail art elements. Red glitter initials on classic white French tips create stunning contrast, especially on stiletto or almond shapes. We suggest adding rhinestone accents around the initials for extra glamour and dimension that elevates the overall design.
Seasonal Initial Nail Art Concepts

We’ll explore how seasonal themes can transform your initial nail art into designs that perfectly capture the essence of each time of year.
Spring Floral Initial Backgrounds
Floral patterns bring spring’s freshness to your initial designs with delicate cherry blossoms, daisies, or roses surrounding your chosen letters. We recommend using nail stickers for precise application or trying hand painted techniques if you’re comfortable with detailed work. Pastel colors create the perfect backdrop for these floral elements, with soft pinks, lavenders, and mint greens complementing the botanical themes beautifully.
Minimalist approaches work best when you keep your initial bold and use just a few floral accents to maintain elegance without overwhelming the design. Consider placing small flower clusters near the base of your letter or creating a subtle vine pattern that frames your monogram.
Summer Beach-Themed Letter Designs
Seashells and stars transform your initials into coastal masterpieces perfect for vacation season. We suggest incorporating small starfish designs or delicate shell patterns around your letters to evoke that beachy atmosphere you’re craving. Bright colors amplify the summer vibe with vibrant coral, turquoise, and sunflower yellow creating stunning contrast against your chosen letters.
Ocean inspired elements like tiny waves or sand dollar motifs can fill negative spaces around your initials. Consider using these beach themes on accent nails while keeping your initials prominent on the ring finger for maximum impact.
Fall Autumn Leaf Initial Patterns
Leaf motifs capture autumn’s warmth using gold, orange, and deep red shades to create cozy seasonal atmosphere around your letters. We love how these earth tones complement both script and block letter styles equally well. Acorns and twigs add rustic charm when placed strategically near your initials, creating organic patterns that feel naturally balanced.
Layered textures work beautifully in fall designs, where you can combine matte finishes on leaves with glossy letters for dimensional interest. Try gradient techniques that blend autumn colors from light amber to deep burgundy for sophisticated seasonal transitions.
Winter Holiday Initial Decorations
Snowflakes and snowmen bring festive magic to your initial nail art during the holiday season. We recommend using white or silver accents to create delicate snowflake patterns that don’t compete with your letter design. Holly and berries offer classic holiday elegance with deep green leaves and bright red berry clusters framing your chosen initials perfectly.
Metallic accents elevate winter designs with gold or silver details that catch light beautifully during holiday gatherings. Consider adding tiny rhinestones to mimic ice crystals or using glitter polish to create that fresh snow sparkle effect around your monogram letters.
Nail Shape Considerations for Initial Designs

We’ve explored beautiful seasonal themes and sparkling embellishments, but selecting the right nail shape creates the foundation for stunning initial designs. Your nail shape determines how initials will appear and which placement techniques work best for maximum visual impact.
Best Initial Layouts for Square Nails
Square nails provide the perfect canvas for bold, geometric initial designs that make a statement. We recommend positioning letters centrally on these nails since the defined edges naturally frame your initials with clean precision. Bold block letters work exceptionally well on square shapes, creating modern and sophisticated looks that highlight the nail’s structured appearance.
French tips paired with square nails offer an elegant backdrop for initial placement at the tip area. We suggest using contrasting colors to ensure your letters pop against the crisp white or colored tip. Solid color bases on square nails also create excellent foundations for both minimalist single letters and elaborate monogram designs.
Oval Nail Initial Placement Tips
Oval nails deliver versatility and create a naturally slimming effect that complements both simple and intricate initial designs. We find that central placement works beautifully on oval shapes, but slightly off-center positioning can create more ever-changing visual balance. The smooth, flowing surface of oval nails accommodates everything from delicate script lettering to bold contemporary fonts.
Vertical letter placement follows the natural elongation of oval nails, making your fingers appear longer and more elegant. We recommend this technique especially for single initial accent nails or when creating flowing script designs. The curved edges of oval nails also provide excellent opportunities for wrapping decorative elements around your initials.
Coffin Shape Initial Positioning
Coffin nails offer dramatic length and taper that creates the perfect canvas for statement-making initial designs. We suggest placing initials vertically along the nail’s length to accentuate the dramatic silhouette and create striking visual impact. This vertical positioning works particularly well with elongated script fonts and bold lettering styles.
The tapered shape of coffin nails provides unique opportunities for creative initial placement near the tip area. We find that positioning letters closer to the nail’s widest point creates better balance and prevents designs from appearing cramped. Multiple initials can be arranged in cascading patterns that follow the nail’s natural curve from base to tip.
Color Combinations for Initial Nail Art

We’ll explore the most striking color combinations that make your initial nail art truly pop. Color choices transform simple letter designs into captivating statement pieces that reflect your personal style.
Contrasting Color Initial Schemes
Monochromatic with Accent creates visual drama by using different shades of the same color family while featuring one nail with a contrasting hue to spotlight your initial. We recommend pairing deep navy bases with bright coral letters or emerald green backgrounds with golden yellow initials for maximum impact.
Neutral Base with Bright Initials offers versatility by combining beige, white, or soft gray foundations with vibrant letter colors. This approach works exceptionally well for professional settings where you want personality without overwhelming boldness. Consider pairing cream bases with electric blue letters or soft taupe with hot pink initials.
Complementary Color Pairs use opposite colors on the color wheel to create striking visual tension. We suggest combining purple bases with yellow letters, orange backgrounds with blue initials, or red foundations with green lettering for eye catching results.
Monochromatic Initial Palettes
Single Color Gradation involves transitioning from light to dark shades of one color across your nails while maintaining the same letter color throughout. This sophisticated approach creates depth and visual interest without color chaos. Start with the palest shade on your thumb and progress to the deepest tone on your pinky.
Tonal Variations use different intensities of the same hue to create subtle sophistication. We recommend using dusty rose, rose, and deep rose combinations or incorporating pale blue, medium blue, and navy progressions for cohesive elegance.
Shade Layering builds complexity by applying multiple coats of the same color at varying opacities. This technique creates natural depth while keeping your initial design harmonious and refined.
Metallic Initial Accent Options
Gold or Silver Accents add luxury to any color background while highlighting your initials with sophisticated shimmer. Gold works beautifully with warm tones like coral, burgundy, and deep purple, while silver complements cool shades including navy, emerald, and sapphire blue.
Metallic Foil Applications create detailed, mirror like effects that draw immediate attention to your letters. We suggest applying foil over tacky base coat for maximum adherence and shine. This technique works particularly well with block letters and geometric initial designs.
Chrome Powder Finishes deliver ultra reflective surfaces that make your initials appear three dimensional. Apply chrome powder over gel polish while it’s still tacky for professional looking results that rival salon quality work.
Rose Gold Combinations offer trendy warmth that pairs exceptionally well with blush pink, soft gray, and cream bases. This metallic option provides modern elegance without the boldness of traditional gold or silver choices.
DIY Initial Nail Art Techniques

Creating stunning initial nail art at home becomes achievable with the right techniques and tools. We’ll explore three effective methods that deliver professional-looking results without expensive salon visits.
Hand-Painting Initial Methods
Hand painting initials offers the most creative freedom and customization options for our nail art designs. We recommend using a small nail polish brush to paint initials directly onto the nail surface for precise control. Choosing contrasting colors makes the initials stand out beautifully against the base color, creating visual impact that catches the eye.
Practice becomes essential when mastering this technique, especially with simple fonts that ensure neatness and readability. We suggest starting with block letters before attempting cursive or script styles. Steady hands develop over time, so patience helps us achieve the crisp lines we want for our initial designs.
Stamping Initial Designs
Stamping provides consistent letter shapes and saves time compared to freehand painting techniques. We use nail stamping plates that feature various letter designs, allowing us to create uniform initials across multiple nails. The process involves applying a base coat first, then placing the stamp over a small area of polish on the nail.
Scraping off excess polish ensures clean transfer when we press the stamp onto the nail surface. We find that stamping works best with specialized stamping polishes that have higher pigmentation. Multiple stamping plates give us different font options, from elegant script to bold block letters that match our desired aesthetic.
Stencil Initial Application Tips
Stencils deliver precise letter shapes with minimal artistic skill required from the user. We use nail stencils or vinyls with letter shapes that adhere temporarily to the nail surface. Placing the stencil over the nail creates a template that we paint with contrasting colors for sharp, defined edges.
Removing the stencil carefully prevents smudging and maintains clean lines around our initial designs. We recommend using a thin brush or makeup sponge to dab polish rather than brush strokes that might seep under the stencil edges. Timing matters when removing stencils, as we need the polish slightly tacky but not completely wet to avoid smearing our carefully crafted letters.
Professional Initial Nail Service Options

We’ve covered DIY techniques, but professional salons offer expert services that can elevate your initial nail art to the next level. Professional nail technicians have the skills and tools to create intricate designs that might be challenging to achieve at home.
Salon Initial Nail Art Pricing
Salons typically charge $5–$15 per nail for basic initial accent nails, which adds to your standard manicure or gel service cost of $25–$60. Simple letter designs on one or two accent nails fall within this basic pricing range. More intricate customized designs command higher fees, sometimes exceeding $20 per nail for complex artwork. Full hand initial designs may come with set pricing that covers all ten nails at once.
Acrylic services with initial art generally cost more than gel applications due to the extended application time. Press-on nails with custom initials offer a middle ground pricing option between basic and premium services. Hand-painted designs require more time and artistic skill, which reflects in the pricing structure.
Custom Initial Design Consultations
Many salons provide consultation sessions where nail technicians discuss your vision for initial nail art. These meetings allow you to explore design ideas, placement options, and color preferences before committing to the service. Technicians can show you examples of different initial styles, from minimalist to elegant to whimsical themes.
In-person consultations let you see color swatches and nail shape options firsthand. Virtual consultations have become increasingly popular, allowing you to share inspiration photos and discuss your preferences remotely. These sessions ensure your final design meets your expectations and fits your lifestyle needs.
Consultations also help determine the best nail shape for your chosen initial design. Technicians can recommend whether your desired letters will work better on square, oval, or coffin shaped nails based on your natural nail bed.
Maintenance Tips for Initial Nail Art
Professional initial nail art requires exact care to maintain its appearance and longevity. Avoiding harsh chemicals and prolonged water exposure helps preserve the design integrity. Wearing gloves during household chores protects your initial nail art from damage and fading.
Reapplying top coat every few days keeps the design looking fresh and adds extra protection. Gel and acrylic nails with initial art need fills or touch-ups every 2–3 weeks to maintain their appearance. Hand-painted initial designs require gentler handling to prevent chipping or peeling.
Never pick or peel at your initial nail art, as this can damage both the design and your natural nails underneath. Proper maintenance extends the lifespan of your professional initial nail service significantly. Scheduling regular appointments with your nail technician ensures consistent care and touch-ups when needed.
Conclusion
We’ve explored the endless possibilities that initial nail art brings to your manicure routine. From classic monograms to glittery statement pieces these personalized designs offer something for every style preference and skill level.
Whether you’re drawn to minimalist elegance or bold seasonal themes initial nails provide the perfect canvas for self-expression. The beauty lies in their versatility – you can create stunning looks at home using simple DIY techniques or elevate your design with professional salon services.
Remember that the key to gorgeous initial nail art is finding the right balance between your chosen style nail shape and color palette. With proper maintenance and care your personalized manicure will continue to make a statement wherever you go.
Start experimenting with these ideas and discover how initial nail art can transform your everyday look into something uniquely yours.
Frequently Asked Questions
What is initial nail art?
Initial nail art is a personalized manicure trend where individuals showcase their own initials or those of someone special on their nails. This versatile design can range from elegant script lettering to bold block letters, allowing for creative expression through various styles like French tips, geometric patterns, and monogram designs.
Which nail shapes work best for initial designs?
Square nails are ideal for bold, geometric initial designs with central placement. Oval nails offer versatile positioning options for balanced looks. Coffin nails work well with vertical letter placement that accentuates their dramatic length. Each shape requires different initial positioning to maximize visual impact and maintain design harmony.
How much does professional initial nail art cost?
Basic initial nail art typically costs $5 to $15 per nail at professional salons. More complex designs with intricate details, crystals, or special effects can exceed $20 per nail. Many salons offer consultations to help determine the best design and nail shape for your initials.
Can I create initial nail art at home?
Yes, you can create initial nail art at home using three main techniques: hand-painting for creative freedom, stamping for consistent letter shapes, and stencils for precise application. Using contrasting colors, proper tools, and following timing guidelines for stencil removal will help achieve professional-looking results.
What color combinations work best for initial nail art?
Effective color combinations include contrasting schemes like monochromatic bases with accent nails, neutral backgrounds with bright initials, and complementary color pairs. Monochromatic palettes offer sophisticated elegance, while metallic accents in gold, silver, chrome, or rose gold can enhance visual appeal and create stunning statement pieces.
How can I incorporate seasonal themes into initial nail art?
Seasonal initial nail art can feature spring florals with cherry blossoms and pastels, summer beach themes with seashells and vibrant colors, fall designs with warm earth tones and leaf motifs, or winter decorations with snowflakes and metallic accents. Keep initials as the focal point while adding seasonal charm.
What are the best techniques for glitter and glamorous initial designs?
For glamorous looks, try sparkly letter overlays using glitter polish layered over base designs. Holographic effects create mesmerizing 3D visuals, while crystal-embellished monograms add jewelry-like sophistication. Strategic crystal placement and appropriate sizing enhance designs without overwhelming the overall aesthetic.
How do I maintain professional initial nail art?
To preserve initial nail art, avoid harsh chemicals, wear gloves during cleaning, apply top coat weekly for protection, and schedule touch-ups as needed. Proper maintenance extends the design’s lifespan and keeps the artwork looking fresh and vibrant longer.


