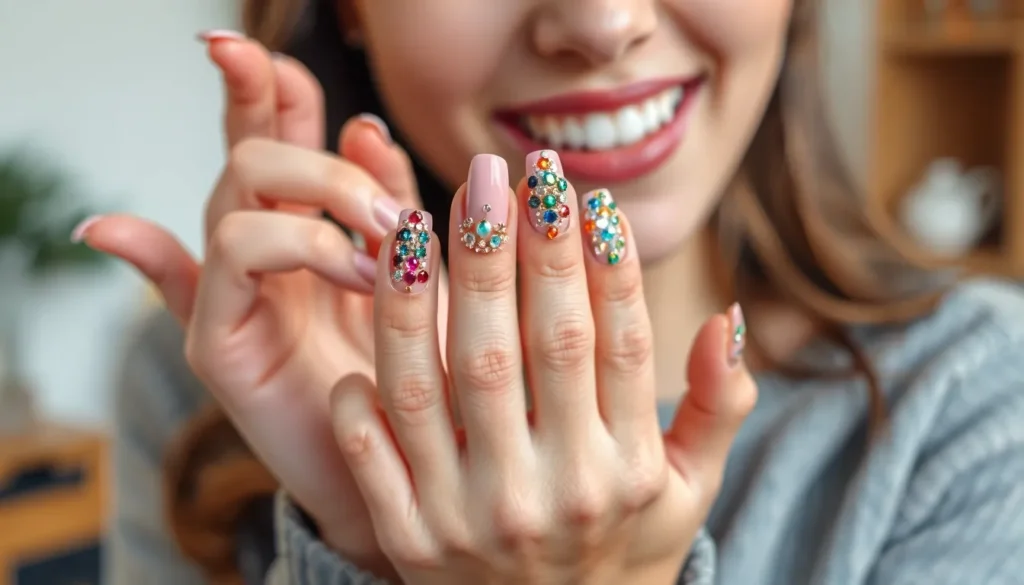
We’ve all been there – staring at our plain nails wondering how to add that perfect sparkle. Nail gems transform ordinary manicures into stunning works of art that catch light and turn heads wherever you go. From subtle single stones to elaborate crystal patterns these tiny treasures offer endless possibilities for self-expression.
Whether you’re preparing for a special occasion or simply want to elevate your everyday look nail gems deliver instant glamour. The best part? You don’t need professional skills to create magazine-worthy designs. With the right gems and a few simple techniques you’ll master this trend in no time.
We’re excited to share our favorite nail gem ideas that’ll inspire your next manicure adventure. From minimalist elegance to bold statement designs these creative concepts will help you discover your signature sparkle style.
Classic Single Gem Accent Nails
Single gem accents offer the perfect introduction to nail gem artistry without overwhelming your overall look. These timeless designs prove that sometimes less truly creates more impact.
Rhinestone Center Placement
Center placement transforms any manicure into an elegant statement piece. We recommend positioning a single rhinestone at the center of your ring finger nail for maximum visual impact. Clear or AB (aurora borealis) rhinestones work beautifully with any nail color, while colored stones like emerald or sapphire complement exact polish shades.
Application becomes effortless when you use a dotting tool or tweezers for precise placement. Start with a small drop of nail glue or clear topcoat at your desired location. Press the rhinestone gently into place and seal with another layer of topcoat for longevity.
Size selection depends on your nail length and personal preference. Smaller nails benefit from 2-3mm rhinestones, while longer nails can accommodate 4-5mm stones without appearing overwhelming.
Swarovski Crystal Tips
Swarovski crystals elevate your French manicure to luxury status. We love placing a single crystal at the center of each nail tip for a sophisticated twist on the classic French design. The superior cut and clarity of Swarovski stones create unmatched brilliance under any lighting.
Color coordination opens endless possibilities for customization. Match crystal colors to your outfit, season, or mood. Rose gold crystals complement warm skin tones, while silver crystals enhance cool undertones.
Professional longevity requires proper sealing techniques. Apply a generous layer of gel topcoat over the crystal, ensuring complete coverage around the edges. Cure under UV or LED light for maximum durability.
Pearl Drop Designs
Pearl accents bring timeless elegance to any nail design. We position single pearls near the cuticle area or at the base of accent nails for a sophisticated drop effect. Natural white pearls create classic appeal, while colored pearls add contemporary flair.
Texture variation adds visual interest to your pearl designs. Combine smooth round pearls with textured or baroque shapes for dimensional appeal. Different pearl sizes create a graduated effect that draws the eye naturally.
Seasonal adaptation makes pearl designs versatile year round. Cream pearls complement autumn and winter palettes, while iridescent pearls capture spring and summer light beautifully. Layer multiple small pearls for special occasions or keep it minimal with single statement pieces.
Ombre Gem Gradient Techniques
 1")
Creating stunning gradient effects with nail gems transforms your manicure into a work of art that catches light beautifully. We’ll explore proven techniques that blend gems seamlessly for sophisticated ombre designs.
Light to Dark Crystal Transitions
Positioning smaller, lighter gems at the nail tip creates the foundation for perfect gradient transitions. Our technique begins with delicate clear or pale crystals placed near the free edge, gradually increasing gem size as we move toward the cuticle. Darker gems should be positioned closest to the base, creating natural depth that mimics professional salon work.
Color intensity builds naturally when we select gems in the same hue family. Start with pale pink crystals and progress to deep rose or burgundy stones for romantic looks. Silver to charcoal transitions work beautifully for edgy styles, while gold to bronze creates warm, luxurious effects.
Size variation enhances the gradient effect significantly. We recommend using 1.5mm gems at the tip, progressing to 2.5mm stones in the middle, and finishing with 3mm crystals near the cuticle. This dimensional approach adds visual weight that draws the eye naturally down the nail.
Multi-Color Stone Progressions
Rainbow effects bring vibrant energy to nail art through strategic color placement. Our preferred sequence follows the natural color spectrum: red gems at the cuticle, flowing through orange, yellow, green, blue, and finishing with purple crystals at the tip. This creates a miniature rainbow that sparkles with every hand movement.
Seasonal color progressions offer versatility throughout the year. Spring palettes might feature soft pastels flowing from mint green to lavender, while autumn designs could transition from warm amber through deep orange to rich burgundy. Winter themes work beautifully with icy blues melting into silver and white crystals.
Complementary color schemes create sophisticated contrast without overwhelming the design. We love pairing warm coral gems with cool teal stones, or combining soft peach crystals with sage green accents. These unexpected combinations create visual interest while maintaining elegance.
Fading Gem Density Patterns
Dense gem placement near the cuticle establishes a strong foundation for fading effects. We start by covering approximately 70% of the nail base with closely packed crystals, leaving minimal space between each stone. This creates a luxurious, jewelry like appearance that commands attention.
Gradual spacing increases as we move toward the nail tip. Our technique involves placing gems with slightly wider gaps in the middle section, then positioning just 2 3 accent stones near the free edge. This creates natural flow that doesn’t overwhelm the nail’s proportions.
Strategic gem removal creates organic fading patterns. Rather than following rigid lines, we vary the fade pattern slightly on each nail for authentic, hand crafted appeal. Some gems might extend further down one side, creating asymmetrical beauty that looks intentionally artistic rather than mechanically perfect.
Geometric Gem Patterns and Shapes
 2")
Modern nail art takes on a sophisticated edge when we incorporate geometric patterns using carefully placed gems. These structured designs offer endless possibilities for creating contemporary looks that range from minimalist to boldly artistic.
Triangle Formation Layouts
Triangle patterns create striking focal points that instantly modernize any manicure design. We recommend starting with three gems positioned at equal distances to form a perfect triangle shape on your accent nail. Smaller rhinestones work best for delicate triangle formations while larger crystals make bold statements on longer nails.
Cluster arrangements allow us to build complex designs by combining multiple triangle formations across the nail surface. Position triangles at varying angles to create ever-changing visual movement that catches light from different directions. We’ve found that alternating triangle sizes prevents the design from appearing too uniform while maintaining geometric precision.
Standalone shapes work beautifully when we want to keep the overall look clean and minimalist. Place a single triangle formation on the ring finger while keeping other nails neutral for maximum impact. This technique particularly shines when we use contrasting gem colors against the base polish.
Diamond Grid Arrangements
Grid patterns transform nails into stunning geometric masterpieces that showcase precision and style. We create these effects by placing diamond shaped gems in evenly spaced rows and columns across the nail surface. Start with smaller gems for intricate grids or choose larger diamonds for bold statement designs.
Accent nail applications make diamond grids more wearable for everyday occasions while still delivering visual impact. We suggest applying the full grid pattern to just one or two nails per hand rather than all five fingers. This approach prevents the design from becoming overwhelming while maintaining sophisticated appeal.
Mimic effects allow us to achieve the diamond grid look without using actual diamond shaped gems. Round or square rhinestones positioned in grid formation create similar visual impact at a fraction of the cost. We arrange these gems with consistent spacing to maintain the geometric integrity that makes this pattern so appealing.
Hexagonal Cluster Designs
Hexagonal formations bring architectural elegance to nail art through their naturally sophisticated shape and structure. We position six gems around a central stone to create perfect hexagon patterns that work beautifully as standalone designs or repeated elements. These clusters particularly shine when we use gradient color schemes within each hexagonal formation.
Mosaic combinations emerge when we blend hexagonal gems with triangular and diamond shapes for complex geometric artwork. Start with the hexagonal base pattern then fill surrounding spaces with complementary geometric forms. We’ve discovered that limiting the color palette to three tones prevents these intricate designs from appearing chaotic.
Asymmetrical arrangements offer creative freedom while maintaining the hexagonal theme throughout the design. Place hexagonal clusters at different positions across each nail rather than centering them uniformly. This technique creates organic flow while preserving the geometric structure that defines modern nail art trends.
Seasonal Gem Color Combinations
 3")
We’ll explore how different seasons inspire unique gem color palettes that perfectly complement your nail art throughout the year.
Spring Pastel Gem Palettes
Soft pinks, lilacs, mint greens, baby blues, and pale yellows create the perfect foundation for spring inspired nail designs. We recommend pairing these pastel polish bases with small, delicate crystals or pearls for a fresh, youthful appearance that captures the season’s renewal energy.
Lightly sprinkled gems mimic morning dew effects when strategically placed across the nail surface. We suggest using tiny clear crystals to enhance the dewy look, especially when combined with mint green or baby blue base colors.
Floral accent techniques work beautifully with spring palettes by incorporating small pearls as flower centers. We’ve found that combining soft pink gems with white pearl details creates stunning cherry blossom inspired designs that perfectly embody spring’s delicate beauty.
Summer Bright Stone Collections
Vibrant reds, electric blues, neon pinks, and teals dominate summer gem selections with their bold, energetic presence. We use chunky rhinestones, oversized charms, or holographic gems to match the season’s playful intensity and create eye catching focal points.
Mixed bright colors in different gem shapes deliver the ultimate summer nail art experience. We recommend combining electric blue rectangular stones with neon pink round gems for a playful, energetic summer style that captures the season’s vibrant spirit.
Holographic elements add extra dimension to summer designs when paired with bright base colors. We’ve discovered that teal polish backgrounds make holographic gems appear more ever-changing, creating stunning color shifts that change with movement and light.
Fall Earth Tone Crystals
Burnt orange, forest green, deep browns, and muted gold represent autumn’s rich color palette in nail gem applications. We combine these earthy polish shades with metallic gold gems or amber stones to create sophisticated seasonal designs.
Autumn leaf inspiration guides our approach to fall gem placement and color selection. We add hand drawn leaf details alongside tiny brown and orange stones to create designs that perfectly capture the season’s natural beauty and warmth.
Metallic gold accents enhance earth tone combinations by adding luxurious touches to fall designs. We’ve found that muted gold gems work particularly well with forest green bases, creating elegant contrasts that reflect autumn’s sophisticated color story.
Winter Ice-Inspired Gems
Silver, white, light blue, and clear or iridescent gemstones create the perfect winter wonderland aesthetic on nails. We use crystal clear rhinestones, silver glitter, or frosty blue gems to achieve sparkling, icy effects that capture winter’s magical appeal.
Geometric placements work exceptionally well with winter gem selections, creating structured designs that mirror ice crystal formations. We recommend arranging clear gems in linear patterns or snowflake shapes for authentic winter inspired nail art.
Gradient effects using iridescent stones create stunning transitions from clear to silver or light blue. We’ve perfected techniques that blend these cool tones seamlessly, resulting in designs that truly embody winter’s crystalline beauty and sophisticated elegance.
Statement Nail Gem Applications
 4")
Statement nail gem applications create bold, eye-catching designs that transform your manicure into a dramatic focal point. These techniques allow you to showcase your creativity while making a confident fashion statement.
Full Coverage Crystal Nails
Full coverage crystal nails involve encrusting the entire nail surface with small to medium-sized gems or crystals for maximum sparkle and impact. We recommend using gel as both an adhesive and top coat to secure gems directly onto the natural nail while providing added shine and durability. This technique creates a bright, reflective look that’s perfect for special occasions like weddings, parties, or red carpet events.
Application requires careful attention to detail. Start by applying a thin layer of gel to create a smooth base, then carefully place crystals across the entire nail surface using tweezers or a dotting tool. Work in small sections to prevent the gel from curing before you finish placement. Cure the design under a UV lamp to ensure lasting hold, then wipe away excess gel with a lint-free cloth to maintain crystal clarity.
The key to successful full coverage lies in minimizing air bubbles during application. Apply gel in slow, deliberate motions to avoid trapping air beneath the crystals. Choose crystals of varying sizes to fill gaps and create seamless coverage that catches light from every angle.
3D Gem Sculpture Techniques
3D gem sculpture techniques go beyond simple placement by creating raised, textured designs that add dimensional depth to your nail art. These methods involve building sculptural elements directly on the nail surface using gel or acrylic, then embedding crystals into the sculpted areas for added visual interest.
Start by creating a raised foundation using thick gel or acrylic material, building up areas like the apex or exact design elements. Shape your sculpture while the material is still workable, creating curves, peaks, or geometric forms that will hold your gems. Once the base structure is set, carefully embed crystals into the sculpted surface at varying heights to enhance the three-dimensional effect.
Distribution and thickness are crucial for maintaining wearability. Keep sculptural elements proportional to your nail size and lifestyle needs. Focus on creating focal points rather than covering the entire nail surface, which allows for comfortable daily wear while still achieving dramatic impact.
Oversized Statement Stones
Oversized statement stones serve as dramatic focal points that instantly elevate any nail design with their bold presence and luxurious appeal. These large, individual gems require stronger adhesives and specialized techniques to ensure they remain secure throughout wear.
We recommend using thick gel or resin as your primary adhesive for oversized stones. Create a small well in the gel before placing the stone, which helps distribute weight evenly and prevents lifting. The surrounding nail area should remain minimal and clean to let the statement stone command full attention.
Secure placement involves multiple curing cycles under a UV lamp. Apply gel around the stone’s base, cure partially, then add additional gel layers as needed for stability. Finish with a protective top coat that covers the stone’s edges without dulling its brilliance. This technique works particularly well for dramatic, high-fashion looks that demand attention at special events or photo shoots.
Mixed Media Gem Combinations
 5")
We’ll explore how combining different materials with nail gems creates depth and visual interest that surpasses single-element designs. These mixed media techniques allow you to experiment with textures and finishes for truly unique nail art.
Gems with Glitter Integration
Glitter ombré effects transform ordinary gem placement into mesmerizing gradient patterns that catch light from every angle. We start with a dense concentration of glitter and gems at the base, gradually tapering off towards the tip for a seamless transition.
Background glitter applications provide the perfect foundation for highlighting individual gems while adding playful vibrancy to your design. Place larger gems strategically over glitter gradients to create focal points that draw attention.
Accent placement techniques involve using glitter to frame or outline gem arrangements, creating definition between different elements. This approach works particularly well when you want to separate geometric gem patterns from the base color.
Crystal and Foil Pairings
Reflective surface combinations pair crystals with foil transfers to create stunning light play that amplifies the sparkle of your gems. Foils add an extra layer of sheen to the base color while providing contrast against crystal placements.
Metallic contrast applications combine different foil finishes with crystal gems for striking depth in your nail design. We recommend using chrome or holographic foils underneath clear crystals to maximize light reflection.
Transfer placement strategies involve applying foil elements first, then strategically placing crystals over exact areas to create dimensional layers. This technique ensures both materials maintain their individual properties while working together harmoniously.
Stone and Stud Combinations
Textured contrast designs combine smooth gems with metallic studs to create visual interest through opposing surface treatments. This combination works exceptionally well with geometric patterns where contrast enhances the structural elements.
Accentuation techniques use studs to highlight gem placements, creating bold and edgy looks that make statements. Place smaller studs around larger gems to create radiating patterns that draw the eye inward.
Geometric integration methods involve alternating between stones and studs in predetermined patterns to achieve balanced designs. We suggest using studs as corner elements in gem clusters to define boundaries and add architectural interest to your nail art.
Special Occasion Gem Designs
 6")
Creating memorable nail gem designs for life’s special moments transforms your manicure into a celebration centerpiece. We’ll explore how to create elegant, festive, and joyful nail art that perfectly complements any important occasion.
Wedding Day Elegant Gems
Elegant Gem Accents create the perfect bridal sophistication through delicate rhinestone and crystal arrangements. We recommend placing small gemstones in intricate patterns across your nails, with the ring finger receiving a single, stunning accent stone for subtle elegance. Delicate crystals work beautifully when arranged in flowing curves or small clusters that catch light without overwhelming your overall look.
Bridal Nail Art incorporates pearls and clear gems to achieve timeless wedding day beauty. We suggest starting with soft pastel base coats in champagne, blush, or classic nude tones before adding your pearl accents. Clear gems provide sophisticated sparkle while maintaining the refined aesthetic that complements wedding attire perfectly.
Holiday Themed Crystal Patterns
Christmas Sparkle brings festive cheer through red and green gem arrangements that capture holiday magic. We create holly leaf patterns using emerald gems for the leaves and tiny red stones for berries, adding glitter accents for extra seasonal sparkle. Christmas tree designs work beautifully on accent nails, using graduated green gems to form the tree shape with a golden star gem at the top.
New Year’s Glam transforms your nails into dazzling party accessories with dense metallic gem coverage. We recommend covering one or two statement nails completely with gold or silver gems while keeping other nails complementary with scattered accent stones. This approach creates maximum glamour for midnight celebrations while maintaining wearable elegance throughout the evening.
Birthday Celebration Stones
Birthday Bling delivers vibrant celebration energy through bold geometric gem patterns in multiple colors. We arrange colorful stones in triangular formations, diamond grids, or asymmetrical clusters that reflect party excitement and personal style. These designs work especially well when using gems that match your birthstone or favorite colors for personalized birthday glamour.
Candy Themed Nails captures playful birthday spirit using bright gems arranged in sweet, whimsical patterns. We create candy stripe effects with alternating colored gems, polka dot patterns using round stones, or even miniature candy shapes using rectangular and square gems. These designs add cheerful, youthful energy perfect for birthday celebrations of any age.
Nail Shape Specific Gem Placements
 7")
We’ll explore how different nail shapes create unique opportunities for gem placement, ensuring each design complements your natural nail architecture. Your nail shape determines the most flattering gem positioning techniques for maximum visual impact.
Stiletto Nail Gem Positioning
Stiletto nails offer dramatic potential with their sharp, pointed tips serving as natural focal points for gem placement. We recommend positioning large statement gems directly at the tip to emphasize the nail’s striking silhouette. Smaller stones work beautifully when arranged along the outer edges, following the nail’s curve to create an elongating effect.
Creating gradient effects becomes effortless on stiletto nails by placing a prominent gem at the tip and tracing smaller stones back toward the cuticle. This technique draws the eye along the nail’s length while maintaining the dramatic pointed aesthetic. Geometric arrangements particularly shine on stiletto shapes, with edge accentuation highlighting the nail’s inherent sharpness and creating modern, architectural designs.
Square Nail Crystal Layouts
Square nails provide the perfect stable canvas for both structured patterns and creative free-form gem arrangements. We position large crystals near the cuticle area or at the nail’s center to achieve optimal balance on the flat surface. The straight edges of square nails make them ideal for geometric rhinestone patterns and clean line arrangements.
Smaller stones create stunning effects when arranged in straight lines or precise geometric formations across the nail surface. We often place rhinestones at the corners or along the free edge to accentuate the nail’s clean, architectural lines. Cluster arrangements work exceptionally well on square nails, with gems framing the edges to create bold, statement looks that emphasize the shape’s modern appeal.
Round Nail Stone Applications
Round nails showcase gems beautifully through central placement or gentle curved arrangements that follow their soft, natural edges. We cluster gems near the cuticle area or arrange them in gentle arcs that mirror the nail’s rounded silhouette. The curved surface of round nails makes them perfect for subtle, elegant gem applications.
Small studs and flat-back stones work particularly well on round nails since they conform to the curved surface without creating bulk. Single prominent gems at the base create understated elegance, while delicate stone lines tracing the outer edge produce soft, feminine effects. We enhance these placements by varying gem sizes and shapes to add depth and visual interest while maintaining the nail’s graceful proportions.
DIY Gem Application Techniques
 8")
Creating stunning nail gem designs at home becomes achievable when you master the essential application techniques. We’ll guide you through selecting the right materials, setting up your workspace, and executing flawless gem placement every time.
Proper Adhesive Selection
Nail polish works exceptionally well for small gems and delicate designs. Clear nail polish provides a reliable base that secures lightweight rhinestones and tiny crystals without overwhelming the design. We recommend using a precision applicator like the Clear Sculptor to apply tiny dots of adhesive for more intricate patterns.
Specialized nail adhesives deliver superior holding power for substantial gemstones. These formulated adhesives create stronger bonds than regular polish, making them ideal for larger crystals or elaborate designs that require extra security. Professional nail adhesives also dry faster, reducing application time.
Gel or acrylic bases serve best for larger designs or full nail coverage. These thick mediums provide robust support for heavy gem applications and multi stone arrangements. We find that gel bases offer flexibility while maintaining durability, perfect for everyday wear with extensive gem work.
Tool Requirements and Setup
Rhinestone pickers feature wax ends that easily lift and position gems. These specialized tools eliminate the frustration of handling tiny crystals with your fingers, allowing precise placement every time. We suggest keeping multiple pickers with different tip sizes for various gem dimensions.
Tweezers provide essential control for securing gems in their final positions. Fine pointed tweezers let you make micro adjustments without disturbing surrounding elements. Quality tweezers prevent gems from slipping during the critical placement phase.
Toothpicks serve multiple functions in gem application processes. These simple tools apply small dots of top coat, create adhesive points, and help adjust gem positioning. We recommend wooden toothpicks over plastic versions for better control and precision.
Base coat and top coat products complete your essential supply list. Base coat creates the foundation for lasting adhesion, while top coat seals gems and prevents premature loss. High quality finishes extend the life of your gem designs significantly.
Step-by-Step Application Process
Prepare your nails by applying a thorough base coat layer. This essential first step creates the smooth surface necessary for proper gem adhesion. Allow the base coat to dry completely before proceeding to prevent smudging or uneven application.
Select and position your gems using a rhinestone picker tool. Place each gem onto a dot of adhesive or fresh top coat, working systematically across the nail. We recommend starting with larger statement pieces and filling in with smaller accents afterward.
Secure each gem by gently pressing with tweezers. Apply steady, even pressure to ensure complete contact with the adhesive surface. Avoid excessive force that might crack delicate crystals or disturb the base layer.
Finish your design with a protective top coat application. This final step seals gems in place and creates lasting shine. We suggest using the no glue method for delicate work: apply top coat, let it dry, then use a toothpick to add small dots of additional top coat for gem security.
Professional Gem Nail Maintenance
 9")
Maintaining your stunning nail gem designs requires proper care techniques and professional knowledge to ensure they last as long as possible while keeping your natural nails healthy.
Cleaning and Care Methods
Gentle cleaning preserves gem brilliance while protecting the adhesive bond underneath. We recommend using a soft brush or cotton swab dampened with water to clean around each gem carefully, avoiding harsh scrubbing motions that could loosen the stones.
Chemical exposure threatens gem stability and can weaken adhesive bonds over time. Wearing gloves during household chores protects your nail art from harsh cleaning products, bleach, and other damaging chemicals that could cause premature gem loss.
Water contact should be minimized whenever possible to maintain adhesive integrity. Long soaks in bathtubs, extended swimming sessions, or prolonged dishwashing can soften the adhesive and cause gems to fall off unexpectedly.
Cuticle oil application supports overall nail health and indirectly helps gem retention by keeping the nail plate strong and flexible. Apply a small amount of cuticle oil around the nail bed twice daily, being careful not to oversaturate the gem areas.
Longevity Enhancement Tips
Quality adhesive selection forms the foundation of long lasting gem applications. Professional nail technicians recommend using specialized nail gem adhesives rather than regular clear polish, as these formulas provide superior bonding strength and flexibility.
Surface preparation dramatically impacts adhesion according to professional application standards. Buffing the nail surface lightly before gem placement creates microscopic grooves that help the adhesive bond more effectively to the nail plate.
Strategic gem placement reduces loss risk by positioning stones away from high friction areas. Professionals place gems toward the cuticle area or nail center rather than near the free edge where they encounter more daily wear and tear.
Curing under UV or LED light strengthens the bond when using gel based adhesives. Professional salons typically cure gem applications for 30 to 60 seconds to ensure maximum durability and longevity.
Top coat application varies by design type and gem size. Smaller gems can often be sealed with a careful top coat application, while larger stones may require resin or gel around the edges to prevent lifting without covering the gem completely.
Safe Removal Techniques
Soaking in acetone dissolves adhesive bonds safely without damaging your natural nails. We recommend using pure acetone or professional nail soaks specifically designed for gem removal, allowing 10 to 15 minutes for complete adhesive breakdown.
Gentle lifting prevents nail damage during the removal process. Use an orangewood stick or metal cuticle tool to carefully lift each gem after soaking, never forcing or pulling stones that resist removal.
Filing around larger gems reduces lifting risk when gel adhesives are involved. Gently file around the stone edges before soaking to break the seal and prevent surrounding polish from lifting during removal.
Nail conditioning follows every removal session to restore moisture and strength to the nail plate. Apply cuticle oil and a strengthening base coat after removing all gems and adhesive residue to maintain nail health.
Forcing removal damages nail integrity and should always be avoided. If gems resist gentle lifting after adequate soaking, extend the soaking time rather than applying force that could cause nail plate damage or thinning.
Conclusion
We’ve explored the endless possibilities that nail gems offer for transforming your manicure game. From simple accent nails to elaborate 3D sculptures these versatile decorative elements can adapt to any style preference or skill level.
The key to success lies in understanding proper application techniques and choosing the right gems for your nail shape and occasion. Whether you’re creating subtle elegance for everyday wear or bold statement pieces for special events the techniques we’ve shared will help you achieve professional-looking results at home.
Remember that practice makes perfect when working with nail gems. Start with simpler designs and gradually work your way up to more complex patterns as your confidence grows. With proper maintenance and care your gem manicures will continue to sparkle and impress for days to come.
Frequently Asked Questions
What are nail gems and how do they transform regular manicures?
Nail gems are decorative crystals, rhinestones, and pearls that can be applied to nails to create stunning art. They transform ordinary manicures into eye-catching designs, ranging from subtle single-gem accents to elaborate full-coverage looks. These versatile accessories work for both special occasions and everyday wear, making any manicure look professionally crafted without requiring advanced skills.
Do I need professional training to apply nail gems successfully?
No, professional training isn’t necessary to achieve beautiful nail gem results. Simple techniques and basic tools like rhinestone pickers, tweezers, and quality adhesives can help anyone master this trend. With proper preparation, step-by-step application, and practice, beginners can create stunning designs at home using accessible methods outlined in detailed tutorials.
What’s the best way to start with nail gem designs as a beginner?
Start with classic single gem accent nails, which create maximum impact with minimal effort. Place one rhinestone or crystal on your ring finger’s center for elegant simplicity. Choose gem sizes appropriate for your nail length, use clear nail polish or specialized adhesive for attachment, and finish with a protective top coat for durability.
How do I choose the right nail gems for different nail shapes?
Different nail shapes require specific gem placement strategies. Stiletto nails work best with large statement gems at the tip and smaller stones along edges. Square nails are ideal for structured patterns with crystals near the cuticle. Round nails showcase gems through central placement or gentle curves that complement their soft edges and natural architecture.
What materials and tools do I need for DIY gem application?
Essential materials include quality gems (rhinestones, crystals, pearls), proper adhesives (clear nail polish for small gems, specialized nail glue for larger stones), and application tools like rhinestone pickers, tweezers, and toothpicks. You’ll also need base coat, top coat, and a clean workspace with good lighting for precise placement and professional results.
How can I make my nail gems last longer?
Enhance longevity by selecting quality adhesives, placing gems strategically to reduce loss risk, and avoiding excessive water contact. Clean gems gently with a soft brush, apply protective top coats, and handle daily activities carefully. Proper nail preparation with base coats and allowing adequate drying time between application steps also significantly improves durability.
What are some popular seasonal gem color combinations?
Spring features soft pastels like lavender and mint green. Summer showcases vibrant coral, turquoise, and sunny yellows. Fall embraces earthy tones including burgundy, gold, and amber. Winter highlights icy colors like silver, crystal clear, and deep blues. Each season offers unique palettes that complement the natural essence and mood of the time.
How do I safely remove nail gems without damaging my nails?
Remove gems gently by soaking nails in warm, soapy water to soften adhesive, then use a cuticle pusher or orangewood stick to lift gems carefully. Avoid forceful pulling or scraping. After removal, condition nails with cuticle oil and moisturizer to restore health. Consider professional removal for heavily applied or 3D sculptured designs.
What’s the difference between rhinestones, crystals, and other nail gems?
Rhinestones are typically glass or acrylic with metallic backing for shine. Swarovski crystals offer superior brilliance and light refraction. Pearls provide timeless elegance with subtle luster. Each type offers different aesthetic effects: rhinestones for classic glamour, crystals for maximum sparkle, and pearls for sophisticated understated beauty. Choose based on desired look and occasion.
Can I combine nail gems with other nail art techniques?
Absolutely! Mixed media combinations create stunning depth and visual interest. Integrate gems with glitter backgrounds, foil accents, or textured studs. Try glitter ombré effects with strategically placed crystals, or combine different gem shapes and sizes for geometric patterns. These combinations allow for unlimited creativity and personalized nail art expressions.


