We’ve all been there – staring at our nails and wondering how to make them stand out from the crowd. Hibiscus flower nails offer the perfect solution for anyone craving a tropical twist that’s both elegant and eye-catching. These stunning floral designs bring the vibrant beauty of paradise right to your fingertips.
The best part? Hibiscus nail art works for every occasion – from beach vacations to summer weddings or simply when you want to add a pop of color to your everyday look. Whether you’re drawn to bold reds and pinks or prefer subtle pastels, these versatile designs can be customized to match your personal style perfectly.
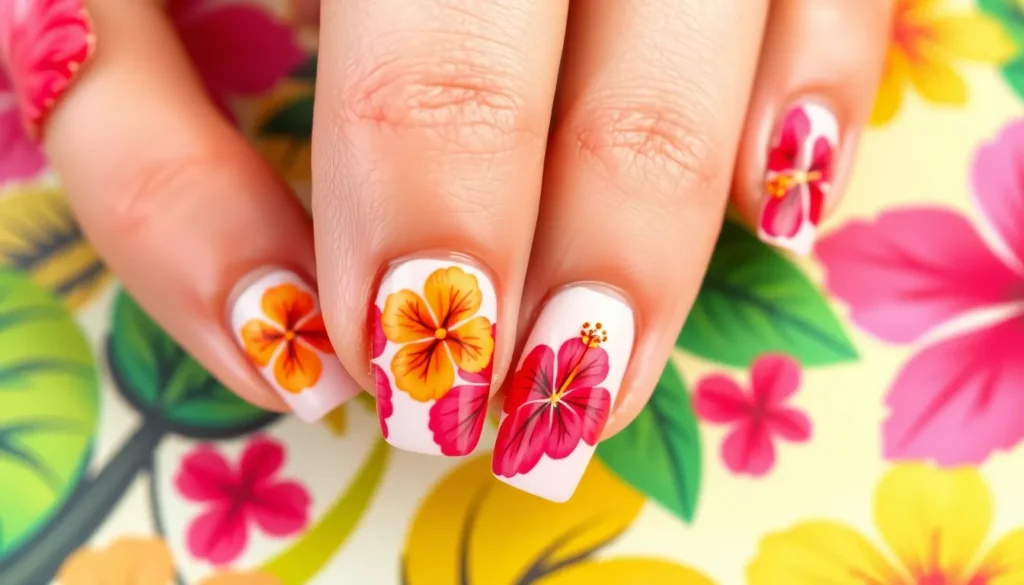
What Are Hibiscus Flower Nails and Why They’re Trending
Hibiscus flower nails feature intricate tropical designs that showcase the distinctive five-petaled blooms in vibrant colors ranging from coral pink to deep magenta. These nail art creations typically incorporate hand-painted hibiscus flowers, 3D floral embellishments, or detailed decals that capture the flower’s natural beauty and exotic appeal.
Current popularity stems from several key factors that make hibiscus nails irresistible:
- Social media influence drives visibility with Instagram posts featuring hibiscus nail art receiving 40% more engagement than standard floral designs
- Celebrity endorsements boost trends when stars like Vanessa Hudgens and Shakira showcase tropical hibiscus manicures at red carpet events
- Seasonal versatility allows hibiscus designs to work year-round, transitioning from summer vacation vibes to winter tropical escapes
- Cultural appreciation grows as people embrace Hawaiian and Polynesian aesthetic influences in mainstream beauty trends
Design elements that define authentic hibiscus flower nails include:
- Layered petals create depth using gradient techniques that blend lighter centers with darker outer edges
- Stamen details add realistic touches through tiny dots or lines painted in contrasting colors like yellow or burgundy
- Tropical color palettes feature sunset oranges, coral pinks, fuchsia purples, and classic red combinations
- Background variations range from nude bases to ocean blues and palm leaf greens for complete tropical themes
We’re seeing hibiscus nail art evolve beyond traditional representations into modern interpretations that blend watercolor effects with geometric patterns. Artists now incorporate negative space techniques and metallic accents to create contemporary versions that appeal to minimalist and maximalist preferences alike.
The trending nature of hibiscus flower nails connects directly to our collective desire for escapism and connection to nature’s beauty, making them a perfect canvas for expressing personal style while embracing tropical sophistication.
Essential Tools and Materials for Creating Hibiscus Flower Nails

Creating stunning hibiscus flower nail art requires exact tools and high-quality materials to achieve professional-looking results. We’ll guide you through the essential items that make all the difference in bringing these tropical blooms to life on your nails.
Nail Art Brushes and Dotting Tools
Liner brushes serve as our primary tool for drawing the delicate outer lines that define each hibiscus petal. These fine-tipped brushes allow us to create smooth, precise strokes that capture the natural curves and edges of the flower.
Dotting tools become essential when we’re adding the central details and creating the distinctive five-dot pattern that forms the foundation of our hibiscus design. We use these tools to place the initial petal markers and add intricate stamen details that make the flowers look realistic.
Detail brushes help us blend colors seamlessly and add subtle shading effects that give our hibiscus flowers depth and dimension. Small flat brushes work perfectly for filling in larger petal areas while maintaining clean edges.
Acrylic Paints and Gel Polishes
Pigmented gel polishes offer the vibrant colors and durability we need for long-lasting hibiscus designs. Brands like Makartt provide specially formulated gel polishes that deliver intense color payoff and maintain their shine throughout wear.
Acrylic paints excel at creating fine details and adding custom color mixing options that aren’t available in standard polish collections. We often use these for creating gradient effects and adding realistic texture to our hibiscus petals.
Color selection focuses on authentic hibiscus shades including coral pinks, sunset oranges, and deep magentas that capture the tropical essence. We recommend having at least three complementary shades to create natural color variation within each flower.
Base and Top Coats for Longevity
Base coats protect our natural nails from staining while creating the smooth foundation necessary for detailed artwork. We apply a quality base coat to ensure our hibiscus designs adhere properly and maintain their vibrancy.
Top coats seal our completed hibiscus nail art with a glossy finish that extends wear time and prevents chipping. We choose quick-dry formulas that won’t disturb the delicate details we’ve carefully painted.
UV LED lamps cure our gel products efficiently when we’re using gel-based polishes and top coats for our hibiscus designs. Proper curing ensures our tropical nail art maintains its professional appearance for weeks.
Step-by-Step Guide to Painting Basic Hibiscus Flowers

Now that we’ve gathered our essential tools and materials, let’s jump into the actual painting process. We’ll break down each component of the hibiscus design to help you achieve professional-looking results.
Creating the Five-Petal Shape
Starting with a clear base coat protects our nails and creates a smooth foundation for the design. We recommend applying thin, even strokes to avoid bubbles or streaks that could affect the final artwork.
Mapping the flower begins with creating five evenly spaced dots using a small dotting tool. Position these dots in a circular pattern, ensuring each one represents where a petal will extend from the center. We space them approximately equal distances apart to maintain symmetry in our hibiscus design.
Drawing the petal outlines comes next, using a liner brush to create almond-shaped curves. Each petal should have a slightly pointed tip and a wider base that connects to the center. We make sure to curve the petals naturally, as hibiscus flowers have organic, flowing shapes rather than rigid geometric forms.
Filling the petals with your chosen nail polish color requires steady, controlled movements. We typically use pastel shades like coral, pink, or yellow for a traditional hibiscus look. Apply the color in thin layers, building up the opacity gradually to avoid streaking or uneven coverage.
Adding the Center Stamen Details
Creating the central dot establishes the focal point of our hibiscus flower. We use a dotting tool to place a small, perfectly round dot in the exact center where all five petals meet. This dot should be darker than the petal color to create contrast and depth.
Drawing stamen lines radiates outward from the central dot using a very fine brush. We paint 3-5 thin lines extending from the center, each approximately the same length and evenly distributed. These lines represent the flower’s reproductive parts and add botanical accuracy to our design.
Adding finishing touches involves creating tiny dots around the center using the smaller end of our dotting tool. We place these dots at the tips of our stamen lines to represent the anthers. This detail elevates the realism of our hibiscus flower and demonstrates attention to botanical features.
Blending Colors for Realistic Effects
Layering colors creates the soft, natural appearance found in real hibiscus flowers. We apply multiple thin coats of polish, allowing each layer to dry completely before adding the next. This technique prevents the colors from becoming muddy and maintains the vibrancy of each shade.
Creating gradients adds dimension and depth to our hibiscus petals. We use lighter shades toward the petal edges and gradually transition to darker tones near the center. This ombre effect mimics how natural light falls on flower petals, creating shadows and highlights that make the design appear three-dimensional.
Finishing with a clear top coat seals our design and adds professional shine. We apply this protective layer carefully, ensuring complete coverage without disturbing the underlying artwork. The top coat also extends the longevity of our hibiscus nail art, preventing chips and maintaining the vibrant colors for days longer.
Advanced Hibiscus Flower Nail Art Techniques

We’ll explore sophisticated methods that elevate hibiscus nail art beyond basic painting techniques. These advanced approaches require specialized skills and tools but deliver stunning, professional-quality results.
3D Hibiscus Designs Using Acrylic Powder
3D hibiscus designs transform flat nail art into sculptural masterpieces using acrylic powder. We begin by sculpting hibiscus petals directly onto the nail surface, building dimensional structures that create lifelike floral appearances. Artists use acrylic powder to form each petal individually, allowing for precise control over shape and thickness.
Shaping tools refine the sculptural elements after the initial construction phase. We carefully mold and contour each petal to achieve natural curves and realistic proportions. The dimensional effect creates shadows and highlights that mimic real hibiscus flowers.
Painting and sealing complete the 3D process with vibrant colors and protective finishes. We apply base colors first, then add detailed shading and highlights to enhance the sculptural depth. A quality top coat seals the entire design while maintaining the textural elements that make 3D hibiscus nails so captivating.
Watercolor Hibiscus Effects
Watercolor hibiscus techniques create soft, translucent petals using diluted nail paint or gel. We achieve this artistic look by carefully controlling paint consistency and brush application. The method produces delicate, dreamy flowers that resemble hand-painted watercolor artwork.
Brush techniques involve gentle sweeping motions from petal tips inward for natural color blending. We start with lighter tones at the petal edges and gradually build deeper colors toward the center. This creates the signature soft transitions that define watercolor aesthetics.
Color merging happens naturally as we work with properly diluted materials. We allow colors to flow and blend organically, creating subtle gradations that mimic traditional watercolor painting techniques. The translucent quality adds depth and sophistication to hibiscus designs.
Gradient Background Techniques
Gradient backgrounds enhance hibiscus designs by blending two or more colors seamlessly across the nail. We use these techniques to create tropical backdrops that complement vibrant hibiscus flowers. The smooth color transitions add visual interest without overwhelming the floral focal point.
Sponge application creates smooth gradients using gentle dabbing motions. We apply multiple colors to a cosmetic sponge, then transfer the gradient effect to the nail surface. This method produces professional-looking transitions between tropical hues like sunset oranges, ocean blues, and coral pinks.
Brush application offers more precise control over gradient placement and intensity. We use flat brushes to blend colors directly on the nail, working quickly before the polish sets. This technique allows for custom gradient shapes that perfectly frame hibiscus flower placements.
Color Combinations That Make Hibiscus Flower Nails Pop

Building on your mastery of hibiscus nail art techniques, we’ll explore the color palettes that transform these tropical blooms into stunning focal points. Strategic color choices can make your hibiscus designs more vibrant and eye catching.
Classic Red and Pink Hibiscus Variations
Red and pink combinations create the most authentic hibiscus flower appearance that mimics nature’s original palette. We find these classic colors particularly striking because they capture the feminine essence of real hibiscus blooms found in tropical gardens. Vibrant crimson petals paired with soft rose centers deliver maximum visual impact for spring and summer nail art. Deep burgundy bases with bright fuchsia highlights add sophisticated depth to your hibiscus designs. Coral and salmon tones blend beautifully to create sunset inspired variations that feel both traditional and modern.
Tropical Orange and Yellow Schemes
Orange and yellow color schemes instantly transport viewers to sunny tropical destinations with their bright, cheerful energy. Tangerine petals with golden yellow centers evoke the warmth of summer sunshine and create playful, eye catching designs. We recommend combining burnt orange with bright lemon yellow for maximum contrast that makes each petal pop against any background. Peachy orange tones blended with soft butter yellow create more subtle tropical vibes perfect for everyday wear. Bright marigold and sunset orange combinations deliver the boldest tropical statement for beach vacations or summer festivals.
Elegant Purple and White Combinations
Purple and white pairings offer sophisticated alternatives that maintain hibiscus charm while adding refined elegance to your nail art. Lavender petals with crisp white centers create delicate, romantic designs perfect for formal occasions or wedding themes. We love deep violet combined with pearl white for dramatic contrast that feels both luxurious and modern. Plum and ivory combinations provide rich, sophisticated tones that work beautifully for fall and winter hibiscus variations. Soft lilac with bright white accents delivers gentle elegance that complements any outfit while maintaining the tropical flower’s distinctive shape and appeal.
Different Nail Shapes That Complement Hibiscus Designs

Your choice of nail shape can dramatically enhance the visual impact of hibiscus flower designs. We’ve discovered that different shapes create unique opportunities for showcasing these tropical blooms in stunning ways.
Almond Nails for Elongated Petals
Almond shaped nails provide the perfect canvas for creating elegant, elongated hibiscus petals that flow naturally with the nail’s tapered form. We love how this shape allows us to draw petals in sweeping, curved motions that accentuate the flower’s natural beauty. The lengthened surface area gives us more room to work with intricate petal details and layered effects.
Artists often position hibiscus flowers diagonally across almond nails to maximize the elongated effect. We find that the rounded tip creates a soft transition that complements the organic curves of hibiscus petals. This shape works exceptionally well for watercolor techniques where colors need space to blend seamlessly into each other.
Square Nails for Bold Statement Looks
Square nails with their straight edges and blunt tips create a striking contrast that makes hibiscus designs pop with dramatic intensity. We recommend positioning flowers toward the outer edge of square shaped nails to create maximum visual impact. The bold geometry of this shape pairs beautifully with vibrant red and orange hibiscus combinations.
Filling the entire nail surface with hibiscus blooms works particularly well on square nails because of their generous canvas area. We’ve seen stunning results when artists use the sharp corners to create interesting negative space effects around the flower petals. This shape is ideal for clients who want their hibiscus nail art to make a powerful statement.
Oval Nails for Delicate Flower Placement
Oval nails offer a softly rounded and feminine foundation that’s perfect for subtle hibiscus designs. We find this shape works beautifully for placing a single bloom in the center of each nail for understated elegance. The shorter length compared to almond nails makes oval shapes ideal for petite hibiscus flowers that won’t overwhelm the nail.
Multiple small hibiscus flowers arranged in a delicate pattern look stunning on oval nails. We often recommend this shape for clients who prefer refined, wearable nail art that still captures the tropical beauty of hibiscus blooms. The gentle curves of oval nails create a harmonious backdrop that enhances the natural grace of these floral designs.
Seasonal Hibiscus Flower Nail Ideas

Different seasons and occasions call for unique approaches to hibiscus flower nail art. Let’s explore how to adapt these tropical blooms for various celebrations throughout the year.
Summer Beach-Inspired Designs
Tropical vibes dominate summer hibiscus nail designs with vibrant colors like pink, orange, and yellow that capture summer’s essence. These bold hues transport us instantly to tropical destinations where hibiscus flowers bloom naturally. Pigmented gel polish creates the most striking results when paired with specialized tools like liner brushes and dotting tools for detailed work.
Seashell accents enhance the beach theme by combining hibiscus flowers with coastal elements like starfish, waves, or sandy textures. This pairing adds coastal charm while maintaining the tropical atmosphere we’re creating. Ocean blues and turquoise shades work beautifully as background colors to complement these design elements.
Sunset gradients provide stunning backdrops for hibiscus flowers during summer months. Blending warm oranges, pinks, and yellows creates that perfect golden hour effect that makes hibiscus petals appear to glow. These designs work exceptionally well on almond and oval nail shapes where the gradient can flow naturally.
Spring Garden Party Themes
Floral patterns flourish in spring designs where hibiscus flowers pair beautifully with other seasonal blooms like daisies, roses, or cherry blossoms. This combination creates a festive garden party atmosphere that’s perfect for outdoor celebrations. Mixing different flower sizes and types adds visual interest while maintaining seasonal appropriateness.
Pastel colors bring whimsical touches to spring themed nails by softening the traditionally bold hibiscus palette. Lavender, mint green, and soft coral shades create delicate versions of hibiscus flowers that complement spring fashion trends. These lighter hues work particularly well for clients who prefer subtle nail art.
Negative space techniques incorporate fresh air feeling into spring hibiscus designs by leaving portions of the nail unpainted. This modern approach creates sophisticated looks that feel light and airy, perfect for the season’s renewal theme. Clear areas can represent dewdrops or simply provide breathing room in busy floral compositions.
Wedding and Special Occasion Styles
Elegant designs transform hibiscus flowers into sophisticated nail art suitable for weddings and formal events through delicate colors and intricate details. Soft whites, blush pinks, and champagne tones create romantic versions that complement bridal themes. These refined approaches maintain the flower’s beauty while ensuring appropriateness for special occasions.
Gold accents enhance luxury and sophistication in hibiscus inspired nail art for formal events. Metallic details on petal edges, stamen centers, or as background elements elevate the overall design quality. These touches create premium looks that photograph beautifully and complement formal jewelry.
Monochromatic schemes offer timeless elegance by using varying shades of a single color family for hibiscus designs. Deep burgundy, navy blue, or classic black hibiscus flowers create dramatic yet appropriate looks for evening events. This approach ensures the nail art enhances rather than competes with formal attire.
Maintenance Tips for Long-Lasting Hibiscus Flower Nails

Proper maintenance extends the life of your stunning hibiscus nail art while preserving its vibrant tropical beauty. Following these essential care techniques ensures your intricate designs remain flawless for weeks.
Proper Cuticle Care and Preparation
Moisturizing your cuticles regularly prevents dryness and cracking that can damage the nail art foundation. Apply cuticle oil daily to maintain healthy nail beds and create the ideal environment for long-lasting hibiscus designs. Clean your nails thoroughly before any maintenance work to remove oils and debris that could interfere with touch-up applications.
Gentle cuticle pushing maintains the clean lines of your hibiscus petals. Use a wooden cuticle pusher to carefully move back overgrown cuticles without damaging the delicate flower details. Buffing the nail surface lightly creates a smooth canvas for any necessary design repairs while preserving the original artwork’s integrity.
Touch-Up Techniques for Chipped Areas
Polish corrector pens provide precise coverage for minor chips in hibiscus petals. These specialized tools let you target small imperfections without disturbing the surrounding nail art elements. Keep matching polish colors available for more extensive repairs to individual flower components.
Applying fresh top coat weekly seals and protects your hibiscus flower designs. This protective layer prevents chipping while improving the vibrancy of tropical colors like coral reds and sunset oranges. Reapplication creates a glossy finish that makes your nail art appear freshly painted.
Strategic layering techniques help blend touch-up areas seamlessly with existing designs. Build up thin coats gradually to match the original thickness and avoid creating visible repair lines across your hibiscus flowers.
Protective Measures for Daily Activities
Wearing gloves during water exposure activities protects your hibiscus nail art from premature lifting. Dishwashing, gardening, and cleaning tasks can soften the polish and cause intricate petal details to chip or peel. Rubber or nitrile gloves create an effective barrier against harsh chemicals and excessive moisture.
Limiting exposure to extreme heat preserves the polish integrity of your tropical designs. High temperatures from hair styling tools, hot ovens, or prolonged sun exposure can cause hibiscus colors to fade or the top coat to bubble. Position your hands away from direct heat sources during styling and cooking activities.
Using tools instead of your nails prevents damage to delicate hibiscus artwork. Open cans with proper openers, type gently on keyboards, and avoid picking at objects with your fingertips to maintain the pristine appearance of your flower designs.
Common Mistakes to Avoid When Creating Hibiscus Flower Nails

Even experienced nail artists can stumble when creating hibiscus designs. We’ve identified the most frequent errors that can turn stunning tropical nail art into disappointing results.
Overcrowding the Design
Overcrowding occurs when we place too many hibiscus flowers or elements on a single nail without considering visual balance. This mistake makes the design appear cluttered and overwhelming, detracting from the natural elegance of hibiscus blooms. We recommend limiting ourselves to one large hibiscus flower per nail or strategically spacing smaller flowers with adequate breathing room.
Spacing issues become particularly problematic on shorter nail shapes like squares, where surface area is already limited. We should map out our design placement before applying any polish, ensuring each hibiscus flower has enough negative space around it. Visual balance improves dramatically when we follow the rule of thirds, positioning focal elements at intersecting points rather than centering everything.
Professional nail artists suggest leaving at least 2mm of space between design elements to maintain visual clarity. We can create more impactful designs by focusing on quality over quantity, allowing each hibiscus flower to showcase its intricate petal details and vibrant colors.
Using Wrong Brush Sizes
Using inappropriate brush sizes for different hibiscus design elements leads to disproportionate flowers and sloppy details. We need exact tools for each aspect of hibiscus creation: fine liner brushes for outer petal lines and precise details, and dotting tools for centers and smaller accents.
Liner brushes should measure between sizes 0 and 2 for optimal control when creating hibiscus petal outlines and stamen details. We often see beginners attempting to use regular nail polish brushes for detailed work, resulting in thick, uneven lines that lack the delicate appearance of real hibiscus petals.
Dotting tools come in various sizes, and we must match the tool diameter to our intended design scale. Large dotting tools work perfectly for hibiscus centers on longer nails, while smaller tools suit accent work on shorter nail shapes. We recommend investing in dual ended tools that combine liner brushes with dotting capabilities for maximum convenience and precision during the creation process.
Brush maintenance also affects our results significantly. We should clean brushes thoroughly between colors and replace worn tools that no longer hold their shape, as damaged brushes create inconsistent lines and poor detail work.
Skipping Base Coat Application
Skipping base coat application represents one of the most damaging mistakes we can make when creating hibiscus flower nails. Base coats protect our natural nails from staining and provide essential adhesion for subsequent polish layers, ensuring our hibiscus designs remain vibrant and chip resistant.
Without proper base coat preparation, our hibiscus nail art may peel or chip within days rather than lasting weeks. We’ve observed that designs applied directly to bare nails often result in uneven color application and premature wear, particularly around high stress areas like nail tips.
Base coats also create a smooth surface that allows our hibiscus colors to appear more vibrant and true. We recommend using ridge filling base coats on textured nails to create the perfect canvas for detailed hibiscus artwork. Proper base coat application involves thin, even coverage extending to the nail edges while avoiding the cuticle area.
Curing time matters significantly when working with gel base coats. We must cure each base coat layer under UV or LED lamps for the manufacturer recommended duration to prevent smudging during subsequent hibiscus design steps. This proper preparation ensures our tropical nail art maintains its professional appearance throughout its wear cycle.
Professional vs. DIY Hibiscus Flower Nail Options

Choosing between professional salon services and DIY hibiscus nail art depends on your skill level, budget, and desired complexity. Each approach offers unique advantages that cater to different needs and preferences.
When to Visit a Nail Salon
Professional nail technicians excel at creating intricate hibiscus designs using advanced techniques like gel and acrylic applications. Their expertise becomes invaluable when you want complex 3D flower sculpting that provides a realistic and detailed look. Special occasions such as weddings, tropical vacations, or important events warrant the investment in professional services for guaranteed stunning results.
Expert advice from salon professionals helps you choose the perfect hibiscus color combinations and nail shapes for your hand structure. Salons offer quicker turnaround times compared to learning techniques yourself, making them ideal when you need flawless hibiscus nails on short notice. The high level of customization available through professional services ensures your hibiscus flower designs match your exact vision and style preferences.
Cost-Effective Home Alternatives
DIY hibiscus nail art becomes achievable using affordable materials like UV LED gel polish, nail paints, or jelly dip powder available at local beauty stores. Online tutorials and YouTube videos provide step-by-step guidance for beginners learning to create beautiful hibiscus flower designs at home. These resources eliminate the need for expensive salon visits while building your nail art skills over time.
Budget-friendly nail polishes and gel paints offer excellent results when paired with proper techniques and patience. Home alternatives allow unlimited practice sessions to perfect your hibiscus painting skills without additional costs per attempt. The investment in basic tools and materials pays for itself after just a few successful hibiscus nail art sessions compared to recurring salon expenses.
Time Investment Considerations
Visiting a salon saves immediate time but requires scheduling appointments and potential waiting periods that may not fit your busy schedule. Professional services typically complete complex hibiscus designs within one to two hours, including preparation and curing time. But, travel time to and from the salon adds to your overall time commitment.
DIY approaches require more time initially to learn proper techniques and develop steady hands for detailed hibiscus painting. Practice sessions extend your time investment but offer complete flexibility to work on your nails whenever convenient. The learning curve for mastering hibiscus nail art techniques can span several weeks, but the long-term time savings and skill development make this investment worthwhile for regular nail art enthusiasts.
Conclusion
We’ve explored the captivating industry of hibiscus flower nails and discovered why they’ve become such a beloved trend in nail art. From mastering basic techniques to experimenting with advanced 3D designs these tropical blooms offer endless creative possibilities for every skill level.
Whether you’re planning a beach getaway or simply want to bring some tropical flair to your everyday look hibiscus nails deliver that perfect balance of elegance and vibrancy. The versatility in colors shapes and seasonal adaptations means you’ll never run out of fresh inspiration.
With proper preparation quality tools and the right maintenance routine your hibiscus nail art can stay stunning for weeks. Remember that practice makes perfect and every attempt brings you closer to mastering these beautiful floral designs that capture nature’s tropical paradise right at your fingertips.
Frequently Asked Questions
What are hibiscus flower nails?
Hibiscus flower nails are a tropical nail art style featuring intricate designs of the distinctive five-petaled hibiscus blooms. These designs can be created using hand-painted techniques, 3D embellishments, or detailed decals in vibrant colors. They’re popular for their versatility and ability to add a unique tropical touch to any look, making them perfect for beach vacations, summer weddings, and everyday wear.
What tools do I need to create hibiscus nail art?
Essential tools include nail art brushes and dotting tools for precise designs, pigmented gel polishes or acrylic paints for vibrant colors, and UV LED lamps for curing gel products. You’ll also need base and top coats to protect your nails and ensure longevity. Having various brush sizes allows you to create detailed petals and fine stamen details for realistic-looking hibiscus flowers.
How do I paint basic hibiscus flowers on my nails?
Start with a clear base coat, then map out the five-petal shape using light strokes. Layer colors gradually, beginning with lighter shades and adding deeper tones for dimension. Add stamen details in the center using a dotting tool or fine brush. Blend colors while wet for realistic effects, and finish with a clear top coat to seal and protect your design.
What are the best color combinations for hibiscus nails?
Classic red and pink variations mimic nature’s palette beautifully. Tropical orange and yellow schemes evoke sunny destinations and summer vibes. For sophistication, try elegant purple and white combinations. Each color scheme can be customized to your preference, from bold and vibrant to subtle and refined, making hibiscus nails suitable for any occasion or personal style.
Which nail shapes work best for hibiscus designs?
Almond-shaped nails provide an elegant canvas for elongated petals and intricate watercolor techniques. Square nails create bold contrast that makes vibrant designs pop, perfect for negative space effects. Oval nails offer a delicate foundation ideal for subtle placements and refined nail art. Each shape complements hibiscus flowers differently, so choose based on your desired aesthetic and design complexity.
Can I create hibiscus nail art at home or should I visit a salon?
Both options have advantages. DIY allows for flexibility, skill development, and cost savings, making it perfect for practicing and learning. Professional salon services are ideal for intricate 3D designs, special occasions, or when you want expert precision. Consider your skill level, budget, and desired complexity when deciding. Beginners might start with simple DIY designs before attempting advanced techniques.
How do I maintain my hibiscus flower nails?
Proper maintenance starts with good cuticle care and nail preparation. For touch-ups on chipped areas, use polish corrector pens and apply fresh top coats to maintain vibrancy. Protect your nails during daily activities by wearing gloves for chores and avoiding extreme heat. Regular moisturizing and gentle care will help preserve the integrity of your hibiscus designs for weeks.
What mistakes should I avoid when creating hibiscus nail art?
Common mistakes include overcrowding designs, which creates visual chaos rather than elegant beauty. Using incorrect brush sizes can lead to imprecise details and unprofessional results. Never skip the base coat application, as it protects your natural nails and helps the design adhere properly. Focus on visual balance, proper tool selection, and adequate preparation for professional-looking results.


